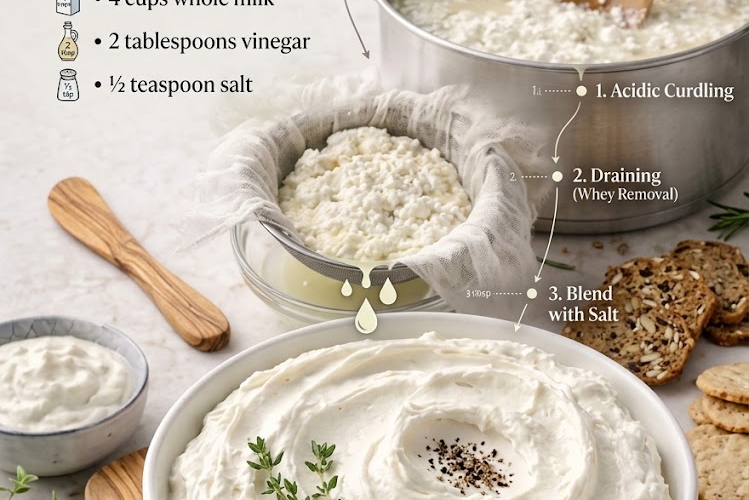
🥛 Homemade Cream Cheese
This easy Homemade Cream Cheese is made with just three simple ingredients: whole milk, vinegar, and salt. The milk is gently heated and curdled, then the fresh curds are drained and blended until smooth and creamy.
The result is a fresh, slightly tangy spread that’s delicious on bagels, toast, crackers, sandwiches, and pastries, and can also be used in dips and other recipes.
Recipe Information
- Prep Time: 5 minutes
- Cooking Time: 10–15 minutes
- Draining Time: 30–60 minutes
- Blending Time: 3–5 minutes
- Total Time: About 1 hour
- Yield: Approximately 1½–2 cups
- Difficulty: Easy
- Method: Stovetop
Ingredients
- 4 cups (960 ml) whole milk
- 2 tablespoons (30 ml) white vinegar
- ¼ teaspoon fine salt, or to taste
Equipment
- Medium heavy-bottomed saucepan
- Fine-mesh strainer
- Cheesecloth or clean thin kitchen towel
- Large bowl
- Food processor or blender
- Rubber spatula
Instructions
1. Heat the Milk
Pour the whole milk into a clean, heavy-bottomed saucepan.
Heat over medium heat, stirring occasionally to prevent the milk from scorching on the bottom.
Bring the milk to about 185–195°F (85–90°C). It should be steaming and very hot, with tiny bubbles beginning to form around the edges, but it does not need to boil vigorously.
2. Add the Vinegar
Remove the saucepan from the heat.
Slowly pour in the vinegar while gently stirring.
The milk should begin separating into white curds and pale yellowish whey.
Once you see a clear separation, stop stirring.
3. Let the Curds Set
Allow the mixture to sit undisturbed for 5–10 minutes.
This gives the curds time to form and separate more completely from the whey.
If the milk hasn’t separated well, add another 1 teaspoon vinegar and let it sit for a few more minutes.
4. Strain the Curds
Place a fine-mesh strainer over a large bowl and line it with cheesecloth or a clean thin kitchen towel.
Carefully pour the curdled milk into the lined strainer.
Allow the whey to drain away.
For a softer cream-cheese consistency, drain for about 30 minutes.
For a thicker, more spreadable consistency, drain for 45–60 minutes.
5. Rinse the Curds
For a milder, cleaner flavor, gently rinse the curds with a little cold water while they remain in the strainer.
Allow them to drain thoroughly afterward.
This step is optional, but it helps remove some of the vinegar flavor.
6. Blend Until Creamy
Transfer the drained curds to a food processor or blender.
Add the salt.
Blend for 2–4 minutes, scraping down the sides as necessary.
Initially, the mixture may appear crumbly. Continue processing until it becomes smooth, creamy, and spreadable.
7. Adjust the Texture
Check the consistency.
For a softer, creamier spread, blend in 1–2 teaspoons of milk or cream at a time until the desired consistency is reached.
For a thicker cream cheese, simply continue draining rather than adding liquid.
Taste and add a little more salt if desired.
8. Chill
Transfer the finished cream cheese to a clean airtight container.
Refrigerate for at least 1 hour before serving.
The cream cheese will firm up slightly as it chills.
Chef’s Tips
- Use whole milk: It gives the creamiest and richest result.
- Don’t aggressively boil the milk: Gentle heating helps produce better-quality curds.
- Drain thoroughly: The amount of draining determines how thick the finished cheese will be.
- Blend patiently: The curds become much smoother with continued processing.
- Rinse for a milder flavor: This is particularly useful if you find the vinegar taste too noticeable.
- Don’t throw away the whey: Use it in bread dough, pancakes, soups, or smoothies.
Ways to Use Homemade Cream Cheese
Spread it on:
- Bagels
- Toast
- Crackers
- English muffins
- Sandwiches
- Wraps
It can also be used for:
- Cheesecakes
- Cream cheese frosting
- Dips
- Stuffed pastries
- Pasta sauces
- Dessert fillings
Flavor Variations
Garlic & Herb
Blend in minced garlic, chopped chives, parsley, and a pinch of black pepper.
Honey Vanilla
Mix in honey and a little vanilla for a sweet breakfast spread.
Strawberry
Fold in finely chopped strawberries and a little powdered sugar.
Jalapeño
Add finely chopped jalapeño, green onion, and a pinch of garlic powder.
Storage
Store the homemade cream cheese in a clean, airtight container in the refrigerator.
For best quality and safety, use within 3–4 days.
Always use a clean utensil when serving.
Important Note
This homemade version is a fresh cream-cheese-style spread, so it will generally be softer and more delicate than commercially produced cream cheese. It does not contain the stabilizers or preservatives found in packaged versions.
Final Result
Smooth, fresh, creamy Homemade Cream Cheese with a gentle tang and rich dairy flavor—made from just three basic ingredients and perfect for spreading, baking, or turning into your favorite sweet and savory cream cheese creations.