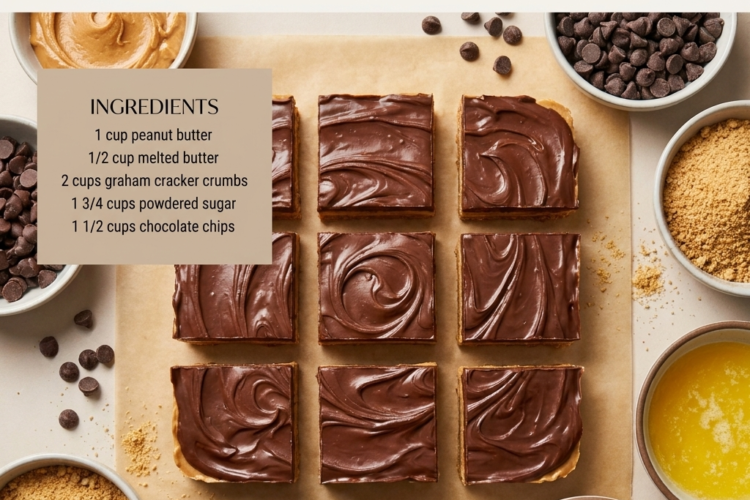
🍫 Chocolate Peanut Butter Bars – The Easiest No-Bake Dessert!
Rich Chocolate, Creamy Peanut Butter, and a Buttery Graham Cracker Base in Every Delicious Bite
Chocolate and peanut butter are a match made in dessert heaven! These easy No-Bake Chocolate Peanut Butter Bars combine a sweet, creamy peanut butter filling with a buttery graham cracker base and a smooth chocolate topping. They’re rich, fudgy, slightly crunchy, and wonderfully satisfying.
The best part? No oven required! With just five simple ingredients and a little chilling time, you can create a homemade treat that tastes like a cross between peanut butter cups and chocolate fudge.
Perfect for parties, holiday dessert trays, bake sales, lunchbox treats, or those moments when you need something sweet without turning on the oven, these bars are incredibly easy to make and even easier to love.
Recipe Details
- Prep Time: 15 minutes
- Chilling Time: 2 hours
- Total Time: Approximately 2 hours 15 minutes
- Yield: 16–20 bars
- Course: Dessert, Snack
- Cuisine: American-inspired
- Difficulty: Easy
- Method: No-bake
Ingredients
For the Peanut Butter Base
- 1 cup (250–260 g) creamy peanut butter
- ½ cup (113 g) unsalted butter, melted
- 2 cups (about 200 g) graham cracker crumbs
- 1¾ cups (about 210 g) powdered sugar, sifted
For the Chocolate Topping
- 1½ cups (255 g) chocolate chips, semi-sweet or milk chocolate
Optional additions:
- 1 teaspoon vanilla extract for extra flavor
- A small pinch of salt to balance the sweetness
- Flaky sea salt for sprinkling over the chocolate
- Crushed peanuts or graham cracker crumbs for decoration
Instructions
Step 1: Prepare the Pan
Line an 8 × 8-inch (20 × 20 cm) square baking pan with parchment paper, leaving some overhang on two opposite sides. This makes it much easier to lift the finished dessert out of the pan.
For slightly thinner bars, use a 9 × 9-inch (23 × 23 cm) pan.
Set the pan aside while you prepare the peanut butter mixture.
Step 2: Make the Graham Cracker Base
In a large mixing bowl, combine the melted butter and creamy peanut butter. Stir until the mixture is smooth and evenly blended.
Add the graham cracker crumbs and powdered sugar. Mix thoroughly with a sturdy spoon or spatula until the mixture forms a thick, uniform dough.
The mixture should hold together when pressed between your fingers without feeling excessively wet.
If desired, stir in the vanilla extract and a small pinch of salt.
Step 3: Press the Mixture into the Pan
Transfer the peanut butter mixture to the prepared baking pan.
Press it firmly into an even layer using the back of a spoon, a spatula, or the flat bottom of a measuring cup.
Pay particular attention to the corners and edges so the base holds together when sliced.
For the neatest results, place a small piece of parchment paper over the mixture while pressing it down. This prevents sticking and helps create a smooth, compact surface.
Step 4: Melt the Chocolate
Place the chocolate chips in a microwave-safe bowl.
Microwave in 20–30-second intervals, stirring well after each interval, until the chocolate is mostly melted and smooth. Continue stirring until the remaining chocolate melts from the residual heat.
Alternatively, melt the chocolate in a heatproof bowl set over a saucepan of gently simmering water. Make sure the bottom of the bowl does not touch the water, and keep all water away from the chocolate.
Tip: Avoid overheating the chocolate. Gentle heating helps keep the topping glossy and smooth.
Step 5: Spread the Chocolate Topping
Pour the melted chocolate over the peanut butter base.
Use an offset spatula or the back of a spoon to spread it evenly from edge to edge.
For a decorative finish, gently drag a toothpick through the chocolate to create subtle swirls. You can also sprinkle a small amount of flaky sea salt or finely chopped peanuts on top.
Step 6: Chill Until Firm
Place the pan in the refrigerator for approximately 2 hours, or until the chocolate topping is set and the peanut butter layer is firm enough to slice cleanly.
For quicker setting, you can place the pan in the freezer for approximately 30–45 minutes, checking periodically to prevent the bars from becoming unnecessarily hard.
Avoid slicing while the chocolate is still soft, as the topping may smear and the bars may fall apart.
Step 7: Slice and Serve
Once set, use the parchment paper overhang to lift the entire dessert out of the pan and transfer it to a cutting board.
For clean slices, allow the bars to sit at room temperature for about 5–10 minutes. Warm a sharp knife under hot water, dry it thoroughly, and cut into squares. Wipe the blade between cuts as needed.
Serve the bars slightly chilled or at cool room temperature for the perfect combination of a firm chocolate top and a soft, creamy peanut butter center.
Enjoy every rich, chocolatey bite!
Tips for Perfect Chocolate Peanut Butter Bars
Use regular creamy peanut butter. Conventional creamy peanut butter generally gives the filling a consistent texture. Natural peanut butter can be oilier and may make the base softer or more difficult to set.
Use finely crushed graham crackers. Fine crumbs help create a smooth, compact base. If using whole crackers, crush them in a food processor or place them in a sealed bag and crush them with a rolling pin.
Press the base firmly. A compact base is less likely to crumble when you cut the bars.
Let the chocolate melt gently. Short microwave intervals and frequent stirring help prevent scorched or grainy chocolate.
Use a warm knife for clean cuts. A warm, dry knife makes it easier to slice through the firm chocolate topping without excessive cracking.
Adjust the chocolate topping to your taste. Semi-sweet chocolate creates a richer, less sugary finish, while milk chocolate makes the bars sweeter and creamier.
Don’t rush the chilling. The bars need enough time to firm up so the layers stay together when sliced.
Delicious Variations
🥜 Crunchy Peanut Butter Bars
Replace the creamy peanut butter with crunchy peanut butter for extra texture. You can also sprinkle chopped roasted peanuts over the chocolate before it sets.
🍫 Double Chocolate Peanut Butter Bars
Use semi-sweet chocolate for the topping and stir 2 tablespoons of unsweetened cocoa powder into the peanut butter mixture. Add a tablespoon of milk only if needed to bring the mixture together, since cocoa powder can make it drier.
🤍 White Chocolate Peanut Butter Bars
Replace the semi-sweet chocolate topping with white chocolate chips for a sweeter, creamier variation. White chocolate can melt differently, so heat it gently and stir frequently.
🍪 Oreo Peanut Butter Bars
Replace the graham cracker crumbs with finely crushed chocolate sandwich cookies. For a less sweet base, reduce the powdered sugar slightly and check the mixture’s consistency before pressing it into the pan.
🍯 Honey Peanut Butter Bars
Replace a small portion of the powdered sugar with honey for a slightly different flavor. Because honey adds moisture, use it sparingly and keep the finished bars refrigerated.
🧂 Chocolate Peanut Butter Pretzel Bars
Mix a small handful of finely crushed pretzels into the peanut butter base, or sprinkle crushed pretzels over the chocolate topping. The salty crunch complements the sweet filling beautifully.
☕ Mocha Chocolate Peanut Butter Bars
Stir ½ teaspoon instant espresso powder into the melted chocolate for a subtle coffee note that makes the chocolate taste deeper and richer.
What to Serve with Chocolate Peanut Butter Bars
These bars are delicious on their own, but they also pair wonderfully with:
- A cold glass of milk
- Hot coffee or espresso
- Vanilla ice cream
- Fresh strawberries or raspberries
- A mug of hot chocolate for an extra-indulgent treat
For a dessert platter, cut the bars into small squares and arrange them with brownies, cookies, and fresh fruit. Their contrasting chocolate and peanut butter layers make them a standout addition to any sweets table.
Make-Ahead and Storage Instructions
Refrigerator Storage
Store the bars in an airtight container in the refrigerator for up to 1 week. Separate layers with parchment paper to prevent sticking.
For the best texture, let them sit at room temperature for about 5–10 minutes before serving.
Freezer Storage
These bars freeze very well. Arrange the sliced bars in a single layer until firm, then transfer them to a freezer-safe airtight container with parchment paper between the layers.
Freeze for up to 3 months for best quality.
Thaw individual bars in the refrigerator or let them stand at room temperature briefly before serving.
Can You Make Them Ahead?
Absolutely! These bars are ideal for preparing a day or two before a gathering. Make the recipe as directed, allow the chocolate to set completely, slice into portions, and store in the refrigerator until needed.
Room Temperature Storage
The bars can soften if left in a warm room because the peanut butter and chocolate contain fats that soften with heat. For the best texture, keep them refrigerated until serving, especially in warm weather.
Frequently Asked Questions
Why is my peanut butter base too crumbly?
The crumbs may be too coarse, or the mixture may contain slightly too much dry material. Mix thoroughly and check that the peanut butter and melted butter are evenly distributed. If the mixture still refuses to hold together, add 1 teaspoon of melted butter at a time until it presses together.
Why is my peanut butter layer too soft?
This can happen if natural peanut butter has excess oil, the butter measurement is too high, or the bars have not chilled long enough. Refrigerate them until firm. For future batches, use conventional creamy peanut butter and measure the ingredients carefully.
Why did my chocolate topping crack when I cut it?
Chocolate can become very firm when chilled. Let the bars rest at room temperature for a few minutes before cutting, and use a warm, dry knife. Press down gently rather than sawing aggressively.
Can I use milk chocolate instead of semi-sweet chocolate?
Yes. Milk chocolate makes a sweeter topping, while semi-sweet chocolate provides a more balanced contrast to the sweet peanut butter filling.
Can I use a different type of crumb?
Yes. Finely crushed digestive biscuits, vanilla wafer cookies, or chocolate sandwich cookies can work as substitutes. Their sweetness and moisture content vary, so the final texture may differ slightly.
Do I need to bake the base?
No. The melted butter and peanut butter bind the crumbs and powdered sugar together, so the base sets in the refrigerator without baking.
Are these bars suitable for people with peanut allergies?
No. Peanut butter is a central ingredient in this recipe. For someone with a peanut allergy, use a suitable alternative spread only if it is safe for that individual and compatible with their allergy requirements. Also check the packaging of the chocolate and other ingredients for allergen and cross-contact information.
Estimated Nutrition Information
Approximate values per bar, assuming the recipe is cut into 20 bars:
- Calories: 230–280
- Protein: 4–6 g
- Carbohydrates: 22–30 g
- Fat: 14–18 g
- Sugar: 16–22 g
These values are estimates and vary with the brands of peanut butter and chocolate, the exact ingredient weights, and the size of each bar.
Final Thoughts
These No-Bake Chocolate Peanut Butter Bars prove that dessert doesn’t have to be complicated to be absolutely delicious. With a buttery graham cracker base, a creamy peanut butter center, and a smooth chocolate topping, every bite delivers the classic combination of sweet, salty, rich, and chocolatey.
They’re simple enough for a last-minute treat, elegant enough for a party platter, and convenient to make ahead whenever a chocolate craving strikes.
Five ingredients, no oven, and plenty of chocolate-peanut butter goodness. Make a batch, chill until set, and enjoy your new favorite easy dessert! 🍫🥜