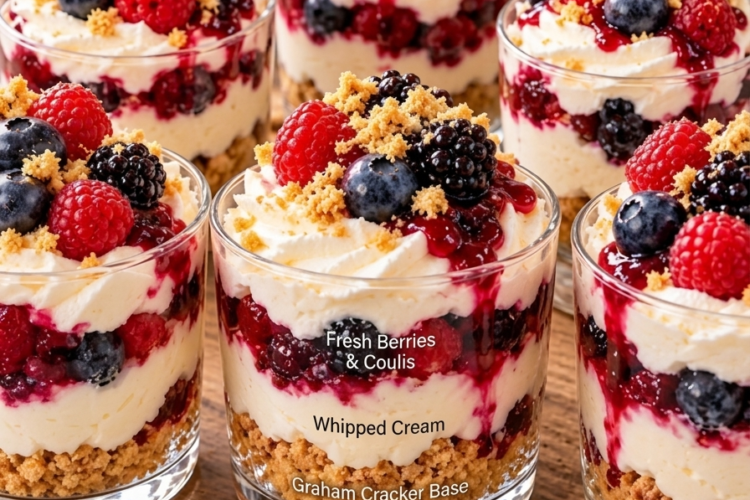
🍓 No-Bake Mixed Berry Cheesecake Cups 🫐
Creamy, Dreamy, and Bursting with Fresh Berry Flavor!
These No-Bake Mixed Berry Cheesecake Cups are the perfect little dessert when you’re craving something creamy, fruity, and irresistibly delicious without turning on the oven! Each cup features a buttery graham cracker crust, a silky-smooth cheesecake filling, layers of luscious mixed berry sauce, and a beautiful topping of fresh blueberries, raspberries, and blackberries.
Every spoonful brings together the satisfying crunch of the buttery crust, the richness of the cream cheese filling, and the sweet-tart freshness of juicy berries. Served in individual cups, these mini desserts look elegant, taste incredible, and are wonderfully easy to prepare.
Perfect for summer parties, birthdays, baby showers, dinner parties, holiday gatherings, or simply treating yourself to something special, these cheesecake cups are a make-ahead dessert everyone will love!
Recipe Details
- Prep Time: 25 minutes
- Chilling Time: 3–4 hours
- Total Time: Approximately 3 hours 25 minutes
- Yield: 6 dessert cups
- Course: Dessert
- Cuisine: American-inspired
- Difficulty: Easy
- Method: No-bake
- Serving Size: 1 individual cup
Ingredients
For the Graham Cracker Crust
- 200 g graham cracker crumbs
- 4 tablespoons (56 g) unsalted butter, melted
For the Creamy Cheesecake Filling
- 8 oz (225 g) full-fat cream cheese, softened
- ½ cup (60 g) powdered sugar, sifted
- 1 teaspoon (5 ml) vanilla extract
- 1 cup (240 ml) heavy whipping cream, cold
For the Mixed Berry Layers
- ½ cup (75 g) fresh blueberries
- ½ cup (60 g) fresh raspberries
- ½ cup (75 g) fresh blackberries
- ½ cup (120 ml) mixed berry sauce
Optional Garnishes
- A few extra fresh berries
- Crushed graham crackers
- Fresh mint leaves
- White chocolate shavings
- A light dusting of powdered sugar
Instructions
Step 1: Prepare the Graham Cracker Crust
Place the graham cracker crumbs in a medium mixing bowl. Pour in the melted butter and stir until the crumbs are evenly moistened.
The mixture should resemble damp sand and hold together when pressed between your fingers. If it seems slightly dry, mix thoroughly before adding any extra butter, as the crumbs will absorb the butter as they rest.
Divide the mixture evenly among six small dessert cups, glasses, or jars.
Press the crumbs firmly into the bottom of each cup using the back of a spoon or the bottom of a small measuring spoon. Create an even layer so the crust holds together when scooped.
Place the cups in the refrigerator while you prepare the cheesecake filling.
Helpful tip: Clear glasses make these desserts especially attractive because the individual layers remain visible.
Step 2: Beat the Cream Cheese
Place the softened cream cheese in a large mixing bowl.
Using an electric mixer, beat on medium speed for approximately 2 minutes until completely smooth and creamy. Scrape down the sides and bottom of the bowl as needed to eliminate lumps.
Add the powdered sugar and vanilla extract. Beat again until the mixture is silky and well combined.
Make sure the cream cheese is softened but not melted. Cold cream cheese can leave lumps, while overly warm cream cheese can make the filling too loose.
Step 3: Whip the Heavy Cream
In a separate, clean bowl, pour in the cold heavy whipping cream.
Beat with an electric mixer until medium-stiff peaks form. When you lift the beaters, the cream should hold its shape while retaining a smooth, fluffy texture.
Avoid overwhipping, as the cream can become grainy and eventually turn buttery.
For best results: Use heavy whipping cream straight from the refrigerator, and chill the mixing bowl beforehand if your kitchen is warm.
Step 4: Fold the Whipped Cream into the Cheesecake Mixture
Add approximately one-third of the whipped cream to the cream cheese mixture and stir gently to lighten it.
Add the remaining whipped cream in two additions, folding with a spatula until the mixture is evenly combined.
Use gentle sweeping motions from the bottom of the bowl upward. This preserves the air in the whipped cream and creates a light, fluffy cheesecake filling.
The finished mixture should be thick, smooth, and creamy enough to pipe or spoon into the dessert cups.
Step 5: Prepare the Mixed Berries
Rinse the blueberries, raspberries, and blackberries gently under cool running water.
Pat the berries dry with paper towels or a clean kitchen towel. Excess moisture can make the cheesecake layers watery, so make sure the fruit is dry before assembling.
Keep the raspberries and blackberries whole if they are small and tender. Cut larger blackberries in half if desired.
Set aside a few attractive berries for decorating the tops of the finished cups.
Step 6: Add the First Cheesecake Layer
Remove the chilled crusts from the refrigerator.
Spoon or pipe the cheesecake filling evenly over the graham cracker base, dividing it among the six cups.
If using a piping bag, fill it with the cheesecake mixture and pipe a smooth layer into each glass. This creates a neat, bakery-style appearance.
Gently tap each cup against the counter once to settle the filling, being careful not to disturb the crust.
Step 7: Add the Mixed Berry Sauce
Spoon a thin layer of mixed berry sauce over the cheesecake filling in each cup.
You can use prepared berry sauce or berry coulis. If the sauce is homemade, allow it to cool completely before adding it to the cups.
For a beautiful layered effect, spread the sauce gently with the back of a teaspoon rather than stirring it into the cheesecake mixture.
If you prefer a marbled appearance, swirl a little sauce into the top of the cheesecake layer with a toothpick.
Step 8: Add the Fresh Berries
Distribute the blueberries, raspberries, and blackberries among the six cups.
You can place some berries directly over the sauce or arrange them on top of the cheesecake layer, depending on your preferred presentation.
For an attractive finish, alternate the berry colors instead of placing all the same berries together. This creates a vibrant mix of blue, red, and deep purple.
If you have additional berry sauce, drizzle a small amount over the fruit.
Step 9: Chill Until Set
Cover the cups loosely with plastic wrap or place them in a covered container.
Refrigerate for at least 3–4 hours, or until the cheesecake filling is cold and firm enough to hold its shape.
For the best flavor and texture, prepare the cups several hours ahead or the evening before serving.
The chilling period allows the cheesecake filling to firm up and gives the buttery graham cracker crust time to settle.
Step 10: Garnish and Serve
Just before serving, decorate each cup with a few fresh berries, a sprinkle of graham cracker crumbs, or delicate white chocolate shavings.
Add a small mint leaf for a fresh, elegant finish if desired.
Serve the cups chilled with dessert spoons, making sure each serving includes a little crust, creamy filling, berry sauce, and fresh fruit.
Enjoy every refreshing, creamy, berry-filled spoonful!
🍓 Homemade Mixed Berry Sauce (Optional)
For an extra-special homemade touch, make your own berry sauce instead of using a store-bought version.
Ingredients
- 1 cup (about 140 g) mixed berries, fresh or frozen
- 2 tablespoons (25 g) granulated sugar, or to taste
- 1 teaspoon lemon juice
- 1–2 teaspoons water, if needed
Instructions
- Place the berries, sugar, and lemon juice in a small saucepan over medium-low heat.
- Cook for 5–8 minutes, stirring occasionally, until the berries soften and release their juices.
- Gently mash the berries with a spoon for a rustic sauce, or blend and strain them for a smoother coulis.
- If necessary, simmer briefly to thicken the sauce to a spoonable consistency.
- Remove from the heat and allow it to cool completely before using.
The sauce should be thick enough to form a layer without running excessively into the crust.
Expert Tips for Perfect No-Bake Cheesecake Cups
Use full-fat cream cheese. It provides a richer taste and a more stable filling than many reduced-fat alternatives.
Soften the cream cheese properly. This is the easiest way to achieve a smooth filling without lumps.
Keep the whipping cream cold. Cold cream whips more effectively and helps produce a fluffy, stable cheesecake mixture.
Fold gently. Overmixing after adding the whipped cream can deflate the filling and make it less airy.
Dry the berries thoroughly. Water on the fruit can dilute the sauce and affect the texture of the cheesecake.
Let the berry sauce cool. Warm sauce can soften the filling and cause the layers to blend together.
Press the crust firmly. A compact graham cracker layer creates a pleasant contrast with the creamy cheesecake.
Chill long enough. Although the cups may look ready sooner, a few hours in the refrigerator helps the filling firm up and makes serving easier.
Use a piping bag for neat layers. It gives the cups a polished appearance and makes portioning the filling more consistent.
Delicious Variations
🍫 Chocolate Berry Cheesecake Cups
Drizzle melted dark chocolate over the cheesecake filling or sprinkle chocolate shavings between the layers. Chocolate pairs beautifully with raspberries and blackberries.
🍋 Lemon Mixed Berry Cheesecake Cups
Add 1 teaspoon finely grated lemon zest to the cream cheese mixture for a brighter flavor. A little extra lemon zest also makes a lovely garnish.
🍪 Oreo Berry Cheesecake Cups
Replace the graham cracker crumbs with finely crushed chocolate sandwich cookies. For a chocolate cookie crust, omit the butter only if the cookie filling makes the crumbs moist enough to bind; otherwise, retain the melted butter and adjust as needed.
🫐 Blueberry Cheesecake Cups
Use blueberries as the main fruit and replace the mixed berry sauce with blueberry sauce. Garnish with a few fresh blueberries and a little lemon zest.
🍓 Strawberry Raspberry Cheesecake Cups
Replace the blackberries with diced strawberries and use a strawberry-raspberry sauce. This version is especially pretty with pink and red layers.
🥥 Coconut Berry Cheesecake Cups
Add 2–3 tablespoons of finely shredded coconut to the crust mixture or sprinkle toasted coconut on top just before serving.
🍯 Honey Vanilla Cheesecake Cups
Replace a small portion of the powdered sugar with honey and add a little extra vanilla. Because honey adds moisture, use it sparingly to avoid making the filling too soft.
🥜 Nutty Berry Cheesecake Cups
Add a thin layer of finely chopped toasted almonds or pecans over the crust for extra crunch. Ensure the nuts are finely chopped so the individual cups remain easy to eat.
What to Serve with Mixed Berry Cheesecake Cups
These individual desserts are delicious on their own, but they also pair wonderfully with:
- Fresh fruit platters
- Hot coffee or espresso
- Iced coffee or iced tea
- Lemonade or sparkling water
- Vanilla shortbread cookies
- Chocolate-dipped strawberries
For parties, arrange the cups on a serving tray with fresh berries scattered around them. The colorful layers make an elegant presentation without requiring complicated decoration.
Make-Ahead and Storage Instructions
Can You Make Them Ahead?
Absolutely! These cheesecake cups are ideal for preparing in advance.
Prepare them several hours before serving or the evening before. Cover and refrigerate until ready to serve. For the freshest appearance, reserve a few berries and add them as a garnish shortly before serving.
Refrigerator Storage
Store the covered cups in the refrigerator at 40°F (4°C) or below. For the best texture and flavor, enjoy them within 2–3 days.
The fresh berries may soften and release juice as they sit, so these cups are best enjoyed relatively soon after assembly.
Can You Freeze Them?
Freezing is not recommended for the best texture. The whipped cream filling may become grainy or release moisture after thawing, and fresh berries can turn soft.
If you need to prepare the components in advance, you can freeze the berry sauce separately, then thaw it in the refrigerator and stir before assembling.
Serving from the Refrigerator
Serve the cups chilled, directly from the refrigerator. Avoid leaving them at room temperature for more than 2 hours, or more than 1 hour when temperatures exceed 90°F (32°C).
Because the recipe contains cream cheese and whipped cream, refrigerate leftovers promptly.
Frequently Asked Questions
Can I use frozen berries?
Yes. Frozen berries work well in the cooked berry sauce. Thaw and drain them if you intend to use them as a fresh-fruit topping, but expect a softer texture than fresh berries. For the prettiest presentation, fresh berries are recommended.
Can I use store-bought berry sauce?
Absolutely. Choose a thick mixed berry sauce or coulis that you enjoy. If it is particularly thin, use a smaller amount so it does not run through the cheesecake layer and soften the crust.
Why is my cheesecake filling too soft?
The cream may not have been whipped sufficiently, the cream cheese may have been too warm, or the cups may not have chilled long enough. Use cold heavy whipping cream, beat it to medium-stiff peaks, and refrigerate the assembled cups for at least 3–4 hours.
Why is my filling lumpy?
The cream cheese was likely too cold when mixed. Allow it to soften at room temperature until it is easy to press with a spatula, then beat it until smooth before adding the powdered sugar.
Can I make these cups without heavy cream?
Heavy whipping cream helps create the light, fluffy filling. Replacing it directly with milk will produce a much thinner mixture. For a different no-bake version, use a suitable whipped topping and fold it gently into the sweetened cream cheese, following the topping’s package instructions.
Can I make this recipe in one large dish?
Yes. Assemble the crust, cheesecake filling, berry sauce, and fruit in a medium glass dish instead of individual cups. Chill for at least 4 hours, then spoon portions into bowls. The presentation will be more rustic, but the flavor will remain delicious.
Can I make these cheesecake cups less sweet?
Yes. You can reduce the powdered sugar modestly, especially if your berry sauce is already sweetened. The powdered sugar also contributes to the filling’s texture, so avoid removing too much at once.
How do I keep the layers neat?
Press the crust firmly, pipe the cheesecake filling into each cup, and spoon the berry sauce gently onto the surface. Chill the cups before adding any final decorative toppings.
Estimated Nutrition Information
Approximate nutrition per cup, assuming 6 servings and using sweetened berry sauce:
- Calories: 430–520
- Protein: 5–7 g
- Carbohydrates: 35–50 g
- Fat: 29–36 g
- Fiber: 2–4 g
Values are estimates and vary according to the graham crackers, cream cheese, cream, and berry sauce used.
Final Thoughts
These No-Bake Mixed Berry Cheesecake Cups are the perfect combination of elegance, freshness, and irresistible creaminess. With a buttery graham cracker crust, fluffy vanilla cheesecake filling, luscious berry sauce, and vibrant fresh fruit, every layer brings something delicious to the table.
They’re easy enough for a relaxed family dessert yet beautiful enough for birthdays, parties, and special occasions. Prepare them ahead, let the refrigerator do the work, and finish with fresh berries for a dessert that looks as wonderful as it tastes.
Creamy cheesecake, buttery crumbs, and juicy berries in every spoonful—your new favorite no-bake dessert is ready to chill! 🍓🫐🍰