🍗 Crispy Fried Chicken — Golden, Crunchy & Juicy!
The Ultimate Homemade Fried Chicken with a Crunchy, Seasoned Crust and Tender, Flavorful Meat
Nothing beats homemade crispy fried chicken with a beautifully golden, crunchy coating and juicy, tender meat inside! This easy recipe combines buttermilk-marinated chicken with a perfectly seasoned flour and cornstarch mixture for that irresistible crunch in every bite.
Paprika adds beautiful color, garlic and onion powder bring savory flavor, and a touch of chili powder gives the coating a gentle kick if you choose to use it. The cornstarch is the secret to an especially crisp crust, while the buttermilk helps tenderize the chicken and allows the coating to adhere.
Perfect for Sunday dinners, family gatherings, picnics, or a homemade fried chicken feast, this recipe delivers classic comfort-food flavor right from your own kitchen.
Recipe Details
- Prep Time: 20 minutes
- Marinating Time: 1–4 hours, optional but recommended
- Cook Time: 25–35 minutes, depending on the size of the pieces
- Total Time: Approximately 1 hour, plus optional marinating
- Servings: 4–6
- Course: Main Course
- Cuisine: American-inspired
- Difficulty: Moderate
- Cooking Method: Deep-frying
Ingredients
For the Chicken
- 1 kg chicken drumsticks or mixed bone-in chicken pieces
- 1 cup (240 ml) buttermilk
For the Crispy Seasoned Coating
- 2 cups (250 g) all-purpose flour
- ½ cup (60 g) cornstarch
- 1 tablespoon paprika
- 1 teaspoon garlic powder
- 1 teaspoon onion powder
- 1 teaspoon ground black pepper
- 1 teaspoon salt
- ½ teaspoon chili powder, optional
For Frying
- Neutral frying oil, such as vegetable, canola, or sunflower oil, enough for deep-frying
Instructions
Step 1: Prepare the Chicken
Pat the chicken pieces dry with paper towels if they are especially wet. Do not rinse raw chicken, as splashing water can spread bacteria around the kitchen.
If using mixed chicken pieces, try to choose pieces of reasonably similar size so they cook more evenly. Very large drumsticks or thick bone-in pieces may need additional frying time.
Place the chicken in a large bowl or food-safe container.
Step 2: Marinate in Buttermilk
Pour the buttermilk over the chicken, turning the pieces so that they are coated on all sides.
Cover the bowl and refrigerate for at least 1 hour, or preferably 2–4 hours for better flavor and tenderness.
If you have more time, the chicken can be marinated overnight in the refrigerator, up to about 24 hours. Avoid leaving raw chicken at room temperature while it marinates.
The buttermilk helps tenderize the meat and gives the seasoned coating something to cling to.
No buttermilk available? Mix 1 cup (240 ml) milk with 1 tablespoon (15 ml) lemon juice or white vinegar. Let it stand for 5–10 minutes before using. The result is a useful substitute for this recipe.
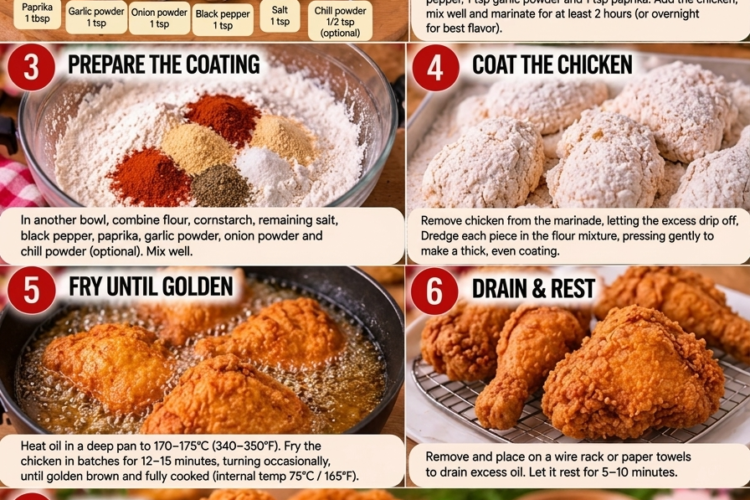
Step 3: Prepare the Seasoned Flour Mixture
In a large, shallow bowl, combine the all-purpose flour, cornstarch, paprika, garlic powder, onion powder, black pepper, salt, and optional chili powder.
Whisk thoroughly until the seasonings are evenly distributed throughout the flour.
The cornstarch is particularly important because it helps create a lighter, crispier crust. Paprika adds warm color, while the garlic and onion powders create a savory flavor in every bite.
Step 4: Coat the Chicken
Remove one piece of chicken from the buttermilk, allowing the excess liquid to drip back into the bowl.
Place it in the seasoned flour mixture and press the flour firmly onto all sides, including around the joints and under any loose skin.
Turn the piece several times to create an even coating, then gently shake off excess flour.
Repeat with the remaining chicken pieces, placing them on a clean tray as you work.
For an extra-crispy crust: After the first coating, briefly dip each piece back into the buttermilk and coat it in the seasoned flour a second time. Press the flour onto the surface to create a craggy, textured crust.
Let the coated chicken rest on the tray for about 5–10 minutes before frying. This helps the coating adhere more securely.
Keep the raw chicken and any utensils that have touched it separate from ready-to-eat foods.
Step 5: Heat the Oil
Pour oil into a heavy-bottomed pot or deep fryer, following the equipment manufacturer’s fill limits. The pot should never be more than half full to allow for bubbling and expansion when the chicken is added.
Heat the oil to 350°F (175°C), using a cooking thermometer to monitor the temperature.
Maintain a frying range of approximately 325–350°F (165–175°C) during cooking.
If the oil is too cool, the coating may absorb excess oil and become greasy. If it is too hot, the outside can darken before the chicken near the bone is cooked through.
Step 6: Fry the Chicken in Batches
Carefully lower a few coated chicken pieces into the hot oil using long tongs. Do not overcrowd the pot; too many pieces at once will cause the oil temperature to drop.
Fry the chicken, turning occasionally for even browning.
Approximate cooking times are:
- Chicken drumsticks: 12–18 minutes
- Smaller bone-in pieces: 12–16 minutes
- Large or thick bone-in pieces: 16–20 minutes or longer, as needed
These are estimates only. Actual cooking time depends on the size of the pieces, the oil temperature, and the fryer or pot being used.
Adjust the heat to keep the oil within the recommended range. The coating should bubble steadily and gradually turn a deep golden brown.
If the chicken is browning too quickly, lower the heat slightly and allow it to cook longer. Do not rely on the crust’s color alone to determine doneness.
Step 7: Check for Doneness
Use a reliable instant-read food thermometer to check the thickest part of each piece, avoiding contact with the bone.
Chicken must reach an internal temperature of 165°F (74°C) to be safe to eat. If a piece has not reached that temperature, continue cooking and check again.
If the outside is already deeply browned but the inside needs more time, transfer the chicken to an oven preheated to 350°F (175°C) and finish cooking until it reaches 165°F (74°C).
Never serve chicken that is still raw or undercooked near the bone.
Step 8: Drain and Rest
Using clean tongs, transfer the cooked chicken to a wire rack set over a baking sheet.
Allow it to drain for approximately 5–10 minutes. A wire rack is preferable to placing the chicken directly on paper towels because it allows air to circulate underneath and helps keep the crust crisp.
Let the chicken rest briefly before serving so the juices settle and the coating firms up.
Step 9: Serve Hot and Crispy
Arrange the fried chicken on a serving platter and serve while the crust is golden and crunchy.
Pair it with mashed potatoes, coleslaw, cornbread, fries, biscuits, or your favorite dipping sauce.
Enjoy that satisfying crunch followed by tender, juicy chicken in every bite!
Tips for Perfect Crispy Fried Chicken
Use the cornstarch. The combination of flour and cornstarch creates a lighter, crispier coating than flour alone.
Give the chicken time to marinate. Even a couple of hours in buttermilk helps improve flavor and tenderness.
Press the coating firmly onto the chicken. This helps the flour adhere and creates a more substantial crust.
Rest the coated pieces before frying. A short rest helps the coating settle onto the chicken and reduces the chance of it falling off in the oil.
Monitor the oil temperature. A thermometer makes a big difference. Maintain the frying temperature rather than letting the oil become too hot or too cool.
Fry in small batches. Crowding the pot lowers the oil temperature and can cause uneven browning.
Use a wire rack after frying. Air circulation helps prevent the bottom crust from becoming soggy.
Season while the chicken is hot. The coating already contains seasoning, but a very light sprinkle of salt immediately after frying can add extra flavor if needed.
Allow enough cooking time. Larger bone-in pieces take longer than small ones. Always use a food thermometer rather than relying exclusively on the clock.
Delicious Variations
🌶️ Spicy Crispy Fried Chicken
Increase the chili powder to 1 teaspoon and add ¼ teaspoon cayenne pepper to the flour mixture. For even more heat, serve with hot sauce or spicy mayonnaise.
🧄 Garlic Pepper Fried Chicken
Add another ½ teaspoon garlic powder and ½ teaspoon freshly ground black pepper to the coating for a more pronounced savory flavor.
🍯 Honey Butter Fried Chicken
Mix softened butter with a little honey and brush a small amount over the cooked chicken just before serving. Apply lightly to preserve as much of the crispy coating as possible.
🌿 Herb-Seasoned Fried Chicken
Add ½ teaspoon dried thyme and ½ teaspoon dried oregano to the flour mixture for a subtle herbal flavor.
🍋 Lemon Pepper Fried Chicken
Replace some of the black pepper seasoning with lemon pepper seasoning. Check the salt content of the seasoning blend before adding the full teaspoon of salt.
🍗 Extra-Crunchy Double-Coated Chicken
Use the optional second dredge described in Step 4. The additional layers create a thicker, craggier crust with plenty of crunch.
🥪 Crispy Chicken Sandwiches
Remove the meat from the bones after cooking, or use boneless chicken pieces instead. Serve on toasted buns with lettuce, pickles, mayonnaise, and a little hot sauce.
What to Serve with Crispy Fried Chicken
This classic fried chicken pairs beautifully with a variety of sides:
- Creamy mashed potatoes: A comforting, hearty combination.
- Homemade coleslaw: The fresh, tangy crunch balances the richness of the fried coating.
- French fries or potato wedges: Perfect for a casual family meal.
- Buttermilk biscuits: Soft, buttery biscuits complement the crispy chicken.
- Cornbread: A slightly sweet side that works especially well with seasoned chicken.
- Macaroni and cheese: A rich, cheesy favorite for a comfort-food feast.
- Steamed green beans or roasted vegetables: A lighter side to round out the meal.
- Pickles and dipping sauces: Ranch, honey mustard, barbecue sauce, or spicy mayonnaise offer extra flavor.
For a classic fried chicken dinner, serve the chicken with mashed potatoes, coleslaw, warm biscuits, and your favorite sauce.
Make-Ahead and Storage Instructions
Can You Prepare the Chicken Ahead?
Yes. You can marinate the chicken in buttermilk for up to about 24 hours in the refrigerator. For the crispiest result, coat the chicken shortly before frying.
You can also mix the dry coating ingredients ahead of time and keep them in an airtight container until needed.
Refrigerator Storage
Allow leftover chicken to cool, then refrigerate it in a covered, airtight container within 2 hours of cooking. Keep it at 40°F (4°C) or below and consume within 3–4 days.
Avoid leaving fried chicken at room temperature for extended periods.
Reheating
For the best texture, reheat the chicken on a wire rack over a baking sheet in an oven preheated to 375°F (190°C) for approximately 10–20 minutes, depending on the size and quantity of the pieces.
You can also use an air fryer at approximately 350°F (175°C), checking frequently until the chicken is hot throughout.
Reheat leftovers to an internal temperature of 165°F (74°C). Avoid relying on the microwave alone if you want to preserve the crisp coating, since it tends to soften the crust.
Freezing
Cool the cooked chicken, then freeze the pieces in a single layer until firm. Transfer them to a freezer-safe airtight container or bag and freeze for up to 3 months for best quality.
Thaw in the refrigerator and reheat in the oven or air fryer until heated through. The crust may not be quite as crisp as freshly fried chicken, but reheating on a rack helps restore some crunch.
Frequently Asked Questions
Why is my fried chicken not crispy?
The most common reasons are oil that is too cool, an overcrowded frying pot, excess moisture on the coating, or draining the chicken on a flat surface where steam gets trapped underneath.
Use a thermometer, fry in batches, let the coating rest briefly before frying, and drain the cooked chicken on a wire rack.
Why does the coating fall off?
The coating may not have adhered properly, or the chicken may have been moved too much immediately after being placed in the oil. Press the flour onto the chicken firmly, allow the coated pieces to rest for 5–10 minutes, and handle them gently during frying.
Can I use boneless chicken?
Absolutely. Boneless chicken thighs or breast pieces work well, but they usually cook more quickly than bone-in pieces. Begin checking their temperature early and remove them when the thickest part reaches 165°F (74°C).
Can I make this recipe without buttermilk?
Yes. Use the milk-and-lemon-juice or milk-and-vinegar substitute described in Step 2. Plain yogurt thinned with a little milk can also work, provided it coats the chicken easily.
Can I use an air fryer instead of deep-frying?
Yes, although the texture will be different from traditional deep-fried chicken. Arrange the coated pieces in a single layer, spray the flour coating lightly with oil, and cook at approximately 375°F (190°C), turning as needed. Cooking times vary considerably with the size of the pieces and the air fryer, so check the internal temperature and ensure every piece reaches 165°F (74°C).
Why is the outside dark while the inside is still undercooked?
The oil may be too hot, or the pieces may be too large for the cooking time. Reduce the heat to keep the oil in the recommended range. If the crust has already browned deeply, finish cooking the chicken in a 350°F (175°C) oven until the center reaches 165°F (74°C).
Can I reuse frying oil?
Yes, provided the oil has not overheated, smoked excessively, or developed an unpleasant odor. Let it cool completely, strain out the crumbs, and store it in a clean, sealed container according to the oil’s storage recommendations. Discard oil that looks or smells off, foams excessively, or has become thick and dark.
Can I make the coating extra flavorful?
Yes. Add your favorite seasonings to the flour mixture, such as dried thyme, oregano, smoked paprika, or a small amount of cayenne. Adjust the salt based on the seasonings you use.
Estimated Nutrition Information
Approximate nutrition per serving, assuming 6 servings and accounting for some oil absorbed during frying:
- Calories: 400–550
- Protein: 30–40 g
- Carbohydrates: 25–40 g
- Fat: 18–30 g
These figures are estimates. Actual values depend on the chicken pieces, whether the skin is left on, how much coating adheres, and how much oil is absorbed during frying.
Final Thoughts
Homemade Crispy Fried Chicken is a timeless favorite for a reason. The buttermilk helps tenderize the meat, the seasoned flour and cornstarch create a crunchy golden crust, and the combination of paprika, garlic, onion, and black pepper adds delicious flavor to every piece.
Whether you’re making a weekend family feast, a casual dinner, or a platter to share with friends, this recipe delivers satisfying comfort-food goodness with simple ingredients.
Golden and crunchy on the outside, tender and juicy inside—serve it hot and enjoy every delicious bite! 🍗