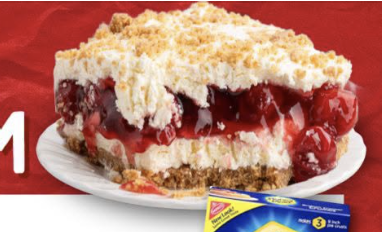
It gives you the deep, toasty crunch of a compacted butter-graham foundation, the velvety tang of whipped vanilla cheesecake mousse, a vibrant layer of ruby-red sour cherry filling, and an airy cloud of sweetened cream dusted with golden crumbs.
When done without rushing, it is clean, bakery-sharp, and holds its structural tiers gracefully on a plate rather than collapsing into a soupy puddle.
The Culinary Mechanics of a Non-Collapsing Yum Yum
- Fat Crystallization Over Heat Gelation: Because this crust is unbaked, it doesn’t rely on baked starch structures or eggs to stay intact. Instead, it depends on the butterfat from melted butter. As it chills in the freezer or fridge, the saturated fats recrystallize, welding the fine graham particles into a firm, sliceable foundation that refuses to crumble into loose sand under your spatula.
- Moisture Buffering with Brick Cream Cheese: Spreadable tub cream cheese contains added water and gums to remain soft when chilled, which will cause your filling to weep. Using standard full-fat brick-style cream cheese provides the optimal fat-to-moisture balance. Beating it thoroughly with powdered sugar ensures smooth incorporation; the micro-fine sugar dissolves without leaving gritty sucrose granules, while the small percentage of cornstarch naturally present in commercial powdered sugar absorbs free moisture from the dairy.
- The Inter-Layer Acid Barrier: Cherry pie filling contains concentrated fruit acids and gelatinized starches. If poured over warm or loose cream cheese, the heavy pie filling sinks immediately and causes the dairy emulsion to split. Giving the cream cheese layer a 15-minute quick-chill creates a chilled hydrophobic (fat-rich) barrier that keeps the bright red layer suspended in a clean horizontal plane.
Ingredients & Precise Proportions
For the Foundation Crust (Layer 1):
- 2 cups (approx. 200 g) graham cracker crumbs (reserve 2 to 3 tablespoons for the final top garnish)
- ½ cup (1 stick / 115 g) unsalted butter, melted and cooled slightly
- 2 tablespoons granulated white sugar (adds an extra snap to the crust)
- ¼ teaspoon fine sea salt (sharpens the toasted honey flavor of the grahams)
For the Whipped Cheesecake Mousse (Layer 2):
- 16 oz (450 g / two 8-oz blocks) full-fat brick cream cheese, completely softened to room temperature
- 1 cup (120 g) powdered sugar, sifted to eliminate lumps
- 1 teaspoon pure vanilla extract (or vanilla bean paste)
- 1 cup (approx. 80 g) thawed whipped topping (Cool Whip), gently folded in
For the Tart Cherry Ribbon (Layer 3):
- 1 can (21 oz / 595 g) quality cherry pie filling
- ½ teaspoon fresh lemon juice (brightens and balances commercial canned fruit)
- ¼ teaspoon pure almond extract (optional, but amplifies stone-fruit aromatics)
For the Cloud Crown & Garnish (Layer 4):
- 1 tub (8 oz / 225 g) whipped topping (Cool Whip), thawed (the remaining balance from Layer 2)
- 2 to 3 tablespoons reserved graham cracker crumbs
Master Execution: Layer by Layer
1. Form the Structural Base
- In a medium bowl, combine the 2 cups graham cracker crumbs, melted butter, granulated sugar, and salt. Stir with a fork until the mixture is uniform and resembles damp beach sand.
- Spoon 2 to 3 tablespoons of the buttery crumbs into a small ramekin and set aside for finishing.
- Tip the remaining crumbs into a standard 9×13-inch glass or ceramic baking dish.
- Using the flat, smooth bottom of a measuring cup or flat-bottomed glass, pack the crumbs down with firm, even pressure across the floor of the pan, pushing slightly into the corners.
- Place the pan in the freezer for 15 minutes (or the fridge for 30 minutes) to allow the butter to solidify completely.
2. Whip the Velvet Cheesecake Layer
- In a stand mixer fitted with the paddle attachment (or using a handheld electric mixer), beat the 16 oz softened cream cheese on medium-high speed for 2 to 3 minutes until silky, aerated, and completely smooth.
- Stop and scrape the sides and bottom of the bowl to ensure no dense pockets remain.
- Turn the mixer to low, add the 1 cup sifted powdered sugar and 1 tsp vanilla extract, and mix until combined. Beat on medium for another 60 seconds until fluffy.
- Add 1 cup of thawed Cool Whip to the bowl. Using a wide silicone spatula, gently fold it into the cream cheese until uniform and airy.
- Remove the chilled pan from the freezer. Drop large spoonfuls of the cheesecake mixture across the crust, then glide an offset spatula over the surface to spread it edge-to-edge into an even layer.
- Slide the dish into the refrigerator for 15 minutes to firm the surface.
3. Spread the Glossy Fruit Ribbon
- In a small bowl, stir the cherry pie filling with the lemon juice and almond extract to brighten the fruit.
- Spoon the cherries evenly over the chilled cream cheese surface.
- Using the back of an offset spatula or large spoon, gently coax the fruit and syrup out to the borders of the dish. Use a light touch so you don’t drag up the white layer beneath.
4. Top and Decorate
- Spoon the remaining thawed Cool Whip over the cherry layer.
- Using sweeping, billowy motions with your spatula, create soft decorative peaks and waves from corner to corner.
- Scatter the reserved graham cracker crumbs evenly over the whipped top.
5. The Indispensable Overnight Chill
- Cover the pan loosely with foil (tenting it slightly so it doesn’t smudge the whipped cream).
- Chill in the refrigerator for at least 6 hours, though a full overnight rest (8 to 12 hours) is strongly recommended.
- The Culinary Reason: As it rests, the graham crust softens just enough to yield smoothly to a fork without breaking, while the cheesecake and cream layers set into a sliceable, stable terrine.
Pro-Baker Troubleshooting & Tips
- Eliminating Lumps in Layer 2: If your cream cheese is even slightly cold, it will form tiny white beads that refuse to blend smooth. Leave your cream cheese bricks on the counter for at least 60 to 90 minutes beforehand. It should yield easily to gentle finger pressure with zero resistance.
- The “Hot Knife” Clean Slice: To get the sharp, picture-perfect layers shown in bakeries, run a large chef’s knife under hot tap water for 10 seconds, wipe it dry with a towel, and press straight down in one smooth stroke. Wipe the blade clean between every single cut.
- Make-Ahead & Storage: Store covered in the refrigerator for up to 5 days; the flavors actually harmonize and taste richer on day two. If preparing for a party, you can freeze the assembled dish for up to 1 month(thaw overnight in the fridge before serving).
There is a reason vintage icebox desserts never go out of style: they hit every nostalgic, textural comfort note with zero fuss and zero oven heat. Cherry Yum Yum—a Southern potluck crown jewel often known as Cherry Delight—is the pinnacle of this genre.
It gives you the deep, toasty crunch of a compacted butter-graham foundation, the velvety tang of whipped vanilla cheesecake mousse, a vibrant layer of ruby-red sour cherry filling, and an airy cloud of sweetened cream dusted with golden crumbs.
When done without rushing, it is clean, bakery-sharp, and holds its structural tiers gracefully on a plate rather than collapsing into a soupy puddle.
The Culinary Mechanics of a Non-Collapsing Yum Yum
- Fat Crystallization Over Heat Gelation: Because this crust is unbaked, it doesn’t rely on baked starch structures or eggs to stay intact. Instead, it depends on the butterfat from melted butter. As it chills in the freezer or fridge, the saturated fats recrystallize, welding the fine graham particles into a firm, sliceable foundation that refuses to crumble into loose sand under your spatula.
- Moisture Buffering with Brick Cream Cheese: Spreadable tub cream cheese contains added water and gums to remain soft when chilled, which will cause your filling to weep. Using standard full-fat brick-style cream cheese provides the optimal fat-to-moisture balance. Beating it thoroughly with powdered sugar ensures smooth incorporation; the micro-fine sugar dissolves without leaving gritty sucrose granules, while the small percentage of cornstarch naturally present in commercial powdered sugar absorbs free moisture from the dairy.
- The Inter-Layer Acid Barrier: Cherry pie filling contains concentrated fruit acids and gelatinized starches. If poured over warm or loose cream cheese, the heavy pie filling sinks immediately and causes the dairy emulsion to split. Giving the cream cheese layer a 15-minute quick-chill creates a chilled hydrophobic (fat-rich) barrier that keeps the bright red layer suspended in a clean horizontal plane.
Ingredients & Precise Proportions
For the Foundation Crust (Layer 1):
- 2 cups (approx. 200 g) graham cracker crumbs (reserve 2 to 3 tablespoons for the final top garnish)
- ½ cup (1 stick / 115 g) unsalted butter, melted and cooled slightly
- 2 tablespoons granulated white sugar (adds an extra snap to the crust)
- ¼ teaspoon fine sea salt (sharpens the toasted honey flavor of the grahams)
For the Whipped Cheesecake Mousse (Layer 2):
- 16 oz (450 g / two 8-oz blocks) full-fat brick cream cheese, completely softened to room temperature
- 1 cup (120 g) powdered sugar, sifted to eliminate lumps
- 1 teaspoon pure vanilla extract (or vanilla bean paste)
- 1 cup (approx. 80 g) thawed whipped topping (Cool Whip), gently folded in
For the Tart Cherry Ribbon (Layer 3):
- 1 can (21 oz / 595 g) quality cherry pie filling
- ½ teaspoon fresh lemon juice (brightens and balances commercial canned fruit)
- ¼ teaspoon pure almond extract (optional, but amplifies stone-fruit aromatics)
For the Cloud Crown & Garnish (Layer 4):
- 1 tub (8 oz / 225 g) whipped topping (Cool Whip), thawed (the remaining balance from Layer 2)
- 2 to 3 tablespoons reserved graham cracker crumbs
Master Execution: Layer by Layer
1. Form the Structural Base
- In a medium bowl, combine the 2 cups graham cracker crumbs, melted butter, granulated sugar, and salt. Stir with a fork until the mixture is uniform and resembles damp beach sand.
- Spoon 2 to 3 tablespoons of the buttery crumbs into a small ramekin and set aside for finishing.
- Tip the remaining crumbs into a standard 9×13-inch glass or ceramic baking dish.
- Using the flat, smooth bottom of a measuring cup or flat-bottomed glass, pack the crumbs down with firm, even pressure across the floor of the pan, pushing slightly into the corners.
- Place the pan in the freezer for 15 minutes (or the fridge for 30 minutes) to allow the butter to solidify completely.
2. Whip the Velvet Cheesecake Layer
- In a stand mixer fitted with the paddle attachment (or using a handheld electric mixer), beat the 16 oz softened cream cheese on medium-high speed for 2 to 3 minutes until silky, aerated, and completely smooth.
- Stop and scrape the sides and bottom of the bowl to ensure no dense pockets remain.
- Turn the mixer to low, add the 1 cup sifted powdered sugar and 1 tsp vanilla extract, and mix until combined. Beat on medium for another 60 seconds until fluffy.
- Add 1 cup of thawed Cool Whip to the bowl. Using a wide silicone spatula, gently fold it into the cream cheese until uniform and airy.
- Remove the chilled pan from the freezer. Drop large spoonfuls of the cheesecake mixture across the crust, then glide an offset spatula over the surface to spread it edge-to-edge into an even layer.
- Slide the dish into the refrigerator for 15 minutes to firm the surface.
3. Spread the Glossy Fruit Ribbon
- In a small bowl, stir the cherry pie filling with the lemon juice and almond extract to brighten the fruit.
- Spoon the cherries evenly over the chilled cream cheese surface.
- Using the back of an offset spatula or large spoon, gently coax the fruit and syrup out to the borders of the dish. Use a light touch so you don’t drag up the white layer beneath.
4. Top and Decorate
- Spoon the remaining thawed Cool Whip over the cherry layer.
- Using sweeping, billowy motions with your spatula, create soft decorative peaks and waves from corner to corner.
- Scatter the reserved graham cracker crumbs evenly over the whipped top.
5. The Indispensable Overnight Chill
- Cover the pan loosely with foil (tenting it slightly so it doesn’t smudge the whipped cream).
- Chill in the refrigerator for at least 6 hours, though a full overnight rest (8 to 12 hours) is strongly recommended.
- The Culinary Reason: As it rests, the graham crust softens just enough to yield smoothly to a fork without breaking, while the cheesecake and cream layers set into a sliceable, stable terrine.
Pro-Baker Troubleshooting & Tips
- Eliminating Lumps in Layer 2: If your cream cheese is even slightly cold, it will form tiny white beads that refuse to blend smooth. Leave your cream cheese bricks on the counter for at least 60 to 90 minutes beforehand. It should yield easily to gentle finger pressure with zero resistance.
- The “Hot Knife” Clean Slice: To get the sharp, picture-perfect layers shown in bakeries, run a large chef’s knife under hot tap water for 10 seconds, wipe it dry with a towel, and press straight down in one smooth stroke. Wipe the blade clean between every single cut.
- Make-Ahead & Storage: Store covered in the refrigerator for up to 5 days; the flavors actually harmonize and taste richer on day two. If preparing for a party, you can freeze the assembled dish for up to 1 month(thaw overnight in the fridge before serving).