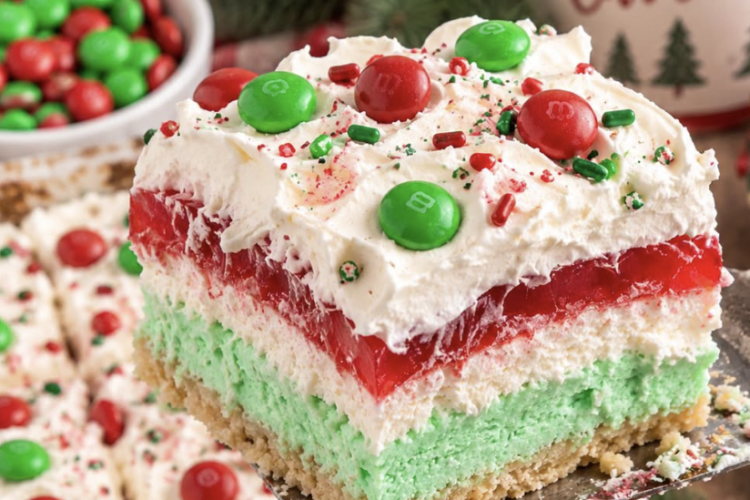
If there is one dessert that guaranteed an empty pan at family potlucks when we were growing up, it was an icebox lush.
This Christmas version is practically a holiday centerpiece. You get that crunchy, buttery golden cookie base on the bottom, a minty pastel-green layer, sweet vanilla cream cheese, a ruby-red fruit layer, and a mountain of fluffy whipped cream covered in holiday M&Ms and sprinkles.
Best of all, you never have to turn on the oven. The only real “trick” here is patience—giving each layer just enough time to set so you get those gorgeous, razor-sharp ribbons when you pull out the first slice.
Why the Technique Matters
- Pack that crust down tight: Don’t just lightly scatter the cookie crumbs. Pressing them firmly into the pan with the bottom of a drinking glass forces the melted butter to bind every crumb together, so your crust doesn’t fall apart when you serve it.
- The “syrupy” gelatin window: This is where most people get tripped up. If you pour hot gelatin over cold cream cheese, it melts the cream into a murky mess. But if you let it sit too long on the counter, it turns into solid Jell-O in the bowl. You want it chilled just until it feels like raw egg whites—cold, thick, and pourable.
- The cream cheese moisture barrier: Cream cheese is naturally rich in fat, which creates a slick barrier that keeps the wet gelatin from soaking down into the green pudding below.
What You’ll Need
The Cookie Base:
- 36 Golden Oreos (keep the creme filling right inside)
- 6 tablespoons unsalted butter, melted
- A tiny pinch of salt
The Green Layer:
- 1 box (3.4 oz) instant vanilla pudding mix (or pistachio if you love that nutty flavor)
- 1 cup cold whole milk
- 1 cup thawed Cool Whip
- 1 or 2 drops green gel food coloring
- ¼ teaspoon peppermint extract (optional, but gives it a great candy cane vibe)
The White Cream Layer:
- 8 oz brick cream cheese, softened to room temperature
- ½ cup powdered sugar
- 1 teaspoon pure vanilla extract
- 1 cup thawed Cool Whip
The Red Layer:
- 1 box (3 oz) strawberry or raspberry Jell-O
- ¾ cup boiling water
- ½ cup ice water
The Topping:
- The rest of the Cool Whip (about 2 cups)
- ½ cup red and green holiday M&Ms
- 2 tablespoons festive sprinkles
How to Build It, Step-by-Step
1. Form the Crust
Toss the Golden Oreos into a food processor and blitz them into fine crumbs. Pour in the melted butter and pulse until it looks like wet sand.
Dump the crumbs into a 9×13-inch dish and use the flat bottom of a measuring cup to pack them down firmly into an even layer. Pop the dish into the freezer for 15 minutes to firm up.
2. Whip the Green Pudding
In a medium bowl, whisk together the dry pudding mix, cold milk, a couple of drops of green food coloring, and the peppermint extract for about two minutes until thick.
Gently fold in 1 cup of thawed Cool Whip until smooth and pastel green. Spread this over your chilled crust and slide it into the fridge.
3. Beat the Cream Cheese Layer
In another bowl, beat the softened cream cheese, powdered sugar, and vanilla extract until completely smooth and creamy—no lumps.
Fold in 1 cup of Cool Whip until light and fluffy. Drop spoonfuls of this mixture over the green layer, then use an offset spatula to gently spread it out to the edges. Pop the pan back in the fridge.
4. The Gelatin Step (Take Your Time Here!)
Stir the red gelatin into the ¾ cup of boiling water for two full minutes until every grain dissolves. Stir in the ½ cup of ice water.
Set this bowl in the fridge for about 25 to 30 minutes. Keep an eye on it! The moment it gets cold and thickens into a loose, syrupy texture, take it out.
Slowly ladle the cold gelatin over the back of a spoon onto the white cream layer so it glides across without digging into the cream. Put the whole pan in the fridge for about 45 minutes until the red top is completely firm to the touch.
5. Finish and Garnish
Once the red layer has set, spread the remaining Cool Whip across the top in pretty, fluffy swoops. Scatter the holiday sprinkles and M&Ms all over.
Let the entire dessert chill in the fridge for at least two hours (or overnight) before slicing.
A Few Helpful Pointers
- Getting neat slices: For clean bakery-style squares, dip your chef’s knife into a glass of hot water and wipe it clean with a paper towel between each cut.
- Candy tip: If you are making this the day before, hold off on scattering the M&Ms and sprinkles until an hour or two before serving. The moisture from the whipped topping can cause the candy colors to bleed if left sitting overnight.
- Leftovers: Keeps beautifully covered in the fridge for 3 to 4 days.