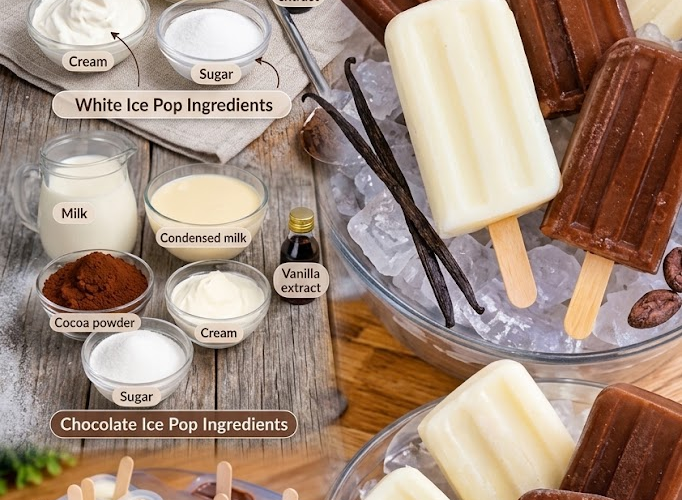
🍦🍫 White and Chocolate Ice Pops
These White and Chocolate Ice Pops are creamy, rich, and incredibly easy to make. The white layer has a smooth vanilla-milk flavor, while the chocolate layer adds a deep cocoa richness for the perfect contrast.
They’re made without complicated equipment and are especially refreshing on hot days. The two-tone layers also make these homemade popsicles look beautiful enough for parties and family gatherings.
Recipe Information
Prep Time: 15 minutes
Freeze Time: 6–8 hours
Total Time: About 8 hours
Yield: 8–10 ice pops
Difficulty: Easy
Method: No-Cook
Ingredients
For the White Ice Pops
- 2 cups (480 ml) whole milk
- ½ cup (120 ml) sweetened condensed milk
- ½ cup (120 ml) fresh cream or heavy cream
- 2 tablespoons (25 g) granulated sugar, optional
- 1 teaspoon vanilla extract
For the Chocolate Ice Pops
- 1½ cups (360 ml) whole milk
- ½ cup (120 ml) sweetened condensed milk
- ½ cup (120 ml) fresh cream or heavy cream
- ¼ cup (25 g) unsweetened cocoa powder
- 2 tablespoons (25 g) granulated sugar, optional
- ½ teaspoon vanilla extract
- Pinch of salt
Instructions
1. Make the White Mixture
Add the milk, condensed milk, fresh cream, sugar, and vanilla extract to a blender.
Blend for 20–30 seconds, just until smooth and well combined.
Taste the mixture. If the condensed milk provides enough sweetness, you can leave out the additional sugar.
Pour the mixture into a measuring jug or bowl and set aside.
2. Make the Chocolate Mixture
Add the milk, condensed milk, fresh cream, cocoa powder, sugar, vanilla extract, and a small pinch of salt to a clean blender.
Blend for 30–45 seconds, until completely smooth and the cocoa is fully incorporated.
For an especially smooth chocolate layer, sift the cocoa powder before adding it.
3. Create the Two-Tone Layers
Place your ice pop molds upright.
Pour the white mixture into each mold, filling it approximately halfway.
Place the molds in the freezer for about 1–2 hours, or until the first layer is partially frozen and firm enough to support the second layer.
Don’t freeze it completely solid, as the two layers may not bond as well.
4. Add the Chocolate Layer
Carefully pour the chocolate mixture over the partially frozen white layer.
Leave a small amount of space at the top of each mold to allow for expansion during freezing.
Insert the ice pop sticks according to your mold’s design.
5. Freeze
Place the molds upright in the freezer.
Freeze for at least 6–8 hours, preferably overnight, until completely solid.
For the smoothest texture, avoid repeatedly opening the freezer while the pops are setting.
6. Remove the Ice Pops
When ready to serve, run the outside of the mold under lukewarm water for 5–10 seconds.
Gently pull on the stick until the ice pop releases.
Do not use hot water, as it can melt the outer layer too quickly.
Serve immediately.
🍫 Easy Variations
Chocolate Chip Ice Pops
Stir mini chocolate chips into the chocolate mixture before freezing.
Mocha Ice Pops
Add 1 teaspoon instant espresso powder to the chocolate mixture.
Strawberry & Cream
Replace the chocolate layer with blended strawberries and a little condensed milk.
Cookies & Cream
Add finely crushed chocolate sandwich cookies to either layer.
Extra-Chocolate Version
Add 2–3 tablespoons melted chocolate to the chocolate mixture for a richer flavor.
Marble Ice Pops
Instead of freezing the white layer completely, swirl small amounts of chocolate mixture into the white mixture using a skewer before freezing.
Chef’s Tips
Use full-fat dairy for the creamiest texture. Whole milk and full-fat cream produce softer, richer ice pops.
Don’t skip the condensed milk. It adds sweetness while helping create a smoother frozen texture.
Sift the cocoa powder. This prevents little cocoa lumps from remaining in the chocolate layer.
Don’t overfill the molds. The mixture expands slightly as it freezes.
For clean layers: Make sure the first layer is firm enough to support the second but not completely frozen solid.
For easier removal: Lukewarm water is enough to loosen the pops from their molds.
Make-Ahead Instructions
These ice pops are ideal for making ahead.
Prepare them the night before serving and allow them to freeze overnight.
Once fully frozen, they can remain in the molds until you’re ready to serve them.
Storage
For the best flavor and texture, keep the ice pops frozen and consume them within 2–3 weeks.
If removing them from the molds for storage, wrap each pop individually in plastic wrap or parchment paper and place them in a freezer-safe container or bag.
This helps prevent freezer burn and unwanted ice crystals.
Serving Suggestions
Serve these creamy ice pops on:
- Hot summer afternoons
- Children’s parties
- Birthday celebrations
- Family gatherings
- Barbecues
- Dessert tables
For an extra-special treat, drizzle the finished pops with melted chocolate and sprinkle with crushed nuts or cookie crumbs just before serving.
Recipe Notes
Yield: 8–10 ice pops, depending on mold size
Texture: Creamy, smooth, and milky
Flavor: Sweet vanilla cream paired with rich chocolate
Best served: Completely frozen and freshly unmolded
❄️ Two Layers, Twice the Fun
The combination of creamy vanilla-white and rich chocolate makes these homemade ice pops both delicious and visually beautiful. They’re an easy freezer treat that the whole family will love.