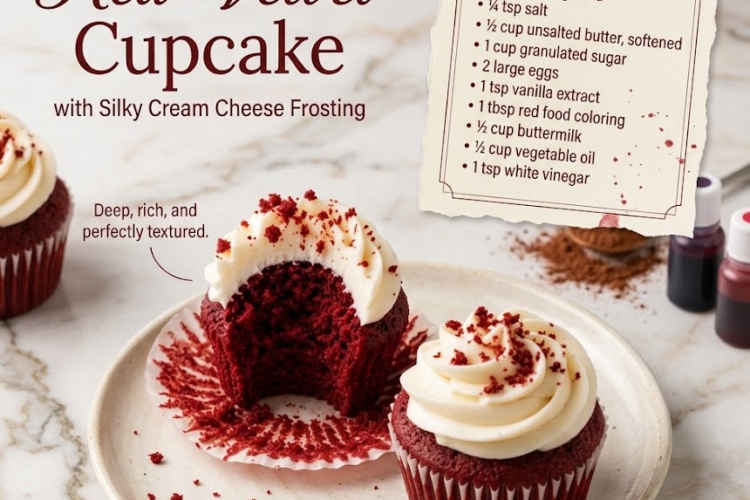
❤️🧁 Moist Red Velvet Cupcakes
Soft, moist, fluffy, and beautifully vibrant, these classic Red Velvet Cupcakes are the perfect combination of subtle cocoa flavor, sweet vanilla, and a delicate tang from buttermilk and vinegar.
The combination of butter and oil creates cupcakes with a rich flavor while keeping the crumb exceptionally moist. Finished with a generous swirl of cream cheese frosting, these cupcakes are perfect for birthdays, Valentine’s Day, holidays, parties, or whenever you’re craving a classic bakery-style treat.
⏱️ Recipe Information
- Prep Time: 20 minutes
- Bake Time: 18–22 minutes
- Cooling Time: 1 hour
- Total Time: About 1 hour 40 minutes
- Yield: 12–14 cupcakes
- Difficulty: Easy
- Method: Oven-Baked
🛒 Ingredients
🧁 For the Red Velvet Cupcakes
- 1½ cups (190 g) all-purpose flour
- 1 tbsp unsweetened cocoa powder
- 1 tsp baking powder
- ½ tsp baking soda
- ¼ tsp salt
- ½ cup (113 g) unsalted butter, softened
- 1 cup (200 g) granulated sugar
- 2 large eggs, room temperature
- 1 tsp vanilla extract
- 1 tbsp red food coloring
- ½ cup (120 ml) buttermilk, room temperature
- ½ cup (120 ml) vegetable oil
- 1 tsp white vinegar
🧀 Optional Cream Cheese Frosting
- 8 oz (225 g) cream cheese, softened
- ½ cup (113 g) unsalted butter, softened
- 3–4 cups powdered sugar, sifted
- 1 tsp vanilla extract
- 1–2 tbsp milk or heavy cream, if needed
👩🍳 Instructions
1. Prepare the Oven and Cupcake Pan
Preheat your oven to 350°F (175°C).
Line a 12-cup muffin pan with cupcake liners.
Set aside while you prepare the batter.
🥣 Make the Cupcake Batter
2. Combine the Dry Ingredients
In a medium bowl, whisk together:
- All-purpose flour
- Cocoa powder
- Baking powder
- Baking soda
- Salt
Whisk until everything is evenly combined.
Set aside.
Chef’s Tip:
Red velvet cake uses only a small amount of cocoa powder. The goal is a subtle chocolate flavor rather than a deeply chocolatey cupcake.
3. Cream the Butter and Sugar
In a large mixing bowl, add the softened butter and granulated sugar.
Using a hand mixer or stand mixer, beat on medium speed for 2–3 minutes, until the mixture becomes lighter and fluffy.
Scrape down the sides of the bowl as needed.
4. Add the Eggs and Vanilla
Add the eggs one at a time, mixing well after each addition.
Add the vanilla extract and mix until combined.
5. Add the Red Food Coloring
Add the red food coloring.
Mix until the batter has an even, vibrant red color.
The amount of food coloring needed may vary depending on whether you use gel or liquid coloring.
6. Combine the Wet Ingredients
In a separate bowl or measuring jug, combine:
- Buttermilk
- Vegetable oil
Stir until combined.
The oil helps keep the cupcakes exceptionally moist, even after refrigeration.
7. Alternate the Ingredients
Add approximately one-third of the dry ingredients to the butter mixture.
Mix on low speed just until incorporated.
Add approximately half of the buttermilk mixture and mix gently.
Continue alternating between the dry ingredients and buttermilk mixture, ending with the dry ingredients.
Mix only until combined.
Important:
Do not overmix the batter. Overmixing can create dense or tough cupcakes.
8. Add the Vinegar
Add the white vinegar.
Gently mix for just a few seconds until incorporated.
The vinegar reacts with the baking soda and helps create a light, tender texture.
🧁 Fill the Cupcake Liners
9. Portion the Batter
Divide the batter evenly between the cupcake liners.
Fill each liner approximately ⅔ full.
Avoid overfilling, as the cupcakes need room to rise.
An ice cream scoop works perfectly for evenly portioning the batter.
🔥 Bake
10. Bake the Cupcakes
Bake at 350°F (175°C) for approximately 18–22 minutes.
The cupcakes are ready when:
- The tops spring back gently when touched.
- A toothpick inserted into the center comes out clean or with a few moist crumbs.
- The cupcakes have risen and look set.
Avoid overbaking, as this can dry out the cupcakes.
❄️ Cool Completely
11. Cool the Cupcakes
Remove the pan from the oven.
Allow the cupcakes to cool in the pan for 5 minutes.
Transfer them to a wire rack and allow them to cool completely.
Do not frost warm cupcakes, as the frosting will melt.
🧀 Make the Cream Cheese Frosting
12. Beat the Cream Cheese and Butter
Add the softened cream cheese and butter to a large mixing bowl.
Beat on medium speed until completely smooth and creamy.
Scrape down the sides of the bowl.
13. Add the Powdered Sugar
Gradually add the powdered sugar, about 1 cup at a time, mixing on low speed.
Once incorporated, increase the speed and beat until smooth and fluffy.
Add the vanilla extract.
If the frosting is too thick, add a little milk or heavy cream.
If it is too soft, add additional powdered sugar.
🌹 Frost the Cupcakes
14. Decorate
Once the cupcakes are completely cool, transfer the frosting to a piping bag fitted with your favorite decorating tip.
Pipe generous swirls of cream cheese frosting onto each cupcake.
Alternatively, spread the frosting using a knife or offset spatula.
15. Add Optional Decorations
For a beautiful bakery-style finish, decorate with:
- Red velvet cake crumbs
- White chocolate shavings
- Red sprinkles
- Fresh strawberries
- Small chocolate hearts
To make traditional red velvet crumbs, crumble one cupcake or trim a small amount from the tops.
⭐ Chef’s Tips
Use Room-Temperature Ingredients
Room-temperature butter, eggs, and buttermilk combine more smoothly and create a more even batter.
Don’t Overmix
Mix the flour only until incorporated. Overmixing develops gluten and can make the cupcakes dense.
Measure the Flour Carefully
For the most accurate results, weigh the flour. Too much flour can make cupcakes dry.
Use Quality Cocoa Powder
A good unsweetened cocoa powder gives the cupcakes their subtle signature chocolate flavor.
Don’t Overbake
Check the cupcakes at the 18-minute mark. Every oven is slightly different.
Cool Completely Before Frosting
Warm cupcakes will soften and melt cream cheese frosting.
❤️ Delicious Variations
🍫 Chocolate Red Velvet Cupcakes
Increase the cocoa powder to 2–3 tablespoons for a deeper chocolate flavor.
🍓 Strawberry Red Velvet Cupcakes
Add a small amount of strawberry jam or strawberry filling to the center before frosting.
🤍 White Chocolate Red Velvet Cupcakes
Top with cream cheese frosting and white chocolate curls.
🍒 Red Velvet Cupcakes with Cherry Filling
Core the cooled cupcakes and fill with cherry pie filling before frosting.
🧁 Mini Red Velvet Cupcakes
Use a mini muffin pan and bake for approximately 10–13 minutes.
🍽️ Serving Suggestions
These cupcakes are perfect for:
- Valentine’s Day ❤️
- Birthdays
- Christmas dessert trays
- Baby showers
- Bridal showers
- Anniversaries
- Afternoon tea
- Holiday parties
Serve them with:
- Coffee
- Tea
- Cold milk
- Hot chocolate
🧊 Storage
Because of the cream cheese frosting, store frosted cupcakes in an airtight container in the refrigerator for up to 4 days.
For the best flavor and texture, allow refrigerated cupcakes to sit at room temperature for approximately 15–20 minutes before serving.
Unfrosted cupcakes can be stored in an airtight container at room temperature for up to 2 days.
❄️ Freezing
Freeze Unfrosted Cupcakes
Allow the cupcakes to cool completely.
Wrap them individually in plastic wrap or place them in an airtight freezer-safe container.
Freeze for up to 2 months.
Thaw at room temperature before frosting.
Freeze the Frosting
Cream cheese frosting can be frozen in an airtight container for up to 1 month.
Thaw overnight in the refrigerator, then beat briefly until smooth before using.
❤️🧁 Final Result
These Moist Red Velvet Cupcakes are wonderfully soft, tender, and rich, with a beautiful red color, subtle cocoa flavor, and perfectly moist crumb.
Topped with smooth, tangy cream cheese frosting, every bite delivers the classic flavor combination that makes red velvet such a beloved dessert.
Soft. Velvety. Moist. Creamy. Absolutely irresistible! ❤️🧁✨