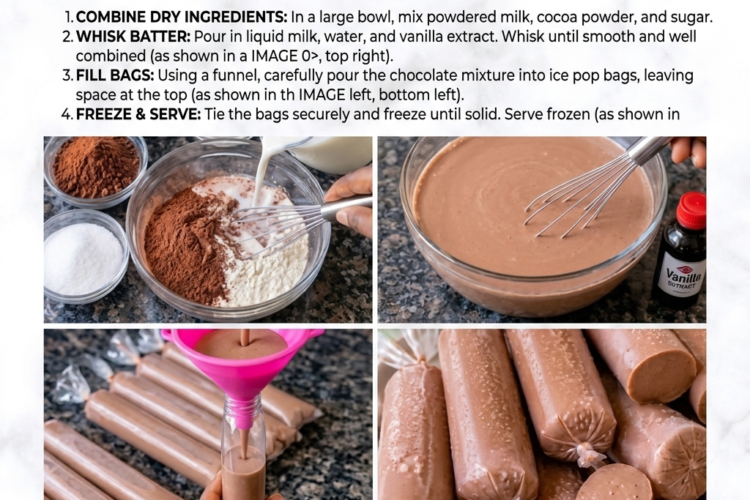
🍫 Chocolate Ice Candy – Creamy, Chocolatey & Refreshingly Delicious!
Rich chocolate flavor, creamy milkiness, and a smooth frozen texture in every bite! 🍦🤎
Beat the heat with this easy homemade Chocolate Ice Candy, a delicious frozen treat made with milk, cocoa powder, powdered milk, sugar, and evaporated milk. It’s wonderfully chocolatey, sweet, and creamy, making it a favorite for hot summer afternoons, family snacks, and homemade frozen desserts.
This classic-style ice candy is easy to prepare with simple ingredients and doesn’t require an ice cream machine. Simply mix the ingredients until smooth, pour the chocolate mixture into ice candy bags or popsicle molds, and freeze until firm.
The combination of liquid milk, powdered milk, and evaporated milk gives the mixture a richer, milkier flavor than ordinary chocolate ice pops. You can also adjust the sweetness and cocoa intensity to suit your taste.
Whether you’re making a batch for your family, serving a refreshing treat to friends, or experimenting with flavors for a small frozen-dessert business, this Chocolate Ice Candy is a delicious recipe to keep on hand! 🍫❄️
Recipe Details
- Prep Time: 15 minutes
- Cook Time: 5 minutes, optional, for easier cocoa dissolving
- Freezing Time: 6–8 hours or overnight
- Total Time: Approximately 6–8 hours
- Yield: 10–12 ice candies, depending on bag size
- Course: Dessert, Frozen Snack
- Cuisine: Filipino-inspired
- Difficulty: Easy
- Method: Mixing and freezing
Ingredients
For the Chocolate Ice Candy
- 2 cups (480 ml) liquid milk
- ½ cup (approximately 50–60 g) powdered milk
- 3 tablespoons (15–18 g) unsweetened cocoa powder
- ½ cup (100 g) granulated sugar, adjusted to taste
- ½ cup (120 ml) evaporated milk
- 1 teaspoon vanilla extract, optional
- 1 tiny pinch of salt, optional, to enhance the chocolate flavor
For Packaging
- 10–12 clean ice candy plastic bags, approximately 80–100 ml each, or
- Popsicle molds suitable for freezing
Ingredient notes:
- Liquid milk: Whole milk gives a richer result, while lower-fat milk produces a lighter frozen treat.
- Powdered milk: Adds a milky flavor and helps create a fuller texture.
- Cocoa powder: Use unsweetened cocoa powder so you can control the sweetness.
- Evaporated milk: Adds creaminess and a richer dairy taste.
- Sugar: Start with the recommended amount, then adjust before freezing. Frozen desserts can taste less sweet once thoroughly chilled.
The recipe works with the listed ingredients alone. Vanilla and a pinch of salt are optional additions that enhance the flavor.
Instructions
Step 1: Combine the Cocoa Powder and Sugar
Place the cocoa powder and granulated sugar in a large mixing bowl or saucepan.
Whisk them together until evenly combined. Mixing the cocoa with the sugar first helps break up small cocoa lumps and makes it easier to incorporate into the milk.
Step 2: Add the Liquid Milk
Pour in a small amount of the liquid milk and whisk until the cocoa mixture forms a smooth paste.
Gradually add the remaining milk, whisking continuously until the cocoa dissolves and the mixture becomes evenly chocolate-colored.
Taking this extra step helps prevent dry cocoa from floating on the surface or forming lumps in the finished ice candy.
Step 3: Add the Powdered Milk
Gradually add the powdered milk while whisking.
Continue mixing until the powder is fully dissolved and no large lumps remain.
If the mixture is difficult to smooth by hand, use a blender for approximately 20–30 seconds. Avoid overfilling the blender, particularly if you’re making a larger batch.
Step 4: Stir in the Evaporated Milk
Pour in the evaporated milk and whisk until fully incorporated.
Add the optional vanilla extract and pinch of salt.
Taste a small amount of the mixture. If you prefer a sweeter ice candy, add a little more sugar and stir until dissolved.
Helpful tip: For a more intense chocolate flavor, you can add another teaspoon of cocoa powder. Mix it thoroughly before proceeding.
Step 5: Warm the Mixture if Needed
If the cocoa or powdered milk has not dissolved completely, transfer the mixture to a saucepan.
Warm it over low heat for approximately 3–5 minutes, stirring continuously, until the mixture is smooth and the sugar has dissolved.
Do not allow it to boil vigorously or scorch at the bottom of the pan.
This step is optional if you have already blended the ingredients until completely smooth.
Step 6: Cool the Chocolate Mixture
If you warmed the mixture, remove the saucepan from the heat.
Allow it to cool, then refrigerate until thoroughly chilled. Cover the container while it cools to protect the mixture from contamination.
Important: Do not pour warm chocolate milk into plastic ice candy bags. Cool it completely first, and use bags designed for food storage and freezing.
Step 7: Fill the Ice Candy Bags
Arrange the clean ice candy bags upright in a tall cup or container to make filling easier.
Using a small funnel, measuring jug, or clean food-safe squeeze bottle, pour the chilled chocolate mixture into each bag.
Fill each bag to approximately three-quarters full, leaving enough room to tie or seal the top securely.
Avoid overfilling, as the liquid expands as it freezes.
Step 8: Seal the Bags
Carefully squeeze out excess air without spilling the mixture.
Tie each bag securely with a knot or seal it according to the manufacturer’s instructions.
Wipe away any chocolate mixture from the outside of the bags and check that each one is properly sealed.
If you’re using popsicle molds instead, pour the mixture into the molds, leaving a little expansion space, and secure the lids or sticks.
Step 9: Freeze Until Firm
Place the filled bags in a single layer on a flat tray so they freeze evenly.
Transfer the tray to the freezer and freeze for 6–8 hours, or preferably overnight, until the chocolate ice candies are completely firm.
Freezing time depends on the size of the bags, how cold the mixture was before freezing, and the temperature of your freezer.
For best food safety and quality, keep the freezer at 0°F (-18°C) or below.
Step 10: Serve and Enjoy
Once completely frozen, remove the desired number of ice candies from the freezer.
Allow each one to soften for a minute or two if necessary, then gently squeeze the frozen chocolate mixture toward the opening as you eat.
The result is a creamy, chocolatey frozen treat with a refreshing milk-and-cocoa flavor in every bite! 🍫❄️
Expert Tips for the Best Chocolate Ice Candy
Dissolve the cocoa thoroughly. Mixing cocoa with sugar and a little milk first helps prevent lumps.
Use a blender for a smoother mixture. Blending the liquid ingredients helps disperse the powdered milk and cocoa evenly.
Adjust the sweetness before freezing. Frozen desserts often taste less sweet than their unfrozen mixture.
Use whole milk for extra richness. If you prefer a lighter ice candy, lower-fat milk also works.
Chill before filling. Starting with a cold mixture helps it freeze more efficiently.
Leave room at the top of each bag. The mixture expands as it freezes, so don’t fill bags to the very top.
Keep the bags sealed tightly. Secure knots or proper seals help prevent leaks and protect the ice candy from freezer odors.
Freeze the bags flat at first. Once firm, you can rearrange them to save freezer space.
Avoid repeated thawing and refreezing. This can create larger ice crystals and affect the texture.
Keep everything clean. Use clean utensils, food-safe packaging, and freshly prepared ingredients for the best quality.
Delicious Variations
🍫 Extra-Chocolate Ice Candy
Add another tablespoon of cocoa powder and adjust the sugar to taste for a stronger chocolate flavor.
For an even richer version, add 1–2 tablespoons melted dark chocolate, cooled slightly before mixing.
🥛 Extra-Creamy Chocolate Ice Candy
Replace ½ cup of the liquid milk with additional evaporated milk. This creates a richer, milkier flavor.
🍪 Chocolate Cookies-and-Cream Ice Candy
Crush 4–5 chocolate sandwich cookies into small pieces and stir them into the chilled chocolate mixture before filling the bags.
Make sure the cookie pieces are small enough to fit comfortably through the bag opening.
🍌 Chocolate Banana Ice Candy
Blend one ripe banana into the milk mixture before filling the bags. The banana adds natural sweetness and a creamy texture, although the flavor will become more pronounced.
🥜 Chocolate Peanut Butter Ice Candy
Whisk in 2 tablespoons smooth peanut butter until fully incorporated. This creates a rich chocolate-and-peanut flavor.
☕ Mocha Ice Candy
Dissolve ½–1 teaspoon instant coffee granules in a tablespoon of warm milk, allow it to cool, and mix into the chocolate base for a gentle coffee flavor.
🍓 Chocolate Strawberry Ice Candy
Blend ¼ cup strawberry purée into the mixture for a fruity chocolate variation. For a layered appearance, prepare a separate strawberry milk mixture and add it in layers, freezing each layer until firm enough to support the next.
🍫 Chocolate Malt Ice Candy
Replace 1–2 tablespoons of the powdered milk with chocolate malted milk powder. Adjust the sugar because malted powder may already contain sweetener.
🌱 Dairy-Free Chocolate Ice Candy
Use an unsweetened plant-based milk, such as soy or oat milk, and choose a suitable dairy-free powdered milk alternative. Replace the evaporated milk with a compatible dairy-free alternative. The texture and flavor will vary depending on the products used.
What to Serve with Chocolate Ice Candy
This frozen treat is delicious on its own, but it can also be part of a fun dessert spread.
- Chocolate brownies: A rich chocolate pairing for serious chocolate lovers.
- Vanilla cupcakes: The light vanilla flavor balances the cocoa.
- Fresh strawberries or bananas: Fresh fruit complements the chocolate.
- Butter cookies: A crisp, buttery contrast to the frozen texture.
- Waffles or pancakes: Serve the ice candy alongside a sweet breakfast or dessert platter.
- Crushed nuts: Sprinkle a little over a serving plate if enjoying the mixture in a bowl.
- Fresh fruit salad: Adds color and freshness to a summer dessert table.
For a simple family treat, serve a frozen chocolate ice candy after lunch or enjoy one during a warm afternoon.
Make-Ahead Instructions
Chocolate Ice Candy is ideal for making ahead because the finished treats stay ready in the freezer.
Prepare the mixture in advance: Blend the ingredients until smooth, then refrigerate in a covered container and fill the bags once the mixture is cold.
Make a batch for the week: Portion the mixture into individual bags and freeze until fully solid.
For parties: Prepare the ice candies the day before and keep them frozen until serving. Take out only the quantity you need so the remaining bags stay frozen.
For a small selling business: Use consistent bag sizes, measure each portion accurately, seal securely, and keep the finished products continuously frozen. Follow applicable local food-handling and labeling requirements.
Storage and Freezing
Freezer Storage
Store the ice candies in their sealed bags or in a clean, covered freezer-safe container.
For the best flavor and texture, enjoy them within 4–6 weeks. They may remain frozen longer if continuously maintained at 0°F (-18°C) or below, but ice crystals and flavor changes can develop over time.
Preventing Freezer Burn
- Seal bags securely and remove excess air.
- Use packaging designed for food freezing.
- Keep the bags away from uncovered foods with strong odors.
- Avoid frequently opening the freezer for long periods.
- Do not refreeze ice candies that have fully thawed.
Can You Keep Them in the Refrigerator?
No, not as a finished frozen treat. The ice candy will melt in the refrigerator. Keep the prepared mixture chilled before filling and freezing, and store the completed ice candies in the freezer.
Frequently Asked Questions
Why is my chocolate ice candy icy instead of creamy?
The mixture contains more water relative to milk solids, or it may not have been blended thoroughly. Using whole milk, adding the powdered milk, and incorporating evaporated milk help create a richer texture.
Why does the powdered milk form lumps?
Powdered milk can clump if it’s added too quickly to cold liquid. Whisk it in gradually, or blend the mixture until smooth.
Can I use chocolate drink powder instead of cocoa powder?
Yes, but chocolate drink powders usually contain sugar and other ingredients, so the flavor and sweetness will change. Start with the same general amount and adjust the sugar to taste.
Can I reduce the sugar?
Yes. Reduce the sugar gradually and taste the mixture before freezing. However, sugar also affects the softness of frozen desserts, so a substantial reduction may make the ice candy harder.
Why did my ice candy freeze too hard?
Homemade ice candy naturally becomes firm in the freezer. Lower sugar and lower fat can also contribute to a harder texture. Let it soften briefly at room temperature before eating, rather than thawing it completely.
Can I make this recipe without evaporated milk?
Yes. You can replace it with an equal amount of liquid milk, although the finished ice candy may taste less rich.
Can I make the ice candy without a blender?
Absolutely. Whisk the ingredients thoroughly, taking care to dissolve the cocoa and powdered milk. Strain the mixture if small lumps remain.
How long does it take to freeze?
Small bags typically require 6–8 hours, although overnight freezing is more reliable. Larger portions or a crowded freezer may need longer.
Can I make this recipe for selling?
Yes. It can be a starting point for a homemade frozen-treat business. Standardize portion sizes, use food-safe bags, maintain proper freezing temperatures, and follow local food safety and business regulations. Test a few batches first to establish your preferred sweetness, texture, and cost per serving.
How do I make the chocolate flavor stronger?
Use a little more unsweetened cocoa powder or add a small amount of melted dark chocolate. Blend thoroughly, then adjust the sweetness if necessary.
Estimated Nutrition Information
Approximate nutrition per ice candy, assuming 12 servings and using whole milk:
- Calories: 90–120
- Protein: 3–5 g
- Carbohydrates: 13–18 g
- Fat: 3–5 g
- Sugar: 10–15 g
- Sodium: 50–100 mg
Actual nutrition will vary according to the milk fat content, powdered milk brand, exact amount of sugar, and portion size.
Final Thoughts
This Homemade Chocolate Ice Candy is a simple, refreshing way to turn everyday ingredients into a creamy frozen treat. The combination of liquid milk, powdered milk, cocoa, sugar, and evaporated milk gives it a lovely chocolate flavor that is both comforting and cooling.
It’s easy to customize, convenient to prepare in batches, and perfect for hot afternoons, family snacks, or a homemade frozen-dessert menu.
Whisk everything until smooth, fill your bags carefully, freeze overnight, and enjoy a delicious chocolate treat whenever the craving strikes! 🍫🍦🤎