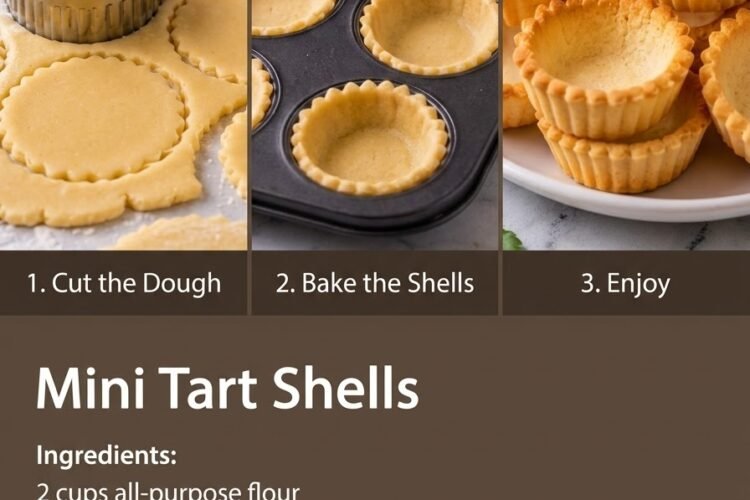
🥧 Mini Tart Shells Recipe — Buttery, Crisp & Perfect for Any Filling
These homemade Mini Tart Shells are delicate, buttery, lightly sweet, and wonderfully crisp—the perfect little pastry bases for all your favorite desserts! Made with simple ingredients like flour, cold butter, powdered sugar, egg yolk, and vanilla, they have a tender, melt-in-your-mouth texture that pairs beautifully with creamy and fruity fillings.
Whether you’re making mini fruit tarts, chocolate ganache tarts, lemon tarts, custard tartlets, or bite-sized cheesecakes, these versatile pastry shells are an essential recipe to keep in your baking collection.
The best part? You can prepare the shells ahead of time, bake them until lightly golden, and fill them whenever you’re ready to serve. They’re perfect for afternoon tea, celebrations, dessert tables, parties, and even small-batch bakery treats!
Recipe Information
- Prep Time: 20 minutes
- Chilling Time: 30–45 minutes
- Bake Time: 12–18 minutes
- Total Time: Approximately 1 hour 15 minutes
- Yield: Approximately 20–24 mini tart shells, depending on size
- Course: Baking Basics, Dessert
- Difficulty: Easy to Intermediate
- Baking Temperature: 350°F (175°C)
Ingredients
- 2 cups (250 g) all-purpose flour
- ½ cup (113 g) unsalted butter, cold and cubed
- ½ cup (60 g) powdered sugar, sifted
- 1 large egg yolk
- 1 teaspoon vanilla extract
- ¼ teaspoon salt
- 1–2 tablespoons cold water, only if needed
Instructions
Step 1: Combine the Dry Ingredients
In a large mixing bowl, whisk together the all-purpose flour, powdered sugar, and salt until evenly combined.
Sifting the powdered sugar beforehand helps remove lumps and creates a smoother pastry dough.
Step 2: Cut in the Cold Butter
Add the cold, cubed butter to the flour mixture.
Using your fingertips, a pastry cutter, or a food processor, work the butter into the dry ingredients until the mixture resembles fine breadcrumbs, with a few pea-sized pieces of butter remaining.
Work quickly to keep the butter cold. This helps create a tender, crumbly pastry that holds its shape during baking.
Step 3: Add the Egg Yolk and Vanilla
In a small bowl, lightly whisk together the egg yolk and vanilla extract.
Add this mixture to the flour and butter mixture. Use a fork or spatula to combine until the dough begins to form small clumps.
Gently press a little dough between your fingers. If it holds together, there’s enough moisture. If it remains dry and crumbly, add cold water, one teaspoon at a time, until the dough comes together.
Avoid adding too much water, as excess moisture can make the pastry tough.
Step 4: Bring the Dough Together
Turn the mixture onto a clean work surface and gently press it together with your hands.
Knead only briefly—just enough to bring the dough into a cohesive ball. Flatten it into a disc, wrap it tightly, and refrigerate for 30 minutes.
Chilling firms the butter, relaxes the gluten, and makes the dough easier to roll without excessive cracking or sticking.
Step 5: Prepare the Tartlet Molds
Lightly grease your mini tart pans or mini tartlet molds with butter if needed, especially if they are not nonstick.
Remove the chilled dough from the refrigerator. Let it sit at room temperature for a few minutes if it’s too firm to roll comfortably.
Place the dough between two sheets of parchment paper and roll it evenly to approximately ⅛ inch (3 mm) thick.
Step 6: Cut and Shape the Tart Shells
Use a round cookie cutter slightly larger than your tart molds to cut out circles of dough.
Gently place each circle into a mini tart pan, pressing the dough into the bottom and sides without stretching it. Stretching can cause the shells to shrink during baking.
Trim away the excess dough along the top edges using a small knife.
If the dough becomes soft or sticky while shaping, refrigerate the prepared shells for 10–15 minutes before baking.
Step 7: Prick the Bases
Prick the bottom of each pastry shell several times with a fork. This helps reduce puffing during baking.
For more precise, flat-bottomed shells, line each shell with a small piece of parchment paper and add pie weights or dried beans for blind baking.
Chill the shaped shells for another 10–15 minutes if your kitchen is warm or the dough has softened significantly.
Step 8: Blind Bake the Tart Shells
Preheat your oven to 350°F (175°C).
Arrange the tart molds on a baking sheet and bake for approximately 10–12 minutes with parchment and pie weights, until the edges begin to set.
Carefully remove the parchment and weights, then return the shells to the oven for another 3–6 minutes, or until the bases are dry and the pastry is lightly golden.
If you’re not using weights, bake the shells for approximately 12–18 minutes, watching closely and checking that the bases have set.
Smaller or shallower tart shells may bake more quickly, so use their color and texture as your guide.
Step 9: Cool Completely
Remove the tart shells from the oven and place the molds on a wire rack.
Allow the shells to cool completely before carefully removing them from their pans.
The pastry will be delicate while hot but will become firmer as it cools. Handle gently to avoid breaking the edges.
Step 10: Fill and Decorate
Once the shells have cooled, fill them with your favorite sweet fillings.
Try silky chocolate ganache, vanilla pastry cream, lemon curd, cheesecake filling, whipped cream with fresh fruit, or salted caramel.
For fillings that require refrigeration, assemble the tartlets and refrigerate them until ready to serve. To keep the shells crisp, fill them as close to serving time as practical, especially when using moist creams or fruit.
Your beautiful homemade mini tart shells are now ready to become delicious bite-sized desserts!
Tips for Perfect Mini Tart Shells
- Keep the butter cold. Cold butter is essential for a tender, crisp pastry.
- Measure the flour accurately. Too much flour can make the dough dry and difficult to shape.
- Use water sparingly. Add only enough to bring the dough together.
- Avoid overworking the dough. Excessive kneading can make the shells tough.
- Chill before baking. Cold pastry is less likely to shrink or lose its shape.
- Don’t stretch the dough into the molds. Gently ease it into the corners instead.
- Use pie weights when possible. They help keep the bases flat during blind baking.
- Watch the final baking stage carefully. Small shells can go from golden to overbaked very quickly.
- Cool before filling. Warm shells can melt chocolate, soften buttercream, or destabilize delicate cream fillings.
Delicious Filling Ideas
Chocolate Ganache Tartlets
Fill the cooled shells with chocolate ganache made from chopped chocolate and warm heavy cream. Chill until set and finish with chocolate shavings.
Fresh Fruit Tartlets
Pipe vanilla pastry cream into each shell and decorate with strawberries, blueberries, kiwi, or raspberries. Add a light apricot glaze for a glossy finish.
Lemon Curd Tartlets
Spoon smooth lemon curd into the cooled shells and garnish with a little lemon zest or a small swirl of whipped cream.
Mini Cheesecake Tartlets
Fill the shells with a thick no-bake cheesecake mixture and refrigerate until firm. Finish with berry sauce or fresh fruit.
Salted Caramel Tartlets
Pour cooled, thick caramel into each shell and finish with a pinch of flaky sea salt or a drizzle of melted chocolate.
Coconut Cream Tartlets
Fill with coconut pastry cream and garnish with toasted coconut flakes for a tropical-inspired dessert.
Make-Ahead and Storage Instructions
Make ahead: Prepare the dough up to 2 days in advance and keep it tightly wrapped in the refrigerator. Let it soften slightly before rolling and shaping.
Baked tart shells: Once completely cooled, store the unfilled shells in an airtight container at room temperature for up to 4–5 days in a cool, dry environment.
Freezing unfilled shells: Freeze completely cooled shells in a rigid, airtight container for up to 2 months for best quality. Separate layers with parchment paper to protect the delicate edges.
Freezing raw dough: Wrap the dough disc tightly and freeze for up to 2 months. Thaw overnight in the refrigerator before rolling.
Filled tartlets: Storage depends on the filling. Refrigerate tartlets containing pastry cream, whipped cream, cheesecake filling, or other perishable ingredients, and follow the filling’s recommended storage time.
Keeping shells crisp: Moist fillings can gradually soften pastry. For the crunchiest result, fill the shells shortly before serving.
Frequently Asked Questions
Why did my mini tart shells shrink?
Shrinking can occur when the dough is stretched into the molds, overworked, or insufficiently chilled. Gently fit the dough into the molds and allow it to chill before baking.
Why are my tart shells crumbly?
The dough may contain too little moisture or too much flour. Add cold water a teaspoon at a time until the dough holds together when pressed, and measure the flour carefully.
Why are the bottoms soggy?
The shells may be underbaked, or a moist filling may have soaked into the pastry. Bake until the bases are dry and lightly golden. For very wet fillings, consider brushing the cooled shells with a thin layer of melted chocolate and letting it set before adding the filling.
Can I make the tart shells without tartlet pans?
Yes. You can press small circles of dough into a lightly greased mini muffin pan to create shallow tartlet shells. Adjust the dough circles to fit each cavity and check the baking time early because the shells may be smaller or deeper.
Do I need to use pie weights?
Pie weights help the shells maintain their shape, especially if you want a flat base. For small, well-chilled shells, docking with a fork may be sufficient, but weights usually give more consistent results.
Can I make these shells savory?
Yes. Omit the powdered sugar, vanilla, and vanilla flavoring, then season the dough with a little black pepper or dried herbs. You may need to adjust the moisture slightly. This will produce a different, savory shortcrust pastry suitable for cheese or vegetable fillings.
How do I get evenly shaped tart shells?
Roll the dough to a consistent thickness and use a round cutter slightly larger than your molds. Trim the tops neatly and avoid stretching the dough as you press it into place.
Final Thoughts
These homemade Mini Tart Shells are a versatile baking essential for anyone who loves creating beautiful desserts. Their buttery flavor, delicate crispness, and subtle vanilla sweetness make them the perfect foundation for everything from glossy chocolate ganache to vibrant fresh fruit and creamy custard.
Prepare a batch ahead of time, store the shells until needed, and turn simple ingredients into elegant little desserts for parties, celebrations, or everyday treats.
Buttery, crisp, and ready for endless filling possibilities—these Mini Tart Shells are the perfect starting point for your next sweet creation! 🥧✨