🍰 Classic New York Cheesecake — Rich, Creamy & Perfectly Smooth
Nothing compares to a slice of Classic New York Cheesecake! With its buttery digestive biscuit crust, luxuriously thick cream cheese filling, and silky-smooth texture, this timeless dessert is the perfect choice for celebrations, dinner parties, holidays, or simply treating yourself to something special.
This traditional baked cheesecake is rich without being overly sweet, with a subtle hint of vanilla and a little tanginess from sour cream. A gentle water bath and slow cooling help create that signature dense yet creamy texture, while the golden biscuit base provides a delicious contrast in every bite.
Serve it plain for a classic bakery-style dessert, or add fresh berries, strawberry sauce, or a drizzle of caramel for an extra-special finish.
Recipe Information
- Prep Time: 25 minutes
- Bake Time: 70–85 minutes
- Cooling Time: 1–2 hours
- Chilling Time: At least 6 hours, preferably overnight
- Total Time: Approximately 9–11 hours
- Servings: 12 slices
- Course: Dessert
- Cuisine: American
- Difficulty: Intermediate
- Pan Size: 9-inch (23 cm) springform pan
Ingredients
For the Digestive Biscuit Crust
- 2 cups (200 g) digestive biscuits, finely crushed
- 6 tablespoons plus 1 teaspoon (90 g) unsalted butter, melted
- 2 tablespoons (25 g) granulated sugar
For the New York Cheesecake Filling
- 32 oz (900 g) full-fat cream cheese, softened to room temperature
- 1 cup (200 g) granulated sugar
- 4 large eggs, at room temperature
- 1 cup (240 g) full-fat sour cream, at room temperature
- ¼ cup (60 ml) heavy cream
- 2 tablespoons (16 g) all-purpose flour
- 2 teaspoons vanilla extract
- 1 tablespoon fresh lemon juice
- 1 teaspoon finely grated lemon zest, optional
- ¼ teaspoon salt
For Serving (Optional)
- Fresh strawberries, blueberries, or raspberries
- Strawberry or raspberry sauce
- Whipped cream
- Caramel sauce
- Powdered sugar, for a light dusting
Instructions
Step 1: Prepare the Oven and Pan
Preheat the oven to 325°F (160°C).
Lightly grease the sides of a 9-inch springform pan and line the bottom with parchment paper.
If you plan to use a water bath, wrap the outside of the pan securely with two layers of heavy-duty aluminum foil, extending the foil up the sides to help prevent water from entering.
Place a kettle of water on to heat for the water bath later.
Step 2: Make the Digestive Biscuit Crust
Place the digestive biscuits in a food processor and pulse until they become fine, even crumbs. Alternatively, place them in a sealed bag and crush them with a rolling pin.
Transfer the crumbs to a mixing bowl. Add the granulated sugar and melted butter, then stir until the mixture resembles damp sand and holds together when pressed.
Pour the mixture into the prepared springform pan.
Press the crumbs firmly over the bottom of the pan, creating an even layer. Use the flat bottom of a measuring cup to compact the crust, paying particular attention to the edges.
Bake for 8–10 minutes, then remove from the oven and allow it to cool slightly while you prepare the filling.
Step 3: Beat the Cream Cheese
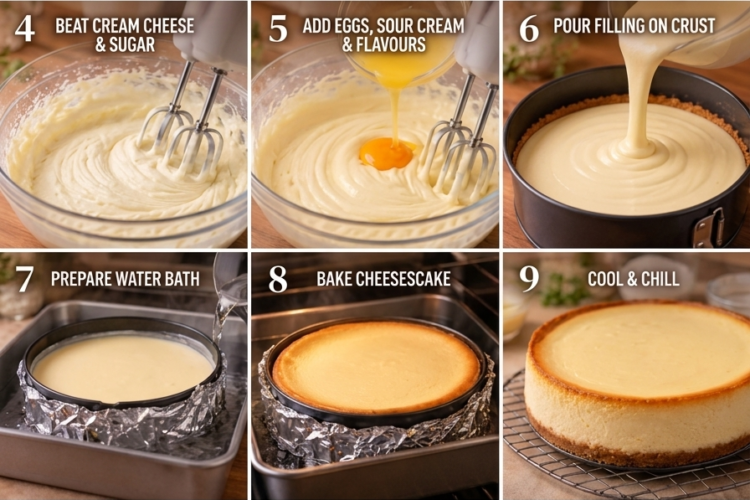
Place the softened cream cheese in a large mixing bowl.
Beat with an electric mixer on low to medium-low speed for approximately 2–3 minutes, until smooth and free of lumps. Scrape down the sides and bottom of the bowl as needed.
Add the granulated sugar and continue mixing until fully incorporated.
Important: Use room-temperature cream cheese and avoid beating at high speed. Overmixing can incorporate excess air, causing the cheesecake to puff up during baking and crack as it cools.
Step 4: Add the Sour Cream and Flavorings
Add the sour cream, heavy cream, vanilla extract, lemon juice, optional lemon zest, and salt.
Mix on low speed until the ingredients are evenly combined and the filling looks creamy.
The sour cream gives the cheesecake its characteristic gentle tang, while the lemon brightens the flavor without making the filling taste strongly of citrus.
Step 5: Incorporate the Eggs
Add the eggs one at a time, mixing on low speed after each addition until just incorporated.
Scrape down the bowl occasionally to ensure everything is blended evenly.
Avoid overmixing once the eggs are added. The finished filling should be thick, silky, and smooth, without large air bubbles.
Step 6: Add the Flour
Sift the flour over the cheesecake mixture and gently mix on low speed until no dry streaks remain.
The flour helps stabilize the filling and gives the cheesecake a dense, sliceable texture.
Do not continue mixing once the flour has been incorporated.
Step 7: Fill the Crust
Pour the cheesecake filling over the partially cooled biscuit crust.
Spread the surface evenly with a spatula and gently tap the pan against the countertop a few times to release any large air bubbles.
Smooth the top for an attractive finish.
Step 8: Prepare the Water Bath
Place the foil-wrapped springform pan inside a larger roasting pan.
Carefully pour hot water into the roasting pan until it reaches approximately halfway up the outside of the springform pan.
Avoid splashing water into the cheesecake or allowing it to rise above the foil.
The water bath helps maintain gentle, even heat and reduces the risk of overbaking and cracking. If you prefer not to use one, place a separate oven-safe dish filled with hot water on a lower rack and bake the cheesecake on the center rack. The result may be somewhat more prone to cracking.
Step 9: Bake the Cheesecake
Carefully transfer the roasting pan to the preheated oven.
Bake for approximately 70–85 minutes, checking toward the end of the baking time.
The edges should appear set, while the center should retain a slight wobble when the pan is gently moved. The cheesecake should not look liquid in the middle.
For food safety, the egg-containing center should reach 160°F (71°C). Check carefully with an instant-read thermometer, keeping in mind that continued baking and cooling can affect the final texture.
If the cheesecake is browning too quickly, loosely cover the top with foil.
Step 10: Cool Slowly in the Oven
Turn off the oven and open the door slightly.
Leave the cheesecake inside for approximately 45–60 minutes. This gradual cooling helps reduce the sudden temperature changes that can cause cracks.
Carefully remove the roasting pan from the oven. Lift the springform pan out of the water bath and remove the foil, taking care not to spill any water onto the crust.
Place the cheesecake on a wire rack and allow it to continue cooling until it reaches room temperature, approximately 1 hour.
Step 11: Chill Until Firm
Once the cheesecake has cooled, cover it and refrigerate for at least 6 hours, preferably overnight.
This chilling period is essential. It allows the filling to firm up, the flavors to develop, and the texture to become dense, smooth, and creamy.
For the cleanest slices, avoid removing the springform ring before the cheesecake is thoroughly chilled.
Step 12: Release and Decorate
Run a thin knife carefully around the inside edge of the pan to loosen the cheesecake.
Release the springform ring and transfer the cheesecake to a serving plate.
Leave it plain for a traditional New York-style presentation, or decorate with fresh berries, whipped cream, or a drizzle of fruit sauce.
Step 13: Slice and Serve
Dip a sharp knife into hot water, wipe it dry, and cut the cheesecake into slices. Clean and rewarm the knife between cuts for neat, professional-looking portions.
Serve chilled, allowing the rich cream cheese filling and buttery biscuit crust to shine.
Every slice should be thick, creamy, and beautifully set, with a smooth vanilla filling and a crisp, buttery base.
Tips for the Perfect New York Cheesecake
- Use full-fat cream cheese. It provides the rich flavor and dense, creamy texture associated with classic New York cheesecake.
- Bring ingredients to room temperature. This helps everything blend smoothly and reduces lumps.
- Mix gently. Excess air can make the cheesecake rise too much and crack as it cools.
- Press the crust firmly. A compact base is less likely to crumble when sliced.
- Use a water bath if possible. It helps the cheesecake bake evenly and stay moist.
- Avoid overbaking. The edges should be set while the center retains a slight wobble; use a thermometer to check food safety.
- Cool slowly. Gradual cooling helps prevent sudden shrinking and surface cracks.
- Chill overnight. The cheesecake becomes firmer, creamier, and easier to slice after a full night in the refrigerator.
- Use a warm knife for serving. This creates smooth edges and attractive slices.
Delicious Variations
Classic Vanilla New York Cheesecake
Omit the optional lemon zest and use the vanilla extract as the main flavor. This creates a simple, rich cheesecake with a traditional vanilla aroma.
Strawberry-Topped Cheesecake
Arrange fresh strawberries over the chilled cheesecake and drizzle with strawberry sauce just before serving.
Blueberry Cheesecake
Top the cheesecake with fresh blueberries or a homemade blueberry sauce for a fruity contrast to the creamy filling.
Chocolate Swirl Cheesecake
Melt 3 oz (85 g) dark chocolate and cool slightly. Swirl it gently through a small portion of the filling before baking for a marbled chocolate finish.
Caramel Pecan Cheesecake
Drizzle caramel sauce over the chilled cheesecake and sprinkle with chopped toasted pecans for a rich, nutty variation.
Lemon New York Cheesecake
Increase the lemon zest to 2 teaspoons and add an extra teaspoon of lemon juice for a brighter citrus note.
Chocolate Biscuit Crust
Replace the digestive biscuits with finely crushed chocolate sandwich cookies. Reduce or adjust the butter as needed, especially if the cookies contain a creamy filling.
What to Serve with Classic New York Cheesecake
This cheesecake is rich enough to serve on its own, but it also pairs beautifully with fresh fruit and simple toppings.
- Fresh strawberries or raspberries: Their slight tartness balances the creamy filling.
- Berry sauce: Adds color and a bright fruit flavor.
- Whipped cream: Provides a light contrast to the dense cheesecake.
- Caramel sauce: Creates a sweet, buttery finish.
- Espresso or black coffee: Balances the richness with a roasted flavor.
- Fresh mint leaves: Add a decorative touch when serving with berries.
For a classic bakery-style presentation, serve a plain slice with a small spoonful of berry sauce on the side.
Make-Ahead and Storage Instructions
Make ahead: Prepare the cheesecake one day before serving and refrigerate overnight. For the best flavor and texture, allow it to chill completely before decorating.
Refrigerator: Keep the cheesecake covered and refrigerated at 40°F (4°C) or below. Consume within 3–4 days for the best quality.
Freezer: Freeze individual slices or the whole chilled cheesecake without fresh fruit toppings. Wrap tightly and store in a freezer-safe container for up to 2 months for best quality. Thaw overnight in the refrigerator before serving.
Serving safety: Do not leave cheesecake at room temperature for more than 2 hours. Return leftovers to the refrigerator promptly.
Frequently Asked Questions
Why did my cheesecake crack?
Cracks can develop from overmixing, overbaking, sudden temperature changes, or cooling too quickly. Use room-temperature ingredients, mix gently, avoid overbaking, and cool the cheesecake gradually in the oven.
Why is my cheesecake grainy?
Graininess can occur if the cream cheese was too cold, the ingredients were not mixed smoothly, or the filling was overbaked. Softened cream cheese and gentle mixing help produce a smoother texture.
Can I make this cheesecake without a water bath?
Yes. You can bake it without one, although the surface may be more prone to cracking and the edges may bake more quickly. An additional pan of hot water on a lower rack can help add moisture to the oven.
Can I use cream cheese straight from the refrigerator?
It’s best to let the cream cheese soften first. Cold cream cheese can leave lumps that are difficult to remove without overmixing the filling.
Why is the middle still wobbly?
A slight wobble is normal when the cheesecake comes out of the oven. The filling continues to set as it cools and chills. It should not look liquid in the center, and the egg-containing filling should reach 160°F (71°C) for food safety.
Can I replace sour cream with Greek yogurt?
Yes. Full-fat plain Greek yogurt can be used in the same quantity. The flavor may be slightly tangier, and the texture may differ a little depending on the yogurt’s thickness.
How do I remove the cheesecake from the pan without breaking it?
Chill the cheesecake thoroughly first. Run a thin knife around the inside edge, then release the springform ring slowly. Use the parchment-lined base or a cake lifter to help transfer the cheesecake if needed.
Can I make this cheesecake a day ahead?
Absolutely. In fact, overnight chilling is highly recommended. It gives the cheesecake time to firm up properly and makes slicing and serving much easier.
Final Thoughts
Classic New York Cheesecake is a timeless dessert beloved for its rich cream cheese filling, buttery biscuit crust, and luxurious texture. With quality ingredients, gentle mixing, careful baking, and plenty of chilling time, you can create a beautiful homemade cheesecake that looks and tastes like it came from a professional bakery.
Serve it plain for an elegant classic or dress it up with berries, chocolate, or caramel for a special occasion.
Thick, creamy, smooth, and irresistibly rich—this Classic New York Cheesecake is a dessert worth every delicious bite! 🍰🤍