🍨 Homemade Neapolitan Ice Cream
Three Classic Flavors in One Beautiful Scoop: Vanilla, Chocolate, and Strawberry!
Why choose one ice cream flavor when you can enjoy three? This Homemade Neapolitan Ice Cream brings together creamy vanilla, rich chocolate, and sweet strawberry in one beautiful frozen dessert.
Made with a simple no-churn ice cream base, this recipe requires no ice cream machine, no complicated cooking, and no special equipment. Cold whipping cream creates a light, airy texture, while sweetened condensed milk adds richness and sweetness. The mixture is divided into three portions, each flavored separately, then layered together to create the familiar Neapolitan look.
It’s a wonderful treat for summer afternoons, birthday parties, family gatherings, or whenever you’re craving a classic scoop-shop dessert at home!
Recipe Information
- Prep Time: 20 minutes
- Cook Time: None
- Freezing Time: 6–8 hours, preferably overnight
- Total Time: Approximately 6 hours 20 minutes
- Servings: 8–10
- Course: Dessert
- Difficulty: Easy
- Method: No-churn, no ice cream maker required
Ingredients
For the Ice Cream Base
- 2 cups (500 ml) whipping cream, very cold
- 1 cup (250 ml) sweetened condensed milk
- 1 teaspoon (5 ml) vanilla extract
For the Chocolate Flavor
- 2 tablespoons unsweetened cocoa powder
- 30 g (about 1 oz) dark or semi-sweet chocolate, melted and cooled slightly, optional for extra richness
- 1 tablespoon milk or cream, if needed to make the cocoa smooth
For the Strawberry Flavor
- 3 tablespoons strawberry jam or preserves
- 1 tablespoon freeze-dried strawberry powder, optional, for stronger strawberry flavor
- 1–2 drops red or pink food coloring, optional
For the Vanilla Flavor
- One-third of the prepared ice cream base
The base ingredients make all three flavors. The chocolate and strawberry additions are divided into separate portions of the base to create the classic Neapolitan combination.
Instructions
Step 1: Chill Your Equipment
Place a large mixing bowl and the beaters of your electric mixer in the refrigerator or freezer for about 10–15 minutes.
Make sure the whipping cream is very cold. Cold cream whips faster and holds its shape better, which helps produce a light, creamy no-churn ice cream.
Prepare a standard loaf pan or a freezer-safe container of approximately 9 × 5 inches (23 × 13 cm). A shallow container makes it easier to create neat layers.
Step 2: Whip the Cream
Pour the cold whipping cream into the chilled mixing bowl.
Using an electric mixer, beat on medium-high speed until the cream forms stiff peaks. When you lift the beaters, the cream should hold its shape without drooping significantly.
Watch carefully toward the end. Overwhipped cream can become grainy, so stop once it is thick, fluffy, and stable.
Step 3: Make the Ice Cream Base
Pour the sweetened condensed milk into a separate bowl and stir in the vanilla extract.
Add approximately one-third of the whipped cream to the condensed milk and fold gently to lighten the mixture.
Add the remaining whipped cream in two additions, folding with a silicone spatula until the mixture is smooth, airy, and evenly combined.
Use gentle folding motions rather than vigorous stirring so you preserve as much air as possible.
Step 4: Divide the Base into Three Portions
Divide the ice cream mixture evenly among three separate bowls.
Each portion will become one of the classic flavors:
- Vanilla
- Chocolate
- Strawberry
Try to keep the quantities as equal as possible so the finished ice cream has balanced layers.
Step 5: Prepare the Vanilla Ice Cream
The vanilla portion is already flavored with vanilla extract, so it requires no additional ingredients.
Fold it gently once or twice to make sure it remains smooth and uniform.
Set it aside while you prepare the other flavors.
Step 6: Prepare the Chocolate Ice Cream
Place the cocoa powder in a small bowl. Add the tablespoon of milk or cream, if needed, and mix into a smooth paste without lumps.
Add the cocoa mixture to the second portion of ice cream base. Fold gently until the color becomes evenly chocolate-brown.
For a richer chocolate flavor, fold in the cooled melted chocolate. Make sure the chocolate is not hot, as heat can soften the whipped cream. Add it in a thin stream while folding gently to prevent hard chocolate clumps from forming.
The chocolate portion should look smooth, creamy, and evenly colored.
Step 7: Prepare the Strawberry Ice Cream
Add the strawberry jam or preserves to the third portion of the ice cream base.
Fold gently until the strawberry flavor is evenly distributed and the mixture becomes pale pink. For a stronger berry flavor and a more pronounced color, add the optional freeze-dried strawberry powder and a drop or two of food coloring.
If your jam contains large pieces of fruit, chop them finely before adding them so the strawberry layer freezes evenly.
Avoid adding a large amount of watery fresh strawberry puree, as excess water can create ice crystals and make the finished ice cream harder.
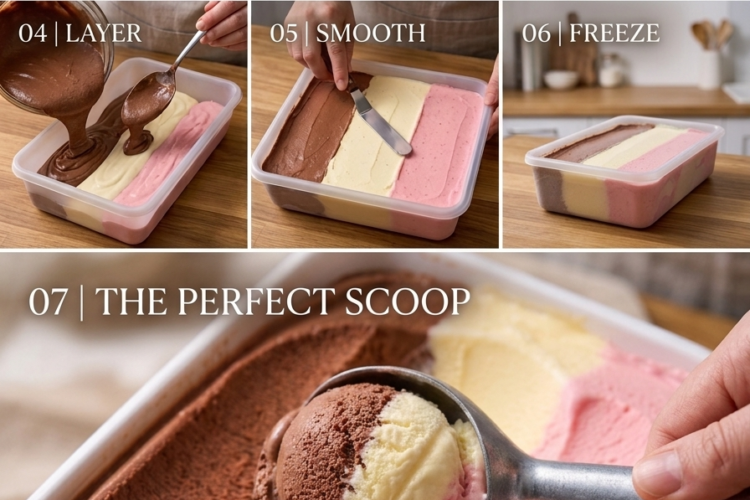
Step 8: Create the Neapolitan Layers
Spoon the vanilla ice cream mixture into one-third of the prepared freezer container. Spread it gently into an even layer.
Add the chocolate ice cream mixture beside or over the vanilla layer, depending on the shape of your container. Spread it carefully, keeping the layers as distinct as possible.
Finish with the strawberry mixture, smoothing the top with a spatula.
For the traditional appearance, create three clearly defined sections of vanilla, chocolate, and strawberry. Alternatively, layer the flavors from bottom to top for an attractive layered dessert.
Tip: Work gently when spreading the mixtures. Too much pressure can mix the colors and blur the separate flavors.
Step 9: Cover and Freeze
Cover the container tightly with a lid or plastic wrap pressed close to the surface of the ice cream.
Place it in the freezer for at least 6–8 hours, preferably overnight, until completely firm.
Keep the container level while freezing so the three flavors remain neatly arranged.
Step 10: Soften Slightly Before Scooping
Remove the ice cream from the freezer and let it stand at room temperature for approximately 3–5 minutes, depending on how firm it is.
Dip an ice cream scoop into warm water, wipe it dry, and scoop across the three flavors to create the classic Neapolitan combination in each serving.
Serve in bowls, cones, or alongside your favorite desserts.
Enjoy the creamy vanilla, rich chocolate, and sweet strawberry flavors together!
Tips for the Best Homemade Neapolitan Ice Cream
- Keep the cream cold: Cold whipping cream provides better volume and a smoother texture.
- Whip to stiff peaks: Underwhipped cream can leave the ice cream too soft, while overwhipped cream may become grainy.
- Fold gently: Preserve the air in the whipped cream for a lighter consistency.
- Use thick strawberry preserves: Thick jam contributes strawberry flavor without introducing excess moisture.
- Cool the melted chocolate: Hot chocolate can melt the whipped cream and create uneven layers.
- Spread each flavor carefully: Gentle handling keeps the three colors separate.
- Cover tightly: Limiting exposure to air helps prevent freezer burn and ice crystals.
- Freeze completely: Allow sufficient time for the ice cream to firm up before scooping.
Delicious Variations
🍓 Extra-Strawberry Neapolitan Ice Cream
Add another teaspoon of freeze-dried strawberry powder to the strawberry layer for a more intense berry flavor.
🍫 Double Chocolate Ice Cream
Add an extra tablespoon of cocoa powder or a little more melted dark chocolate for a richer chocolate section.
🍦 Vanilla Bean Ice Cream
Replace the vanilla extract with the seeds from half a vanilla bean for a naturally speckled vanilla layer.
🍪 Cookie Neapolitan Ice Cream
Fold finely crushed chocolate cookies into the chocolate portion for added crunch.
🥜 Chocolate Peanut Butter Ice Cream
Swirl 1–2 tablespoons of smooth peanut butter into the chocolate portion before layering.
🍓 Strawberry Ripple Ice Cream
Reserve a tablespoon of strawberry jam and gently swirl it through the strawberry layer just before freezing.
How to Serve Neapolitan Ice Cream
This homemade ice cream is delicious on its own, but you can make it extra special with:
- Chocolate sauce or strawberry syrup
- Waffle cones or sugar cones
- Crushed cookies or chocolate sprinkles
- Fresh strawberries
- Brownies or chocolate cake
- Warm fruit crumble
- Chopped toasted nuts
For a classic dessert-shop presentation, serve three small scoops—one of each flavor—in a bowl or cone.
You can also place a slice of Neapolitan ice cream between two cookies to make colorful homemade ice cream sandwiches.
Make-Ahead Instructions
This recipe is ideal for preparing in advance.
Make the ice cream a day before serving, freeze it overnight, and keep it covered until ready to use. The longer freezing period gives the mixture time to set properly and makes scooping easier.
For parties, scoop the ice cream into individual dessert cups shortly before serving, then keep them in the freezer until needed.
Storage Instructions
- Freezer: Store the ice cream in a tightly sealed, freezer-safe container for up to 2 weeks for the best flavor and texture.
- Prevent ice crystals: Press plastic wrap directly against the surface before closing the lid, if practical.
- Serving: Let the ice cream soften slightly before scooping, but return the container to the freezer promptly.
- Avoid repeated thawing: Repeated softening and refreezing can create ice crystals and make the texture less creamy.
Frequently Asked Questions
Do I need an ice cream maker?
No! This is a no-churn recipe. Whipped cream provides the airy texture, while sweetened condensed milk helps keep the ice cream creamy without traditional churning.
Why is my homemade ice cream icy?
The cream may not have been whipped enough, the mixture may have been overmixed, or the strawberry flavoring may have contained too much water. Use very cold cream, fold gently, and choose thick strawberry preserves rather than watery puree.
Can I use fresh strawberries?
Yes, but they are best prepared into a thick strawberry sauce first. Cook the chopped strawberries briefly until some of their moisture evaporates, then cool completely before adding a small amount to the base. This helps reduce ice crystals.
Can I make the ice cream less sweet?
Sweetened condensed milk is essential to this easy no-churn base, so reducing it substantially can change the texture. You can balance the sweetness with unsweetened cocoa powder or use a less-sweet strawberry preserve, but avoid major changes to the base ratio.
Can I use a different container?
Absolutely. A loaf pan, freezer-safe glass dish, or plastic container with a tight-fitting lid works well. Choose a shallow, wide container for faster freezing and easier scooping.
How do I keep the flavors separate?
Make sure each portion is thick and fluffy before layering. Spoon the mixtures into the container carefully and avoid stirring the three flavors together.
Three Flavors, One Delicious Dessert! 🍨❤️
This Homemade Neapolitan Ice Cream combines three timeless favorites—vanilla, chocolate, and strawberry—in one beautiful frozen treat. The creamy no-churn base makes it easy to prepare, while the three distinct flavors create a classic dessert that everyone can enjoy.
Whether you’re serving it at a family gathering, creating an ice cream sundae bar, or simply treating yourself on a warm day, this recipe brings homemade ice cream-shop magic straight to your freezer.
Whip it, flavor it, layer it, and freeze it until creamy perfection—then scoop yourself a little taste of all three!