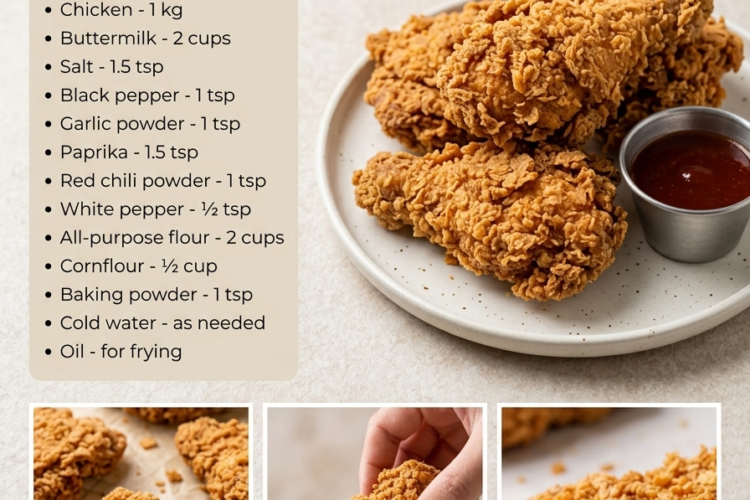
🍗 Crispy Fried Chicken (Restaurant Style)
Golden, Extra-Crispy, Juicy, and Packed with Flavor!
Craving that irresistible restaurant-style fried chicken with a crunchy, craggy crust and tender, juicy meat inside? This homemade Crispy Fried Chicken delivers all that and more! Chicken is marinated in seasoned buttermilk, coated in a flavorful flour and cornflour mixture, and deep-fried until beautifully golden and deliciously crisp.
The secret to that signature crunch is a combination of buttermilk marination, a well-seasoned coating, and little crispy flour flakes that form during dredging. The result is flavorful chicken with a satisfying crunch in every bite.
Serve it with fries, coleslaw, mashed potatoes, or your favorite dipping sauce for a restaurant-style meal right at home!
Recipe Information
- Prep Time: 20 minutes
- Marinating Time: 2–4 hours
- Cook Time: 15–25 minutes per batch, depending on the chicken pieces
- Total Time: Approximately 2½–5 hours
- Servings: 4–6
- Course: Main Course, Lunch, Dinner
- Cuisine: American-inspired
- Difficulty: Moderate
- Cooking Method: Deep-frying
Ingredients
For the Chicken Marinade
- 1 kg chicken, cut into medium-sized pieces
- 2 cups (480 ml) buttermilk
- 1 teaspoon salt
- ½ teaspoon black pepper
- ½ teaspoon garlic powder
- ½ teaspoon paprika
- ½ teaspoon red chili powder
- ¼ teaspoon white pepper
For the Crispy Coating
- 2 cups (250 g) all-purpose flour
- ½ cup (60 g) cornflour (cornstarch)
- 1 teaspoon baking powder
- ½ teaspoon salt, or to taste
- ½ teaspoon black pepper
- ½ teaspoon garlic powder
- 1 teaspoon paprika
- ½ teaspoon red chili powder
- ¼ teaspoon white pepper
- Cold water, as needed to create crispy flakes
For Deep-Frying
- Neutral cooking oil, such as sunflower, canola, or vegetable oil, enough to fill a heavy pot about one-third to halfway full
Note: This recipe works with bone-in chicken pieces or boneless chicken. Bone-in pieces generally require longer cooking, while smaller boneless pieces cook faster.
Instructions
Step 1: Prepare the Chicken
Pat the chicken pieces dry with paper towels. If the pieces are particularly large, make a shallow cut through the thickest part of the meat to help the marinade penetrate and promote even cooking.
Place the chicken in a large bowl or food-safe container.
Use pieces of similar size where possible so they cook at a similar rate.
Step 2: Make the Buttermilk Marinade
Pour the buttermilk over the chicken. Add the salt, black pepper, garlic powder, paprika, red chili powder, and white pepper.
Mix thoroughly, making sure every piece is coated with the seasoned buttermilk.
Cover the bowl and refrigerate for at least 2 hours, or up to 4 hours for deeper flavor. Keep the chicken refrigerated throughout marinating; do not leave it at room temperature.
The buttermilk adds flavor and helps tenderize the chicken, while the spices season the meat from the outside in.
Step 3: Prepare the Seasoned Flour
In a large shallow bowl, combine the all-purpose flour, cornflour, baking powder, salt, black pepper, garlic powder, paprika, red chili powder, and white pepper.
Whisk thoroughly until the spices are evenly distributed.
The cornflour helps produce a lighter, crispier coating, while the baking powder encourages a rough, craggy texture.
Step 4: Create the Crispy Flour Flakes
This step helps recreate that extra-crunchy restaurant-style crust.
Drizzle 1–2 tablespoons of cold water into the seasoned flour mixture, a little at a time. Rub the mixture gently with your fingertips to form small, irregular clumps.
These little flour flakes cling to the chicken during coating and fry into delicious crunchy pieces.
Avoid adding too much water. You want a mostly dry flour mixture with scattered small clumps—not a wet batter.
Step 5: Coat the Chicken
Remove one piece of chicken from the buttermilk marinade, allowing excess liquid to drip off without wiping the chicken dry.
Place it in the seasoned flour mixture and press the coating firmly onto all sides, making sure the surface is thoroughly covered.
For a thicker crust, dip the coated chicken briefly back into the buttermilk, then return it to the flour mixture and press the coating on again.
Shake off only the loose excess flour and place the coated piece on a clean tray.
Repeat with the remaining chicken, working carefully to maintain an even coating.
Step 6: Let the Coating Set
Allow the coated chicken to rest on the tray for 10–15 minutes before frying.
This helps the flour hydrate slightly and adhere to the chicken, reducing the likelihood of the crust falling off during cooking.
While the chicken rests, prepare a wire rack set over a baking tray for draining the cooked pieces.
Step 7: Heat the Oil
Pour the oil into a heavy-bottomed pot or Dutch oven. Avoid filling the pot more than halfway, as the oil will bubble as the chicken cooks.
Heat the oil to 325–350°F (163–177°C), using a kitchen thermometer to monitor the temperature.
For larger bone-in pieces, aim closer to 325°F (163°C) to give the center time to cook without excessively darkening the crust. Smaller boneless pieces can generally be cooked closer to 350°F (177°C).
Never leave hot oil unattended, and keep water away from the pot.
Step 8: Fry the Chicken in Batches
Carefully lower a few chicken pieces into the hot oil using metal tongs. Do not overcrowd the pot, because adding too many pieces at once can lower the oil temperature and make the coating greasy.
Fry the chicken, turning occasionally, until the coating is golden brown and crisp.
Approximate cooking times will vary:
- Small boneless pieces: About 8–12 minutes
- Boneless thighs or thick strips: About 10–15 minutes
- Bone-in drumsticks: About 12–18 minutes
- Bone-in thighs or larger pieces: About 15–25 minutes
These times are estimates only. Piece size, bone structure, oil temperature, and the type of pot all affect cooking time.
Maintain a steady oil temperature and allow it to recover between batches.
Step 9: Check That the Chicken Is Fully Cooked
Check the thickest part of each piece with a food thermometer, avoiding contact with the bone.
Chicken must reach an internal temperature of 165°F (74°C) for safe consumption. Larger bone-in pieces may need extra time even when the outside is already golden.
If the coating browns too quickly, reduce the heat slightly and continue frying until the center reaches the required temperature.
Step 10: Drain the Chicken
Carefully remove the cooked chicken using tongs or a spider strainer, allowing excess oil to drip back into the pot.
Place the pieces on the prepared wire rack rather than stacking them or covering them tightly. This allows steam to escape and helps preserve the crispy crust.
Let the chicken rest for approximately 5 minutes before serving.
Step 11: Serve Hot and Crispy
Arrange the chicken on a serving platter and serve immediately while the coating is crunchy and the meat is juicy.
Pair it with French fries, coleslaw, mashed potatoes, corn on the cob, or your favorite dipping sauce for a complete restaurant-style meal.
Enjoy every golden, crunchy bite!
Tips for the Crispiest Restaurant-Style Chicken
- Marinate for flavor: At least 2 hours in buttermilk helps season and tenderize the chicken.
- Use cornflour: Cornstarch helps create a lighter, crispier crust.
- Create flour clumps: A little cold water rubbed into the seasoned flour forms crunchy flakes on the finished chicken.
- Press the coating firmly: Make sure the flour mixture adheres to every surface.
- Let the coating rest: A short rest helps prevent the crust from separating during frying.
- Fry in small batches: This helps maintain the correct oil temperature.
- Use a thermometer: Check both the oil temperature and the chicken’s internal temperature.
- Drain on a wire rack: This keeps the underside from becoming soggy.
- Avoid overcrowding: Proper spacing lets the chicken brown evenly.
- Season thoughtfully: The marinade and coating both contain salt, so adjust carefully to avoid over-seasoning.
Delicious Variations
🌶️ Spicy Crispy Fried Chicken
Increase the red chili powder or add ½ teaspoon cayenne pepper to the flour mixture for a fiery coating.
🧄 Garlic Pepper Fried Chicken
Add extra black pepper and ½ teaspoon additional garlic powder for a bold, savory flavor.
🍯 Hot Honey Fried Chicken
Drizzle the freshly fried chicken with hot honey just before serving for a delicious sweet-and-spicy contrast.
🍗 Extra-Crunchy Double-Coated Chicken
Use the flour–buttermilk–flour method and gently press the final coating onto the chicken. This creates a thicker crust with plenty of crispy flakes.
🌿 Herb-Seasoned Fried Chicken
Add dried thyme, oregano, or a little mixed Italian seasoning to the flour mixture for a fragrant variation.
🥪 Crispy Chicken Sandwich
Place a boneless fried chicken piece on a toasted bun with lettuce, pickles, and mayonnaise or spicy sauce.
What to Serve with Crispy Fried Chicken
This chicken pairs beautifully with classic comfort-food sides:
- French fries or potato wedges
- Creamy coleslaw
- Mashed potatoes and gravy
- Macaroni and cheese
- Corn on the cob
- Biscuits or cornbread
- Pickles and sliced onions
- Garlic mayo, ranch, or spicy dipping sauce
For a complete restaurant-style meal, serve the chicken with fries, coleslaw, and a creamy garlic dipping sauce.
Make-Ahead Instructions
Prepare the marinade ahead: Mix the buttermilk and spices and refrigerate until ready to use. Keep the raw chicken covered and refrigerated during marinating.
Prepare the coating ahead: Measure and mix the dry coating ingredients in advance. Add the cold water to create flour flakes shortly before coating the chicken.
Best serving tip: Fry the chicken just before serving for maximum crispness. If necessary, keep finished pieces on a wire rack in an oven set to approximately 200°F (95°C) while cooking the remaining batches.
Storage and Reheating
Refrigeration: Store cooked chicken in a shallow airtight container in the refrigerator within 2 hours. Use within 3–4 days.
Oven reheating: Place the chicken on a wire rack over a baking tray and reheat at 375°F (190°C) until hot throughout. Check that the center reaches 165°F (74°C).
Air fryer reheating: Reheat at approximately 350°F (175°C) until the coating becomes crisp and the chicken is thoroughly hot.
Microwave: You can microwave leftovers, but the coating will become softer rather than crisp.
Freezing: Freeze fully cooked and cooled chicken in airtight freezer-safe packaging for up to 2–3 months for best quality. Thaw in the refrigerator and reheat thoroughly.
Frequently Asked Questions
Why is my fried chicken not crispy?
The oil may be too cool, the pot may be overcrowded, or the coating may be too wet. Keep the oil within the recommended temperature range, fry in batches, and drain the chicken on a wire rack.
Why does the coating fall off?
Excess liquid, insufficient coating pressure, or moving the chicken too much during the early stages of frying can cause the crust to separate. Allow excess marinade to drip off, press on the coating firmly, and let it rest before frying.
Can I use regular milk instead of buttermilk?
Yes. For a simple substitute, mix 2 cups milk with 2 tablespoons lemon juice or white vinegar and let it stand for 5–10 minutes before using. The flavor and texture may differ slightly from true buttermilk.
Can I use only chicken breasts?
Yes. Cut them into evenly sized strips or pieces to help them cook evenly. Boneless breast meat cooks faster than bone-in chicken, so monitor the internal temperature and avoid overcooking.
Can I make this chicken without deep-frying?
Yes. You can cook the coated chicken in an air fryer, lightly spraying the crust with oil before cooking. The texture may differ slightly from traditional deep-frying, but it can still become nicely crisp.
How do I prevent the chicken from becoming greasy?
Keep the oil hot enough, avoid overcrowding the pot, and let the oil recover between batches. Drain each batch on a wire rack rather than leaving the chicken sitting in excess oil.
The Ultimate Homemade Crispy Fried Chicken! 🍗🔥
This Restaurant-Style Crispy Fried Chicken brings together tender buttermilk-marinated chicken, bold seasoning, and a crunchy flour-and-cornflour coating for a delicious homemade version of a fast-food favorite.
The combination of spices, crispy flour flakes, and carefully controlled frying creates chicken that’s golden on the outside and juicy in the middle.
Marinate it, coat it, fry it until beautifully crisp, and enjoy restaurant-style fried chicken straight from your own kitchen!