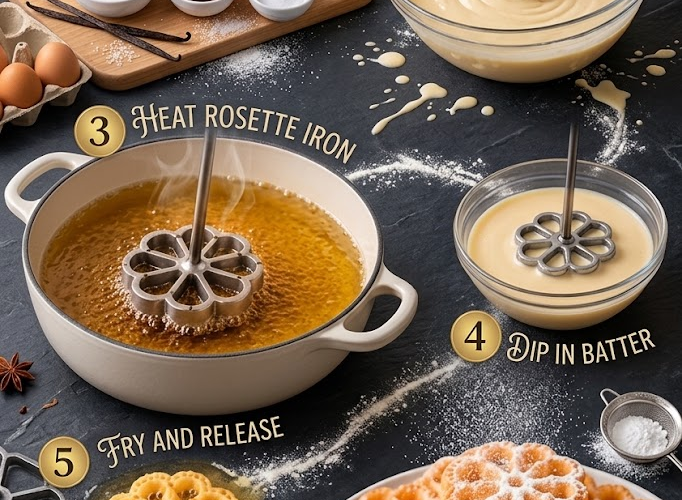
🌸 Crispy Rosette Cookies
Delicate, golden, and wonderfully crisp, these traditional Rosette Cookies are made by dipping a decorative iron into a light batter and deep-frying it until beautifully golden.
With their intricate flower-like shape and delicate crunch, these cookies are as pretty as they are delicious. A light dusting of powdered sugar adds the perfect finishing touch.
They’re wonderful for holidays, celebrations, afternoon tea, cookie trays, and homemade gifts.
Recipe Information
Prep Time: 15 minutes
Resting Time: 20–30 minutes
Frying Time: 20–30 minutes
Total Time: About 1 hour
Yield: 20–30 cookies
Difficulty: Easy–Intermediate
Method: Deep-Fried
Ingredients
- 1 cup (125 g) all-purpose flour
- ½ cup (120 ml) milk
- 1 large egg
- 2 tablespoons (25 g) granulated sugar
- ½ teaspoon vanilla extract
- Pinch of salt
- Vegetable oil, for deep-frying
- Icing sugar, for dusting
Special Equipment
- Rosette cookie iron or rosette mold
- Deep, heavy-bottomed saucepan or deep fryer
- Slotted spoon
- Paper towels
- Wire rack
Instructions
1. Make the Batter
In a medium mixing bowl, whisk together the egg, milk, sugar, vanilla extract, and salt until smooth.
Gradually add the flour, whisking continuously.
Mix until you have a smooth, thin batter with a consistency similar to heavy cream.
Don’t overmix.
2. Rest the Batter
Cover the bowl and let the batter rest for 20–30 minutes.
This allows the flour to hydrate and helps produce crisp, delicate cookies.
Give the batter a gentle stir before frying.
3. Heat the Oil
Pour approximately 2–3 inches (5–7.5 cm) of vegetable oil into a deep, heavy-bottomed saucepan.
Heat the oil to approximately 350–375°F (175–190°C).
Use a kitchen thermometer for the most reliable results.
Maintain the temperature throughout frying.
4. Heat the Rosette Iron
Place the clean rosette iron into the hot oil for approximately 1–2 minutes.
The iron needs to be thoroughly hot before dipping it into the batter.
This is one of the most important steps for getting the batter to release properly.
5. Dip the Hot Iron Into the Batter
Remove the hot iron from the oil and allow excess oil to drip off briefly.
Dip the hot iron into the batter, making sure the batter coats the sides and bottom of the mold.
Do not cover the top edge of the mold with batter.
If the batter covers the top, the cookie may become difficult to release from the iron.
6. Fry the Rosette
Immediately place the battered iron back into the hot oil.
Hold it near the surface of the oil and allow the cookie to begin frying.
After approximately 10–20 seconds, gently jiggle the iron.
The cookie should begin to release.
If necessary, use a fork to gently encourage it off the mold.
7. Continue Frying
Once released, fry the rosette for another 30–60 seconds, turning it if necessary.
Cook until beautifully golden and crisp.
Avoid letting the cookies become too dark.
8. Drain
Remove the finished rosette with a slotted spoon or spider strainer.
Transfer it to a wire rack lined underneath with paper towels to catch excess oil.
Allow it to drain and cool.
9. Repeat
Before making each new cookie, place the rosette iron back into the hot oil for approximately 30–60 seconds to reheat it.
Then repeat the dipping and frying process.
Keep the oil temperature as consistent as possible.
10. Dust With Icing Sugar
Once the cookies have cooled completely, arrange them on a serving platter.
Generously dust with icing sugar just before serving.
For a festive presentation, you can also drizzle them lightly with melted chocolate.
⭐ Chef’s Tips
Keep the iron hot
A properly heated iron is essential. If it’s too cool, the batter won’t adhere properly.
Don’t dip too deeply
Only coat the sides and bottom of the mold. Batter covering the top can prevent the cookie from releasing.
Maintain the oil temperature
Oil that is too cool produces greasy cookies. Oil that is too hot can brown the outside before the cookie becomes crisp.
Aim for approximately 350–375°F (175–190°C).
Don’t overcrowd the pan
Fry only a few rosettes at a time. Too many cookies will lower the oil temperature.
Be patient with the first cookie
The first rosette can sometimes be a test. Adjust the batter thickness or iron temperature if needed.
Drain well
Allow the finished cookies to drain on a rack so they remain crisp rather than oily.
Troubleshooting
The batter won’t stick to the iron
The iron probably isn’t hot enough. Return it to the oil and heat it thoroughly before trying again.
The cookie won’t release
Try gently shaking the iron after the cookie has fried for several seconds.
A light tap with a fork can also help.
The cookies are greasy
The oil temperature may be too low. Allow the oil to return to approximately 350–375°F between batches.
The cookies are too thick
The batter may be too thick. Whisk in a small amount of milk, about 1 teaspoon at a time, until it reaches a thin, pourable consistency.
The cookies are too dark
Reduce the oil temperature slightly and shorten the frying time.
🌸 Flavor Variations
Cinnamon Rosettes
Add ½ teaspoon ground cinnamon to the batter.
Lemon Rosettes
Add 1 teaspoon finely grated lemon zest for a bright citrus flavor.
Almond Rosettes
Replace the vanilla with ½ teaspoon almond extract.
Orange Rosettes
Add 1 teaspoon orange zest and a tiny splash of orange extract.
Chocolate-Dipped Rosettes
Once completely cool, dip one edge of each cookie into melted chocolate.
Place on parchment paper and allow the chocolate to set.
Cinnamon Sugar Rosettes
Instead of icing sugar, lightly toss the warm cookies in a mixture of granulated sugar and cinnamon.
🎄 Holiday Presentation
Rosette cookies make a beautiful addition to holiday dessert trays.
Arrange them in overlapping layers and dust generously with icing sugar to create a snow-covered appearance.
They also make lovely homemade gifts when packed in decorative tins.
☕ Serving Suggestions
Enjoy Crispy Rosette Cookies with:
- Coffee
- Hot chocolate
- Black tea
- Chai
- Vanilla ice cream
- Fresh berries
- Whipped cream
They’re especially delicious when served alongside a warm drink.
🧊 Storage
Allow the cookies to cool completely before storing.
Place them in an airtight container at room temperature.
For the best crispness, enjoy within 3–5 days.
If your environment is humid, add a small piece of parchment between layers and keep the container tightly sealed.
Avoid refrigerating the cookies, as moisture can make them lose their crisp texture.
❄️ Freezing
Fully cooled rosette cookies can be frozen in an airtight freezer-safe container for up to 1 month.
Place parchment paper between layers.
Thaw uncovered at room temperature to help preserve their crispness.
Dust with fresh icing sugar just before serving.
Recipe Notes
Yield: Approximately 20–30 cookies, depending on the size of your rosette iron.
Texture: Extremely crisp, delicate, and light.
Flavor: Buttery-vanilla style sweetness with a subtle fried-cookie richness.
Best served: Fresh and crisp with a light dusting of icing sugar.
🌸✨ The Perfect Rosette
The secret to beautiful rosette cookies is simple: a hot iron, properly heated oil, thin batter, and patience.
Once you get the first few cookies right, the process becomes quick and enjoyable—and you’ll have a gorgeous batch of delicate, crispy flower-shaped treats ready to share.