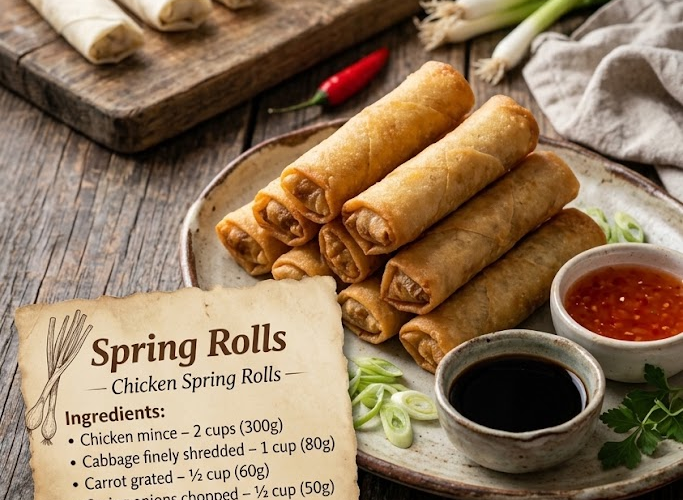
🥢 Crispy Homemade Chicken Spring Rolls
These Crispy Homemade Chicken Spring Rolls are filled with juicy seasoned chicken, crunchy cabbage, sweet carrots, and fresh spring onions, all wrapped in delicate pastry and fried until perfectly golden. Every bite delivers a satisfying crunch followed by a savory, flavorful filling with hints of garlic, soy sauce, and chili.
Perfect as a party appetizer, afternoon snack, or side dish for your favorite Asian-inspired meal, these homemade spring rolls are surprisingly easy to prepare. Serve them hot with sweet chili sauce, garlic dip, or your favorite dipping sauce for a delicious treat everyone will love.
Recipe Information
- Prep Time: 25 minutes
- Cook Time: 25–30 minutes
- Total Time: Approximately 55 minutes
- Yield: 20 spring rolls
- Servings: 5–8
- Course: Appetizer, Snack
- Cuisine: Asian-inspired
- Difficulty: Easy to moderate
Ingredients
For the Chicken Filling
- 2 cups chicken mince (300 g)
- 1 cup finely shredded cabbage (80 g)
- ½ cup grated carrot (60 g)
- ½ cup chopped spring onions (50 g)
- 1 tablespoon garlic paste (15 g)
- 1 tablespoon soy sauce (15 ml)
- 1 tablespoon red chili sauce (15 ml)
- ½ teaspoon ground black pepper (2 g)
- ½ teaspoon crushed red chili flakes (2 g)
- 1 teaspoon salt (5 g), or to taste
- 1 tablespoon oil (15 ml)
For Wrapping
- 20 spring roll pastry sheets, thawed if frozen
- 2 tablespoons all-purpose flour
- 3 tablespoons water, approximately
Mix the flour and water together to make a thick sealing paste.
For Deep-Frying
- Approximately 500 ml neutral cooking oil, or enough for frying in your chosen pan
Optional additions: A little grated ginger, finely chopped mushrooms, or a teaspoon of sesame oil can add extra flavor to the filling.
Instructions
Step 1: Prepare the Vegetables
Finely shred the cabbage, grate the carrot, and chop the spring onions. Keep the vegetables relatively small so the spring rolls are easy to fill and roll without tearing.
If the cabbage is particularly wet after washing, pat it dry with a clean kitchen towel. Excess moisture can make the filling soggy and weaken the wrappers.
Step 2: Cook the Chicken
Heat 1 tablespoon of oil in a large frying pan or wok over medium-high heat.
Add the garlic paste and sauté for approximately 30 seconds, stirring continuously until fragrant. Avoid letting the garlic burn.
Add the chicken mince and break it apart with a wooden spoon or spatula. Cook for approximately 5–8 minutes, stirring regularly, until the chicken is no longer pink and has cooked through.
Season with the soy sauce, red chili sauce, black pepper, crushed red chili, and salt. Stir well so the chicken absorbs the flavors.
Food safety: Ground chicken should reach an internal temperature of 74°C (165°F).
Step 3: Add the Vegetables
Add the shredded cabbage and grated carrot to the pan. Stir-fry for 2–3 minutes, just until the vegetables soften slightly but retain some crunch.
Add the chopped spring onions and cook for another minute.
Taste the filling and adjust the seasoning if needed. Because soy sauce and chili sauce already contain salt, you may find that less than the full teaspoon of salt is sufficient.
The filling should be flavorful but not watery. If liquid collects in the bottom of the pan, continue cooking briefly until most of it evaporates.
Step 4: Cool the Filling Completely
Remove the pan from the heat and spread the filling onto a shallow plate or tray to help it cool quickly.
Allow it to cool completely before assembling the spring rolls. Warm filling can soften the wrappers, make them tear, and cause steam to build up inside during frying.
Keep the filling refrigerated if you are not assembling the rolls promptly.
Step 5: Prepare the Sealing Paste
In a small bowl, combine the all-purpose flour and water. Mix until smooth and thick enough to brush or spread along the edges of the wrappers.
Set aside.
Step 6: Fill the Spring Roll Wrappers
Place one spring roll sheet on a clean, dry work surface with one corner pointing toward you, forming a diamond shape.
Keep the remaining wrappers covered with a clean, slightly damp towel according to the package instructions so they do not dry out.
Spoon approximately 1–1½ tablespoons of cooled filling near the corner closest to you. Shape the filling into a compact horizontal strip, leaving enough space around the edges to fold securely.
Avoid overfilling the wrappers, as this can cause them to split during frying.
Step 7: Roll and Seal
Fold the bottom corner up and over the filling, tucking it snugly underneath.
Fold the left and right corners inward toward the center. Continue rolling firmly away from you until you reach the final corner.
Brush a small amount of flour paste along the exposed edge and press gently to seal.
Place the finished spring roll seam-side down on a tray. Repeat with the remaining wrappers and filling.
Make sure each roll is sealed securely and that no filling is exposed.
Step 8: Heat the Oil
Pour enough cooking oil into a deep, heavy-bottomed pan to submerge the spring rolls or allow them to fry evenly when turned. Leave plenty of room at the top of the pan to prevent the oil from overflowing.
Heat the oil to approximately 170–180°C (340–355°F).
If you do not have a thermometer, place a small piece of wrapper into the oil. It should begin bubbling steadily and rise toward the surface without immediately turning dark brown.
Keep the temperature steady throughout frying.
Step 9: Fry Until Golden and Crispy
Carefully lower 3–5 spring rolls into the hot oil, depending on the size of your pan. Avoid overcrowding, as this can reduce the oil temperature and result in greasy rolls.
Fry for approximately 4–6 minutes, turning occasionally, until the wrappers are crisp and evenly golden brown.
Because the chicken filling has already been cooked, the main goal is to heat the filling thoroughly and crisp the pastry without burning it.
Transfer the finished spring rolls to a wire rack or a plate lined with paper towels to drain excess oil.
Repeat with the remaining rolls, allowing the oil to return to the correct temperature between batches.
Step 10: Serve Hot
Arrange the chicken spring rolls on a serving platter. Garnish with chopped spring onions or fresh coriander, if desired.
Serve immediately with sweet chili sauce, garlic mayonnaise, soy-vinegar dipping sauce, or your favorite spicy dip.
For the crispiest results, let them rest for just a few minutes before serving.
Chef’s Tips for Perfect Spring Rolls
- Cool the filling completely: This is essential for preventing soggy wrappers and reducing the chance of splitting.
- Keep the filling dry: Cook off excess liquid before assembling the rolls.
- Do not overfill: A modest amount of filling makes the spring rolls easier to seal and fry evenly.
- Seal every edge: Use the flour paste sparingly but thoroughly to prevent the rolls from opening in the oil.
- Keep wrappers covered: Spring roll sheets dry out quickly and may crack while rolling.
- Maintain the oil temperature: Oil that is too cool makes the wrappers greasy; oil that is too hot can brown the exterior too quickly.
- Fry in batches: Leaving enough space around each roll helps maintain the temperature and promotes even crisping.
- Use a wire rack when possible: Air can circulate around the rolls, helping the bottoms remain crisp rather than steaming on a flat plate.
Delicious Variations
Spicy Chicken Spring Rolls
Add extra chili flakes, chopped green chilies, or a little more red chili sauce for a bolder, spicier filling.
Chicken and Mushroom Spring Rolls
Add finely chopped mushrooms and cook until their moisture evaporates before mixing them with the other filling ingredients.
Chicken and Cheese Spring Rolls
Mix a small amount of grated mozzarella or cheddar into the cooled filling for a richer, cheesy variation.
Garlic Ginger Chicken Spring Rolls
Add 1 teaspoon of freshly grated ginger when sautéing the garlic for a fragrant, warming flavor.
Vegetable Spring Rolls
Replace the chicken with finely shredded cabbage, carrots, mushrooms, bean sprouts, and spring onions. Season with soy sauce, garlic, pepper, and chili to taste.
Air Fryer Instructions
For a lighter alternative, preheat the air fryer to 190°C (375°F), following your appliance instructions.
Arrange the assembled spring rolls in a single layer with space between them. Lightly brush or spray the wrappers with oil on all sides.
Air-fry for approximately 10–15 minutes, turning halfway through, until golden and crisp. Cooking time varies depending on the wrapper thickness and air fryer model.
Check that the centers are hot throughout before serving. The air-fried version may not develop quite the same evenly blistered crust as deep-fried spring rolls, but it still makes a delicious alternative.
Make-Ahead Instructions
The chicken filling can be prepared a day in advance. Cool it promptly, transfer it to a covered container, and refrigerate at 4°C (40°F) or below.
You can also assemble the spring rolls a few hours ahead. Arrange them in a single layer in a covered container, separating layers with parchment paper if needed, and refrigerate until ready to fry.
For longer preparation, freeze the uncooked spring rolls in a single layer on a lined tray until firm, then transfer them to a freezer-safe bag or container.
Storage and Reheating
Refrigerator: Store leftover cooked spring rolls in an airtight container for up to 3–4 days. Refrigerate promptly after cooking.
Freezer: Freeze uncooked assembled spring rolls for up to 2 months for best quality. Separate them with parchment paper to prevent sticking. For the crispiest texture, cook them from frozen, using a moderate oil temperature and allowing extra cooking time. Do not overcrowd the pan, and check that the filling is piping hot throughout.
Cooked spring rolls can also be frozen once fully cooled, although the wrapper texture may change slightly.
Reheating: Reheat cooked spring rolls in an oven at 190°C (375°F) or an air fryer at 180°C (350°F) until crisp and heated through. Avoid microwaving when possible, as it tends to soften the wrappers.
Frequently Asked Questions
Why did my spring rolls burst while frying?
They may have been overfilled, insufficiently sealed, or filled with a mixture that contained too much moisture. Cool the filling completely, leave room around the edges, and seal each wrapper securely.
Can I use leftover cooked chicken instead of chicken mince?
Yes. Finely shred or chop fully cooked chicken and stir-fry it briefly with the garlic, sauces, seasonings, and vegetables. Make sure the finished filling is dry and cool before wrapping.
Can I make the spring rolls less spicy?
Absolutely. Reduce the crushed red chili or omit it altogether. You can also use a mild chili sauce or replace it with a little extra soy sauce.
Why are my spring rolls not crispy?
Common reasons include oil that is too cool, overcrowding the pan, wet filling, or stacking the rolls while they are hot. Fry in small batches at the correct temperature and drain on a wire rack.
Can I bake the spring rolls instead of frying them?
Yes. Brush or spray them generously with oil and bake at 200°C (400°F) for approximately 18–25 minutes, turning halfway through, until golden and crisp. Exact timing depends on the wrappers and oven.
Serving Suggestions
Serve these crispy chicken spring rolls with sweet chili sauce, soy sauce mixed with a little rice vinegar, garlic mayonnaise, or spicy dipping sauce.
They pair beautifully with vegetable fried rice, chicken chow mein, stir-fried noodles, or an Asian-style cucumber salad. For parties, arrange them on a platter with several dipping sauces so guests can choose their favorite.
Final Result
These homemade Chicken Spring Rolls are wonderfully crunchy on the outside and packed with savory chicken, colorful vegetables, aromatic garlic, and a delicious chili-soy seasoning inside. Every bite offers a satisfying contrast of crisp pastry and tender filling.
The secret to the best spring rolls: cook the filling until dry, let it cool completely, roll tightly, seal securely, and fry at the right temperature. Serve them fresh and hot for maximum crunch!