🥐 Classic Homemade Puff Pastry
There’s nothing quite like homemade puff pastry: delicate, buttery layers that rise into a crisp, golden, beautifully flaky masterpiece. Made with a simple flour dough and a generous block of butter, this classic recipe uses the traditional folding technique to create hundreds of thin layers without any chemical leavening agents.
Although puff pastry takes a little patience, the process is straightforward when you keep the dough cold and allow enough resting time between folds. Once prepared, this versatile pastry is perfect for savory pies, sausage rolls, cheese twists, fruit tarts, turnovers, croissants-style pastries, and elegant desserts.
Recipe Information
- Prep Time: 45 minutes
- Resting and Chilling Time: 3–4 hours
- Total Time: Approximately 4 hours
- Yield: About 1.2–1.3 kg puff pastry
- Course: Baking Basics
- Cuisine: French-inspired
- Difficulty: Intermediate
Ingredients
For the Dough
- 4¼ cups all-purpose flour (510 g)
- 1¼ teaspoons salt
- 4 tablespoons cold unsalted butter, cubed (57 g)
- 1¼ cups ice-cold water (300 ml)
For the Butter Block
- 396 g cold unsalted butter
- ¼ cup all-purpose flour (30 g)
Measurement note: The 396 g butter listed for the butter block is approximately 1¾ US cups, depending on how it is measured. For the most accurate result, use the weight in grams.
Instructions
Step 1: Prepare the Dough
In a large mixing bowl, combine the flour and salt. Add the 57 g of cold, cubed butter.
Use your fingertips to rub the butter into the flour until the mixture resembles coarse crumbs, with a few small pieces of butter remaining.
Gradually pour in the ice-cold water, mixing with a fork or your hands until a rough dough forms. You may not need every last drop, so add the water gradually and stop when the dough comes together.
Knead gently for about 1–2 minutes, just until the dough is cohesive. It should feel firm and slightly tacky, not wet or sticky.
Shape it into a square, wrap tightly in plastic wrap, and refrigerate for 30 minutes.
Step 2: Make the Butter Block
Place the 396 g cold unsalted butter and 30 g flour in a bowl.
Allow the butter to soften slightly just enough to be workable, then mix the flour into it until evenly incorporated. Avoid melting the butter.
Place the butter mixture between two sheets of parchment paper. Use a rolling pin to shape it into a square approximately 18–20 cm (7–8 inches) wide and about 1–1.5 cm thick.
Keep the edges as straight and even as possible. Transfer the butter block to the refrigerator until firm but still flexible, usually 20–30 minutes.
Important: The butter and dough should have a similar firmness before you begin laminating. Butter that is too hard may break into pieces, while butter that is too soft may squeeze out of the dough.
Step 3: Enclose the Butter
Lightly flour your work surface. Remove the chilled dough from the refrigerator and roll it into a rectangle approximately 20 × 40 cm (8 × 16 inches).
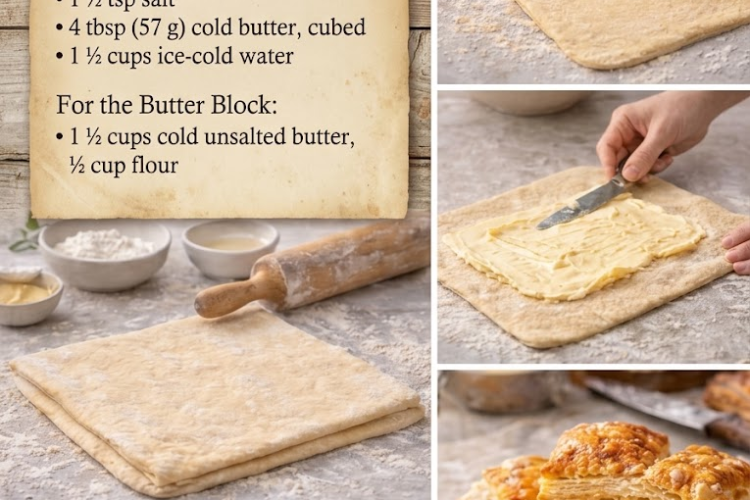
Place the chilled butter block in the center of the dough. Fold one end of the dough over the butter, then fold the other end over it, completely enclosing the butter like a letter.
Pinch the seams gently to seal the butter inside. Check that no butter is exposed through the edges.
Turn the dough so the seam is positioned to one side, then gently press it with the rolling pin to help flatten it slightly.
Step 4: Roll and Fold for the First Turn
Roll the dough into a long rectangle approximately 20 × 60 cm (8 × 24 inches). Use even pressure and work from the center outward, taking care not to push the butter through the dough.
Brush away any excess flour on the surface.
Fold the bottom third of the rectangle toward the center, then fold the top third over it, just like folding a business letter. This completes one single turn.
Rotate the folded dough 90 degrees. Gently press it to mark the direction, then wrap it tightly and refrigerate for 30 minutes.
Step 5: Complete the Remaining Turns
Remove the dough from the refrigerator and place it with the folded edge facing you.
Roll it lengthwise into a long rectangle again, using gentle and even pressure. Fold it into thirds as before to complete the second turn.
Wrap and refrigerate for another 30 minutes.
Repeat this rolling, folding, and chilling process until you have completed six single turns in total.
After every turn, rotate the dough 90 degrees before rolling again. Keep track of the turns by making a small indentation in the dough or noting them down.
If the dough becomes warm, sticky, difficult to roll, or starts releasing butter, stop and refrigerate it for 20–30 minutes before continuing.
The key to flaky pastry: Keep the layers distinct. Avoid forcing the rolling pin through resistant dough or allowing the butter to soften excessively.
Step 6: Rest the Finished Puff Pastry
After completing the sixth turn, wrap the pastry tightly and refrigerate it for at least 1 hour, preferably 2 hours, before using.
This final rest allows the gluten to relax, making the pastry easier to roll while keeping the butter firm.
For even better flavor and convenience, the pastry can be refrigerated overnight before shaping and baking.
Step 7: Roll and Shape as Needed
Lightly flour your work surface and rolling pin. Roll the chilled pastry to the thickness required by your recipe, generally around 3–5 mm for pies, turnovers, and many savory pastries.
Use a sharp knife or pastry cutter to cut the dough cleanly. Avoid crushing the edges, as clean cuts help the layers rise evenly.
Arrange the shaped pastry on a baking sheet lined with parchment paper. Chill it again for 15–20 minutes before baking if it has become warm during shaping.
Step 8: Bake Until Golden and Flaky
Preheat the oven to the temperature specified by your chosen recipe. For many puff pastry applications, 200–220°C (400–425°F) is a good starting range.
Place the chilled pastry in the fully preheated oven. Bake until it has risen well, looks dry and crisp, and develops a deep golden color. Depending on the size and shape, this can take approximately 15–35 minutes.
Avoid opening the oven door too early, because a sudden drop in temperature can interfere with the pastry’s rise.
For filled pastries, make sure the filling is also heated through and follow the baking instructions for the specific recipe.
Chef’s Tips for Perfect Puff Pastry
- Keep everything cold: Warm dough and butter can blend together instead of forming distinct layers.
- Use butter with a high fat content: Good-quality unsalted butter gives the pastry its signature flavor and flaky texture.
- Match the firmness of the butter and dough: Both should bend and roll without breaking or becoming greasy.
- Roll gently: Excessive pressure can squeeze butter out of the dough and damage the layers.
- Chill between turns: Resting keeps the butter firm and prevents the gluten from becoming too elastic.
- Brush away excess flour: Loose flour trapped between folds can interfere with the layers sticking together.
- Cut edges cleanly: A sharp knife helps the pastry rise evenly.
- Bake in a hot oven: The water in the dough and butter creates steam, which helps lift the pastry layers.
- Avoid stretching the dough: Stretching can cause the pastry to shrink during baking.
Common Puff Pastry Problems and Solutions
The butter breaks into hard pieces.
The butter is probably too cold compared with the dough. Let it soften slightly until it becomes flexible, then continue rolling gently.
Butter leaks out during rolling.
The butter may be too soft, or the dough may have torn. Chill the pastry until firm before continuing. Lightly dust the surface with flour, but do not knead or smear the exposed butter into the dough.
The dough keeps shrinking.
The gluten needs more time to relax. Cover the dough and refrigerate it for 20–30 minutes before rolling again.
The pastry rises unevenly.
Uneven rolling, crushed edges, or an inconsistent butter block may cause irregular layers. Roll the dough evenly and cut it with a sharp blade.
The pastry is dense instead of flaky.
The butter may have blended into the dough, or the oven may not have been hot enough. Keep the butter in distinct layers and bake the chilled pastry in a fully preheated oven.
Delicious Ways to Use Homemade Puff Pastry
Savory Recipes
- Chicken and mushroom puff pastry pies
- Sausage rolls
- Spinach and cheese pastries
- Beef patties and savory turnovers
- Cheese twists and herb straws
- Vol-au-vents filled with creamy chicken
Sweet Recipes
- Apple turnovers
- Strawberry and custard pastries
- Chocolate-filled pastry rolls
- Fruit tarts
- Cinnamon-sugar palmiers
- Cream-filled pastry horns
Make-Ahead Instructions
Homemade puff pastry is excellent for preparing in advance. Complete all six turns, wrap the dough tightly, and refrigerate it overnight before use.
You can also divide the finished dough into smaller portions so you only thaw or roll what you need.
Storage Instructions
Refrigerator: Wrap the finished pastry tightly and refrigerate for up to 3 days.
Freezer: Wrap the dough in plastic wrap, then place it in a freezer-safe bag or container. Freeze for up to 2 months for best quality.
Thawing: Transfer frozen pastry to the refrigerator and allow it to thaw overnight. Keep it cold while working with it.
After shaping: Shaped, unbaked pastries can often be refrigerated for several hours before baking. Keep them covered to prevent drying and chill again if the butter becomes soft.
Frequently Asked Questions
Can I make puff pastry without a food processor?
Yes. This recipe is designed for hand preparation. A mixing bowl, rolling pin, parchment paper, and refrigerator are all you need.
Why is there flour in the butter block?
A small amount of flour helps make the butter mixture more workable and distributes it evenly. It must still remain cold and firm enough to roll into distinct layers.
Can I use salted butter?
Yes, but the finished flavor may be slightly saltier. Reduce the added salt in the dough if necessary.
Can I use puff pastry immediately after folding?
It is best to refrigerate it for at least an hour after the final turn. This makes rolling easier and helps the butter remain firm during baking.
Is six turns really necessary?
Six single turns create a classic layered pastry. Fewer turns can still produce a flaky result, but the layers may be less numerous and the texture slightly different.
Can I freeze puff pastry after rolling it out?
Yes. Roll it into a flat sheet, place parchment between layers if necessary, wrap securely, and freeze flat. Thaw in the refrigerator before shaping.
Serving Suggestions
Use this homemade puff pastry to create elegant appetizers, golden hand pies, savory dinner pastries, or sweet treats for afternoon tea. For a simple dessert, cut the pastry into rectangles, sprinkle with sugar, bake until puffed and golden, and serve with fresh berries and whipped cream.
Final Result
This Classic Homemade Puff Pastry produces delicate, buttery layers with a crisp golden exterior and a light, airy interior. The process takes patience, but the reward is a versatile, freezer-friendly pastry that elevates everything from everyday snacks to impressive celebration dishes.
Remember: Cold butter, gentle rolling, sufficient chilling, and a properly heated oven are the secrets to beautiful, flaky homemade puff pastry.