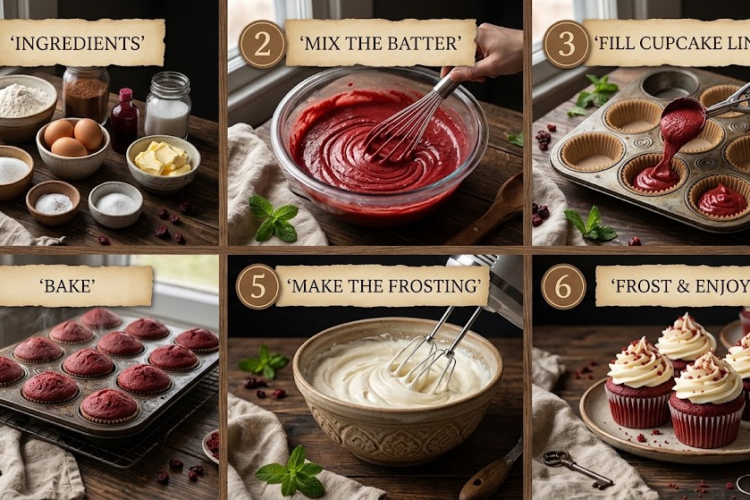
🧁 Classic Red Velvet Cupcakes with Cream Cheese Frosting
Soft, fluffy, and beautifully red, these Classic Red Velvet Cupcakes are a delicious combination of delicate cocoa flavor, a tender crumb, and luscious cream cheese frosting. Each cupcake has that signature red velvet color and a subtle tang from buttermilk and vinegar, perfectly balanced by a smooth, sweet, and slightly tangy frosting.
These homemade cupcakes are perfect for birthdays, Valentine’s Day, Christmas celebrations, bake sales, or whenever you’re craving an elegant bakery-style dessert. They’re easy to prepare with simple ingredients and look stunning with a generous swirl of creamy frosting.
Recipe Information
- Prep Time: 20 minutes
- Bake Time: 18–22 minutes
- Cooling Time: 30–45 minutes
- Total Time: Approximately 1 hour 15 minutes
- Yield: 12 cupcakes
- Course: Dessert
- Cuisine: American
- Difficulty: Easy
Ingredients
For the Red Velvet Cupcakes
- 1½ cups all-purpose flour (190 g)
- 1 cup granulated sugar (200 g)
- 2 tablespoons unsweetened cocoa powder (approximately 10–12 g)
- 1 teaspoon baking powder
- ½ teaspoon baking soda
- ½ teaspoon salt
- 2 large eggs, at room temperature
- ½ cup vegetable oil (120 ml)
- ½ cup buttermilk (120 ml), at room temperature
- 1 teaspoon vanilla extract (5 ml)
- 1 tablespoon red food coloring, preferably concentrated gel coloring if using
- 1 teaspoon white vinegar (5 ml)
Homemade buttermilk alternative: Mix ½ cup milk with 1 teaspoon white vinegar. Let it stand for 5–10 minutes before using.
For the Cream Cheese Frosting
- 225 g full-fat cream cheese (8 oz), softened but still slightly cool
- 115 g unsalted butter (½ cup), softened
- 360–420 g powdered sugar (3–3½ cups), sifted
- 1 teaspoon vanilla extract (5 ml)
- A small pinch of salt, optional
Optional Decorations
- Red velvet cake crumbs
- White chocolate shavings
- Heart-shaped sprinkles
- A little extra cocoa powder for a light decorative dusting
Instructions
Step 1: Prepare the Oven and Cupcake Pan
Preheat the oven to 175°C (350°F). Line a standard 12-cup muffin pan with paper cupcake liners.
Make sure the eggs and buttermilk are at room temperature so they combine smoothly with the other ingredients.
Step 2: Combine the Dry Ingredients
In a medium bowl, whisk together the flour, granulated sugar, cocoa powder, baking powder, baking soda, and salt.
Break up any cocoa powder lumps and make sure the leavening agents are distributed evenly throughout the flour mixture. Set aside.
Step 3: Mix the Wet Ingredients
In a separate large mixing bowl, whisk the eggs and sugar mixture’s dry counterpart is already prepared, so begin by whisking the eggs lightly until combined.
Add the vegetable oil, buttermilk, vanilla extract, and red food coloring. Whisk until the mixture is smooth and evenly colored.
Stir in the white vinegar just before combining with the dry ingredients.
The batter should have a rich red color. If using gel food coloring, start with a smaller amount and add more as needed, following the manufacturer’s concentration guidance.
Step 4: Make the Red Velvet Batter
Add the dry ingredients to the wet mixture in two additions. Use a whisk or spatula to gently mix until the flour is just incorporated and no large dry patches remain.
The batter should be smooth and pourable but not overly thin.
Avoid vigorous or prolonged mixing. Overmixing can develop the gluten in the flour and make the cupcakes dense instead of soft and tender.
Step 5: Fill the Cupcake Liners
Divide the batter evenly among the 12 prepared cupcake liners, filling each approximately two-thirds full.
Avoid filling the liners to the top, as the cupcakes need room to rise without overflowing.
Gently tap the pan against the counter once to release any large air bubbles.
Step 6: Bake the Cupcakes
Place the pan on the center rack of the preheated oven.
Bake for 18–22 minutes, or until the cupcake tops spring back gently when touched and a toothpick inserted into the center comes out clean or with a few moist crumbs.
Avoid opening the oven door during the first 15 minutes, as a sudden temperature change can affect the rise.
Remove the pan from the oven and let the cupcakes cool for about 5 minutes. Transfer them to a wire rack and allow them to cool completely before frosting.
Important: Never frost warm cupcakes, as the cream cheese frosting will soften and slide off.
Step 7: Prepare the Cream Cheese Frosting
Place the softened butter in a mixing bowl and beat for 2–3 minutes until pale and creamy.
Add the cream cheese and beat briefly until smooth and fully combined. Avoid excessive beating, which can make cream cheese frosting loose.
Gradually add the sifted powdered sugar, one cup at a time, mixing on low speed after each addition.
Add the vanilla extract and a small pinch of salt, if desired. Beat briefly until the frosting is smooth, creamy, and thick enough to hold its shape.
If the frosting is too soft for piping, refrigerate it for 15–30 minutes. If it is too thick, mix in 1 teaspoon of milk at a time, although additional liquid may make it harder to pipe.
Step 8: Frost the Cupcakes
Once the cupcakes have cooled completely, transfer the cream cheese frosting to a piping bag fitted with a star or round piping tip.
Pipe a generous swirl onto each cupcake, starting from the outside and working toward the center.
Alternatively, spread the frosting over the cupcakes using a small spatula or butter knife for a simple homemade finish.
Step 9: Decorate and Serve
Sprinkle each cupcake with red velvet cake crumbs, white chocolate shavings, or festive sprinkles.
For an elegant bakery-style appearance, keep the frosting swirls uniform and add a small decorative accent to each cupcake.
Serve once the frosting has set slightly, or refrigerate briefly if you prefer a firmer topping.
Chef’s Tips for Perfect Red Velvet Cupcakes
- Measure flour accurately: Too much flour can make the cupcakes dry and heavy. Weighing the flour is the most reliable option.
- Use room-temperature ingredients: Eggs and buttermilk blend more evenly into the batter when they are not very cold.
- Choose the right cocoa powder: Unsweetened natural cocoa powder works well with the baking soda and vinegar in this recipe.
- Don’t overmix: Gentle mixing helps create a soft, tender crumb.
- Use concentrated food coloring carefully: Gel coloring often produces a vivid red color with less liquid than standard liquid coloring.
- Cool completely before frosting: Even slightly warm cupcakes can melt cream cheese frosting.
- Keep the frosting cool: Cream cheese frosting is naturally softer than some buttercreams, so refrigerate it briefly if it becomes difficult to pipe.
- Avoid overbaking: Remove the cupcakes as soon as they are baked through to preserve their moisture.
Delicious Variations
Chocolate Chip Red Velvet Cupcakes
Fold ½ cup mini chocolate chips into the finished batter for little pockets of chocolate in every bite.
Red Velvet Cupcakes with White Chocolate
Add white chocolate shavings to the frosting or drizzle the cooled cupcakes with melted white chocolate.
Strawberry Red Velvet Cupcakes
Top each frosted cupcake with a fresh strawberry slice just before serving.
Mini Red Velvet Cupcakes
Divide the batter among mini cupcake liners and begin checking for doneness after approximately 9–12 minutes.
Extra-Cocoa Red Velvet Cupcakes
For a slightly deeper chocolate flavor, increase the cocoa powder by a small amount, keeping in mind that too much cocoa can change the texture and color.
Make-Ahead Instructions
The cupcakes can be baked one day ahead. Allow them to cool completely, then store them in an airtight container until ready to frost.
The cream cheese frosting can also be prepared a day ahead and refrigerated in a covered container. Before using, let it soften slightly and stir or briefly beat it until smooth.
For the best presentation, frost the cupcakes on the day you plan to serve them.
Storage Instructions
Refrigerator: Because the cupcakes contain cream cheese frosting, store them in an airtight container in the refrigerator for up to 4 days. For the best texture and flavor, let them stand at room temperature for about 15–20 minutes before serving.
Room Temperature: Unfrosted cupcakes can be kept in an airtight container in a cool room for up to 2 days. Frosted cupcakes containing cream cheese frosting should not be left at room temperature for more than 2 hours, or 1 hour when temperatures exceed 32°C (90°F).
Freezer: Freeze unfrosted cupcakes in an airtight, freezer-safe container for up to 2–3 months for best quality. Thaw overnight in the refrigerator or until fully thawed, then frost.
The cream cheese frosting can also be frozen separately, although its texture may need brief re-whisking after thawing.
Frequently Asked Questions
Why are my red velvet cupcakes not bright red?
The shade depends on the cocoa powder, the coloring used, and the amount added. Concentrated red gel coloring usually creates a more vivid color. Natural cocoa can also darken the batter, so adjust the coloring according to the desired result.
Can I make these cupcakes without food coloring?
Yes. They will still have the same delicious cocoa, vanilla, and buttermilk flavor, but the finished cupcakes will be brown rather than red.
Can I use milk instead of buttermilk?
Yes. Add 1 teaspoon of white vinegar to 120 ml milk and let it stand for 5–10 minutes before using. This provides a simple buttermilk substitute.
Why did my cupcakes sink in the middle?
This may happen if the batter was overmixed, the oven door was opened too early, the oven temperature was too low, or the cupcakes were underbaked. Measure the leavening agents carefully and check that the centers are fully baked.
Why is my cream cheese frosting too runny?
The cream cheese may have been too warm, the mixture may have been overbeaten, or too much liquid may have been added. Refrigerate the frosting briefly and avoid adding milk unless absolutely necessary.
Can I make the frosting less sweet?
You can begin with the lower amount of powdered sugar and add more only as needed. However, reducing it too much may produce a softer frosting that does not hold piped shapes as well.
Serving Suggestions
Serve these Red Velvet Cupcakes with coffee, tea, hot chocolate, or a cold glass of milk. They also make a beautiful addition to birthday dessert tables, Valentine’s Day celebrations, Christmas parties, baby showers, and afternoon tea.
For a special presentation, arrange them on a tiered dessert stand and decorate with white chocolate curls or a few red velvet crumbs.
Final Result
These Classic Red Velvet Cupcakes are tender, moist, delicately chocolatey, and beautifully colored, topped with a thick swirl of creamy, tangy cream cheese frosting. Their soft texture and elegant appearance make them a timeless homemade dessert for celebrations and everyday treats alike.
The secret to success: gently mix the batter, bake only until the centers are set, and make sure the cupcakes are completely cool before adding the frosting. The result is a batch of soft, bakery-style red velvet cupcakes with a perfectly creamy finish.