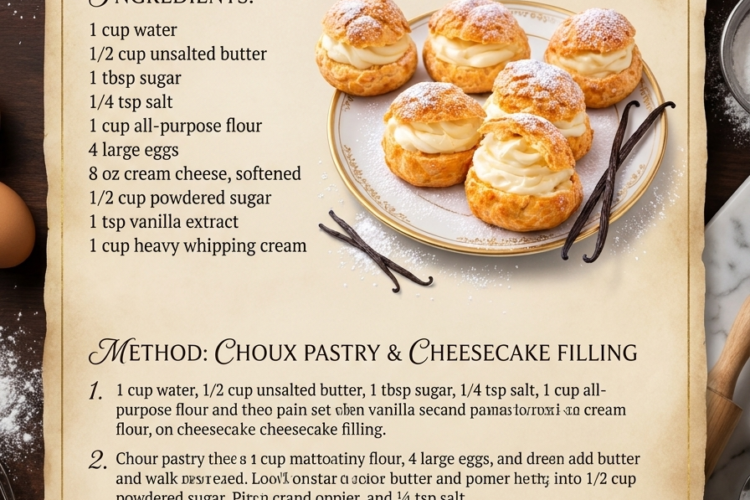
🧁 Cheesecake Cream Puffs – Light, Airy & Filled with Creamy Cheesecake
Imagine delicate, golden choux pastry shells filled with a rich, fluffy cheesecake filling that melts in your mouth! These Cheesecake Cream Puffs combine the light, airy texture of classic French cream puffs with the irresistible taste of sweet cream cheese filling.
Each little pastry has a crisp, golden exterior and a soft, hollow center packed with smooth cheesecake cream. A light dusting of powdered sugar makes them look elegant and bakery-worthy, while their creamy filling makes every bite absolutely irresistible.
They’re perfect for afternoon tea, birthdays, dinner parties, holiday dessert tables, or whenever you want to make something special from simple ingredients. The best part? You don’t need complicated equipment or professional baking experience to make them at home. ❤️
Recipe Details
- Prep time: 30 minutes
- Bake time: 35–40 minutes
- Cooling time: 30–45 minutes
- Filling and assembly: 15 minutes
- Total time: Approximately 2 hours
- Yield: 12–15 cream puffs
- Difficulty: Moderate
- Oven temperature: 425°F (220°C), then 350°F (175°C)
Recipe note: Your original ingredient list included only the first four choux pastry ingredients. I’ve added suggested quantities for the flour and eggs, along with a complete cheesecake filling, to make a balanced recipe.
Ingredients
For the Choux Pastry (Cream Puff Shells)
- 1 cup water (240 ml)
- ½ cup unsalted butter (113 g), cut into pieces
- 1 tablespoon granulated sugar (12–13 g)
- ¼ teaspoon salt
- 1 cup all-purpose flour (125 g), sifted
- 4 large eggs, at room temperature (approximately 200 g without shells)
Important: Depending on the flour and the size of your eggs, you may not need all four eggs. Add them gradually and judge the dough by its texture.
For the Cheesecake Filling
- 1 package (8 oz / 225 g) full-fat cream cheese, softened
- ½ cup powdered sugar (60 g), sifted
- 1 teaspoon vanilla extract
- 1 cup heavy whipping cream (240 ml), cold
- 1 tablespoon fresh lemon juice (optional)
- ½ teaspoon finely grated lemon zest (optional)
For Decorating
- 2–3 tablespoons powdered sugar, for dusting
- Fresh strawberries or raspberries, optional
- Melted white chocolate, optional
Instructions
Step 1: Prepare the Baking Sheets
Preheat your oven to 425°F (220°C).
Line two baking sheets with parchment paper. If desired, draw small 2-inch circles on the underside of the parchment as guides for evenly sized cream puffs.
Make sure the parchment is completely flat so the pastry shells bake evenly.
Step 2: Heat the Water, Butter, Sugar, and Salt
In a medium saucepan, combine the water, butter, granulated sugar, and salt.
Place over medium heat and bring the mixture to a full boil. Stir occasionally to help the butter melt evenly.
Once the butter has completely melted and the liquid is boiling, remove the saucepan briefly from the heat.
Step 3: Add the Flour
Immediately add all the sifted flour at once.
Using a sturdy wooden spoon or heatproof spatula, stir vigorously until the flour absorbs the liquid and forms a thick dough.
Return the saucepan to medium-low heat and continue stirring for approximately 1–2 minutes.
The dough should pull away from the sides of the pan and form a smooth ball. A thin film may develop on the bottom of the saucepan. This is normal and indicates that some moisture has evaporated.
This cooking stage is important because it prepares the flour to absorb the eggs and helps the pastry puff properly in the oven.
Step 4: Cool the Dough Slightly
Transfer the dough to a large mixing bowl or the bowl of a stand mixer.
Let it cool for approximately 5–10 minutes, stirring occasionally to release steam.
The dough should still be warm but not hot. Adding eggs while the dough is too hot could cause them to scramble.
Step 5: Add the Eggs Gradually
Add the eggs one at a time, mixing thoroughly after each addition.
The dough may initially look slippery or separated. Continue mixing, and it will gradually become smooth and glossy.
After adding three eggs, check the consistency before adding the fourth.
The finished choux dough should be thick, smooth, shiny, and pipeable. When you lift a spatula, the dough should fall slowly and form a distinctive V-shaped ribbon.
If the dough is too stiff and does not fall from the spatula, lightly beat the fourth egg in a separate bowl and add it gradually, a little at a time.
Avoid adding too much egg, as overly loose dough may spread excessively and produce flat shells.
Step 6: Pipe the Cream Puff Shells
Transfer the choux dough into a piping bag fitted with a large round piping tip.
Pipe approximately 2-inch (5 cm) mounds onto the prepared baking sheets, leaving at least 2 inches (5 cm) between each one.
Keep the piping tip close to the parchment while piping, then lift it gently at the end of each mound.
If small pointed peaks remain, lightly smooth them with a damp fingertip.
For more evenly rounded shells, try to keep the size and height of each mound consistent.
Step 7: Bake Until Golden and Puffed
Place the baking sheets in the preheated oven.
Bake at 425°F (220°C) for 15 minutes without opening the oven door.
After 15 minutes, reduce the temperature to 350°F (175°C) and continue baking for another 20–25 minutes, or until the shells are nicely puffed, golden brown, and feel fairly firm.
Avoid opening the oven during the early baking stages. The steam inside the pastry is what creates the hollow centers, and a sudden temperature drop can cause the shells to collapse.
Step 8: Dry the Shells
Once the cream puffs are baked, remove them from the oven.
Using a small sharp knife or skewer, carefully make a small hole in the bottom or side of each shell to release trapped steam.
Return the shells to the turned-off oven for approximately 5 minutes with the door slightly open. This helps remove excess moisture and reduces the chance of soggy shells.
Transfer them to a wire rack and allow them to cool completely before filling.
Step 9: Prepare the Cream Cheese Mixture
In a large mixing bowl, beat the softened cream cheese with an electric mixer until smooth and creamy.
Add the powdered sugar and vanilla extract. Mix on low speed until combined, then beat briefly until fluffy.
Add the optional lemon juice and lemon zest for a subtle cheesecake tang.
Scrape down the sides of the bowl to make sure the mixture is completely smooth.
Step 10: Whip the Heavy Cream
In a separate chilled bowl, pour in the cold heavy whipping cream.
Using a hand mixer or stand mixer fitted with a whisk attachment, beat on medium-high speed until stiff peaks form.
The whipped cream should hold its shape when the whisk is lifted. Be careful not to overwhip, as it can become grainy or turn buttery.
Step 11: Combine the Cheesecake Filling
Gently fold the whipped cream into the cream cheese mixture in two or three additions.
Use a spatula and a gentle folding motion to preserve the airiness of the whipped cream.
Continue until the filling is smooth, fluffy, and evenly combined.
For a firmer filling that’s easier to pipe, refrigerate it for 15–20 minutes before assembling the cream puffs.
Step 12: Fill the Cream Puff Shells
Transfer the cheesecake filling to a piping bag fitted with a small round or star-shaped tip.
There are two easy ways to fill the shells:
Method 1 – Fill through a small opening: Insert the piping tip through the hole made for releasing steam and gently pipe the cheesecake filling inside until the shell feels full.
Method 2 – Slice and fill: Carefully cut each cream puff horizontally, leaving one side attached if desired. Pipe a generous swirl of cheesecake filling into the bottom half and replace the top.
Repeat until all the shells are filled.
Step 13: Decorate and Chill
Arrange the filled cream puffs on a serving platter.
Dust generously with powdered sugar for a classic bakery-style finish.
For an extra-special presentation, drizzle with melted white chocolate or garnish with small pieces of fresh strawberries.
Refrigerate for approximately 20–30 minutes before serving to allow the filling to firm up.
Step 14: Serve and Enjoy!
Serve the Cheesecake Cream Puffs chilled. Their delicate pastry shells and fluffy cheesecake filling make an irresistible combination.
Enjoy them with coffee, tea, or a glass of cold milk. Every bite is light, creamy, and wonderfully indulgent! 🧁
Expert Tips for Perfect Cheesecake Cream Puffs
Measure the flour accurately. Too much flour can create heavy dough that doesn’t puff properly. Weighing the flour is the most reliable method.
Cook the flour mixture properly. Stirring the dough over the heat for 1–2 minutes helps remove excess moisture and prepares it to absorb the eggs.
Add eggs gradually. The exact amount needed can vary. Always check the dough consistency before adding the final portion of egg.
Look for the V-shaped ribbon. When the dough falls from a spatula in a smooth V shape, it is usually ready for piping.
Don’t open the oven too early. Choux pastry relies on steam to expand. Opening the oven before the shells have set can cause them to collapse.
Bake until deeply golden. Pale shells often contain too much moisture and may collapse or become soggy as they cool.
Dry the shells thoroughly. Releasing steam and allowing the shells to dry briefly in the turned-off oven helps create a sturdier, crisp exterior.
Use cold heavy cream. Cold cream whips more easily and creates a light, stable cheesecake filling.
Fill shortly before serving. For the best contrast between crisp pastry and creamy filling, assemble the puffs as close to serving time as practical.
Delicious Variations
🍓 Strawberry Cheesecake Cream Puffs
Add 2–3 tablespoons of thick strawberry preserves to the cheesecake filling, or place a small amount of strawberry jam inside each shell before piping in the cream.
Decorate with fresh strawberry pieces for a fruity finish.
🍫 Chocolate Cheesecake Cream Puffs
Add 2 tablespoons unsweetened cocoa powder to the cream cheese mixture and increase the powdered sugar slightly to taste.
Finish with melted dark chocolate or chocolate shavings.
🍋 Lemon Cheesecake Cream Puffs
Increase the lemon zest to 1 teaspoon and use 1½ tablespoons lemon juice in the filling. The citrus flavor creates a refreshing contrast to the buttery pastry.
🍪 Oreo Cheesecake Cream Puffs
Fold ½ cup finely crushed chocolate sandwich cookies into the finished cheesecake filling. Reserve a few cookie crumbs for decoration.
🤍 White Chocolate Cheesecake Cream Puffs
Fold ¼ cup (45 g) melted and cooled white chocolate into the cream cheese mixture before incorporating the whipped cream.
☕ Coffee Cheesecake Cream Puffs
Dissolve 1 teaspoon instant espresso powder in 1 teaspoon warm water. Cool completely and mix into the cream cheese filling for a delicious coffee-flavored variation.
🥜 Caramel Pecan Cheesecake Cream Puffs
Pipe a little thick caramel sauce into the shells before adding the cheesecake filling. Finish with finely chopped toasted pecans and a light caramel drizzle.
Serving Suggestions
These Cheesecake Cream Puffs are beautiful served on their own, but they also pair wonderfully with:
- Fresh strawberries, raspberries, or blueberries.
- A light dusting of cocoa powder or powdered sugar.
- Melted white or dark chocolate.
- Salted caramel sauce.
- Coffee, cappuccino, or hot tea.
- Vanilla ice cream for an extra-indulgent dessert.
For special occasions, arrange the cream puffs on a tiered dessert stand and decorate the platter with fresh berries and a few mint leaves.
Make-Ahead Instructions
Prepare the shells ahead: Bake the choux pastry shells up to 1–2 days in advance. Once completely cooled, store them in an airtight container at room temperature in a cool, dry place.
If the shells soften, refresh them in a 300°F (150°C) oven for approximately 5–8 minutes. Allow them to cool completely before filling.
Prepare the cheesecake filling ahead: Make the filling up to 24 hours in advance and refrigerate it in an airtight container. Give it a gentle stir before transferring it to a piping bag.
Assemble ahead: Filled cream puffs are best assembled a few hours before serving and kept refrigerated. The shells will gradually soften as they absorb moisture from the filling.
Storage and Freezing
Unfilled shells: Store completely cooled shells in an airtight container at room temperature for up to 2 days. For longer storage, freeze them.
Filled cream puffs: Store in a covered container in the refrigerator and enjoy within 1–2 days for the best texture. The pastry will gradually soften after filling.
Cheesecake filling: Keep any unused filling refrigerated in a sealed container and use within 2 days.
Freezing unfilled shells: Arrange completely cooled shells in a freezer-safe container or bag and freeze for up to 2 months for best quality. Thaw at room temperature, then refresh in a 300°F (150°C) oven for 5–8 minutes. Cool completely before filling.
Freezing filled cream puffs: Freezing is not recommended for this whipped cheesecake filling, as the texture may become watery or grainy after thawing.
Food safety: Because the filling contains cream cheese and whipped cream, keep filled cream puffs refrigerated. Do not leave them at room temperature for more than 2 hours.
Frequently Asked Questions
1. Why didn’t my choux pastry puff up?
The dough may have contained too much flour, too little egg, or too much moisture. Incorrect oven temperature can also prevent proper expansion. Make sure the butter and water mixture reaches a full boil before adding the flour, cook the dough briefly on the stove, and bake in a properly preheated oven.
2. Why did my cream puffs collapse after baking?
The shells may have been underbaked or removed from the oven before enough moisture had evaporated. Bake until they are deeply golden and firm, then pierce them to release steam and dry them briefly in the turned-off oven.
3. Can I make the choux pastry without a piping bag?
Absolutely! Use two spoons to scoop small mounds of dough onto the baking sheet. They may not be perfectly uniform, but they will still puff beautifully if the dough has the correct consistency.
4. Can I use mascarpone instead of cream cheese?
Yes. Mascarpone creates a softer, more delicate filling with a mild flavor. You may need to adjust the powdered sugar to taste and chill the filling before piping.
5. Why is my cheesecake filling runny?
The cream cheese may have been too warm, the whipping cream may not have reached stiff peaks, or the two mixtures may have been overmixed. Use cold heavy cream, properly softened but still cool cream cheese, and fold gently.
6. Can I use whipped topping instead of heavy cream?
Yes. Thawed whipped topping can replace the heavy cream. Fold it gently into the sweetened cream cheese mixture. The filling will have a slightly sweeter flavor and a different texture.
7. How can I tell when the cream puffs are fully baked?
They should be well risen, golden brown, and firm to the touch. If the shells still feel soft or look pale, they likely need more baking time.
8. Can I make mini cheesecake cream puffs?
Yes! Pipe smaller mounds, approximately 1–1½ inches wide. Begin checking for doneness after about 18–22 minutes of total baking, adjusting according to their size and color. Small shells bake faster than standard cream puffs.
Estimated Nutrition
Approximate values per cream puff, assuming 15 servings and including the cheesecake filling:
- Calories: 220–260
- Carbohydrates: 16–20 g
- Protein: 4–5 g
- Fat: 15–19 g
- Sugar: 8–12 g
- Sodium: 100–150 mg
These values are estimates and vary depending on the amount of filling used, the size of the pastry shells, and the brands of ingredients.
Final Thoughts
These Cheesecake Cream Puffs are a beautiful combination of delicate French pastry and rich, creamy cheesecake. The golden choux shells bake into light, airy little pockets that hold a generous amount of fluffy cream cheese filling, creating a dessert that’s elegant enough for celebrations but simple enough to enjoy at home.
Fill them with your favorite cheesecake flavor, add a dusting of powdered sugar, and serve them chilled for a truly special homemade treat. One bite of these creamy, airy pastries, and you’ll understand why they’re so hard to resist! ❤️🧁