🎄 Christmas Tree Brownies – Fudgy, Festive & Easy Holiday Treats
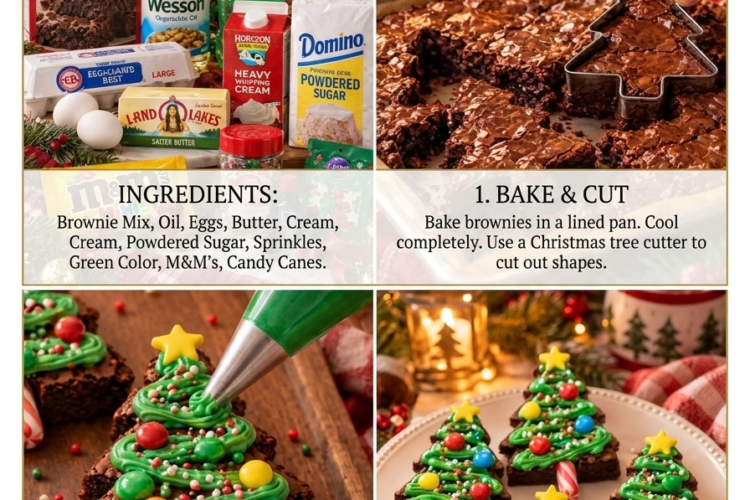
Turn a simple box of fudge brownie mix into the cutest Christmas dessert! These Christmas Tree Brownies are rich, chocolatey, and deliciously fudgy, decorated with bright green frosting, colorful sprinkles, and little candy stars to look just like miniature Christmas trees.
The best part? They’re surprisingly easy to make! Bake one large pan of brownies, cut it into triangles, and decorate each piece with swirls of green frosting. Add a few festive sprinkles and a candy cane piece for the trunk, and you’ll have an adorable holiday treat everyone will love.
Perfect for Christmas parties, cookie exchanges, school celebrations, holiday dessert boards, or a fun afternoon of baking with the family. ❤️
Recipe Details
- Prep time: 25 minutes
- Bake time: 22–28 minutes
- Cooling time: 1–2 hours
- Decorating time: 20 minutes
- Total time: Approximately 2 hours
- Yield: 12–16 Christmas tree brownies
- Difficulty: Easy
- Oven temperature: 350°F (175°C)
- Pan size: 9 × 13-inch (23 × 33 cm)
Ingredients
For the Brownies
- 1 box (15.25 oz / 432 g) fudge brownie mix
- ½ cup vegetable oil (120 ml)
- 2 large eggs
- 3 tablespoons lemon-lime soda (45 ml)
For the Green Buttercream Frosting
- ½ cup unsalted butter, softened (113 g)
- 2 cups powdered sugar (240 g), sifted
- 1 teaspoon vanilla extract
- 1–2 tablespoons milk or heavy cream (15–30 ml)
- Green gel food coloring, as needed
- A small pinch of salt, optional
For Decorating
- 2–3 tablespoons colorful holiday sprinkles
- 12–16 small star-shaped candies or yellow sprinkles
- 3–4 candy canes, broken into small pieces, for the tree trunks (optional)
Ingredient note: The frosting and decorations are suggested additions to complete the recipe. The lemon-lime soda is included as a small addition to the brownie batter; follow the brownie mix package for any other required ingredients and baking guidance.
Instructions
Step 1: Prepare the Oven and Baking Pan
Preheat your oven to 350°F (175°C), or use the temperature specified on your brownie mix package if it differs.
Lightly grease a 9 × 13-inch baking pan and line it with parchment paper, leaving some overhang along the sides. This makes it easier to lift the brownies out after cooling.
Step 2: Prepare the Brownie Batter
In a large mixing bowl, combine the fudge brownie mix, vegetable oil, eggs, and lemon-lime soda.
Stir with a spatula or wooden spoon until the ingredients are just combined and no large pockets of dry mix remain.
The batter should be thick, smooth, and glossy. Avoid overmixing, as this can make the brownies tougher rather than fudgy.
Step 3: Transfer the Batter to the Pan
Pour the brownie batter into the prepared baking pan.
Spread it evenly into the corners using a spatula. Gently tap the pan on the counter once or twice to release any large air pockets.
Step 4: Bake the Brownies
Place the pan in the preheated oven and bake for approximately 22–28 minutes, or according to the package instructions.
Begin checking near the shorter end of the baking time. Insert a toothpick into the center; it should come out with a few moist crumbs, but not wet batter.
Avoid overbaking, as the brownies should remain soft and fudgy enough to make delicious Christmas tree shapes.
Step 5: Cool Completely
Remove the pan from the oven and place it on a wire rack.
Allow the brownies to cool completely in the pan, approximately 1–2 hours. For cleaner cuts, refrigerate the cooled brownies for 20–30 minutes.
Do not attempt to cut or decorate warm brownies, as they can crumble and the frosting may melt.
Step 6: Cut the Christmas Tree Shapes
Use the parchment paper to lift the brownie slab out of the pan and place it on a cutting board.
Cut the brownies into long strips, then cut each strip into triangles.
For the classic Christmas tree appearance, make each triangle slightly taller than it is wide. Depending on your desired serving size, you should get approximately 12–16 tree-shaped brownies.
Save the extra brownie pieces for snacking, dessert parfaits, or brownie truffles.
Step 7: Prepare the Green Buttercream
In a large mixing bowl, beat the softened butter with an electric mixer for 2–3 minutes, until pale and fluffy.
Gradually add the powdered sugar, mixing on low speed to prevent it from scattering.
Add the vanilla extract and 1 tablespoon of milk or cream. Beat until the frosting is smooth and creamy.
Add green gel food coloring a little at a time until you achieve a bright Christmas tree green. If the frosting is too thick, add a little more milk. If it becomes too soft, mix in a little additional powdered sugar.
Beat for another minute until the color is evenly distributed.
Step 8: Pipe the Christmas Trees
Transfer the green frosting into a piping bag fitted with a small star tip or round decorating tip.
Starting at the wider bottom edge of each brownie triangle, pipe small zigzags or overlapping rows of frosting toward the pointed top.
You can also pipe a continuous back-and-forth zigzag pattern from top to bottom for a simple Christmas tree design.
Make sure to leave a little space between the frosting lines so the chocolate brownie remains visible.
Step 9: Add the Festive Decorations
While the frosting is still soft, sprinkle each brownie with colorful holiday sprinkles to resemble Christmas lights and ornaments.
Place a small star-shaped candy at the top of each tree.
For an extra-cute finish, insert a short piece of candy cane into the bottom center of each triangle to create a little tree trunk.
Step 10: Let the Frosting Set
Arrange the decorated brownies on a serving tray.
Allow the frosting to set for approximately 15–20 minutes before stacking or transporting them. For firmer frosting, refrigerate briefly.
Serve and enjoy your festive homemade Christmas Tree Brownies! 🎄🍫
Expert Tips for Perfect Christmas Tree Brownies
Use completely cooled brownies. Warm brownies are fragile and can cause the frosting to melt. Cooling thoroughly makes cutting and decorating much easier.
Chill before cutting. A short time in the refrigerator helps the brownie slab become firmer, giving you cleaner triangular shapes.
Use gel food coloring. Gel coloring provides a vibrant green shade without adding too much liquid to the frosting.
Don’t overbake the brownies. A fudgy brownie is easier to enjoy and has a richer texture than a dry, overbaked one.
Use a piping bag for neat decorations. A star or round piping tip creates attractive frosting patterns. A resealable plastic bag with a small corner snipped off also works.
Add sprinkles immediately. Apply the decorations before the frosting starts to crust so they stick properly.
Make the shapes evenly sized. Lightly mark the cutting lines with a ruler or knife before making the final cuts for a more uniform presentation.
Delicious Variations
🍫 Chocolate Christmas Trees
Use chocolate frosting instead of green buttercream, then decorate with red, green, and white sprinkles for a chocolate-covered forest look.
❤️ Red and White Christmas Trees
Tint half the frosting green and leave the other half white. Pipe alternating lines for a festive candy-cane-inspired appearance.
🎄 Mint Chocolate Brownies
Add ¼ teaspoon peppermint extract to the frosting for a refreshing holiday flavor. Start with a small amount because peppermint extract is strong.
⭐ Snowy Christmas Trees
Dust the finished brownies lightly with powdered sugar for a snowy effect. Add white sprinkles or tiny edible pearls.
🍬 Candy Cane Christmas Trees
Crush a few candy canes and sprinkle the pieces over the green frosting for a refreshing peppermint crunch.
🧁 Mini Christmas Tree Brownies
Cut the brownie slab into smaller triangles to create bite-sized treats for holiday dessert platters. Use small amounts of frosting and miniature decorations.
🤍 White Chocolate Christmas Trees
Drizzle melted white chocolate over the green frosting before adding the sprinkles. Allow the chocolate to set before serving.
Serving Suggestions
These Christmas Tree Brownies make a beautiful addition to any holiday dessert table.
Serve them alongside:
- Christmas sugar cookies and gingerbread cookies.
- Peppermint bark and chocolate truffles.
- Mini cheesecakes and festive cupcakes.
- Hot chocolate topped with whipped cream.
- Coffee, cappuccino, or warm spiced cider.
For a beautiful presentation, arrange the brownies on a large platter with the pointed tops facing upward. Add a few extra sprinkles around the plate and some small holiday decorations for a festive display.
Make-Ahead Instructions
Bake the brownies ahead: Bake the brownie slab up to 2 days before decorating. Once completely cool, wrap it tightly and refrigerate.
Prepare the frosting ahead: Make the buttercream up to 3 days in advance. Store it in an airtight container in the refrigerator. Before piping, allow it to soften slightly and beat briefly until smooth again.
Cut ahead: You can cut the chilled brownie triangles a day in advance and keep them covered in the refrigerator. Decorate them closer to serving time for the freshest appearance.
For Christmas parties: Fully decorated brownies can be made the day before and kept refrigerated in a covered container.
Storage and Freezing
Room temperature: If made with the suggested buttercream frosting, the decorated brownies can generally be kept in an airtight container in a cool room for up to 1–2 days. For food safety, refrigeration is the better choice if the frosting contains perishable additions or the room is warm.
Refrigerator: Store decorated brownies in a single layer in an airtight container for up to 4–5 days for best quality. Allow individual brownies to sit out briefly before serving for a softer texture.
Freezing: For the best appearance, freeze the unfrosted brownie slab or individual brownie triangles. Wrap them well and place in a freezer-safe container for up to 2 months.
Thawing: Thaw the brownies in the refrigerator, then bring them to a cool serving temperature and decorate with freshly prepared frosting.
Food safety: Do not leave perishable frosting or decorated brownies in a warm environment for more than 2 hours.
Frequently Asked Questions
1. Can I use homemade brownie batter instead of a boxed mix?
Absolutely! Use your favorite homemade fudgy brownie recipe, baked in a 9 × 13-inch pan. Let it cool completely before cutting into triangles.
2. Why are my brownies falling apart when I cut them?
They may still be warm, or they may be too soft from underbaking. Let them cool completely and refrigerate for 20–30 minutes before cutting. Use a sharp knife and wipe it clean between cuts.
3. Can I use store-bought frosting?
Yes! A tub of ready-made vanilla frosting can be tinted green with gel food coloring. Transfer it to a piping bag for easy decorating.
4. Can I make these brownies without lemon-lime soda?
Yes. Replace the soda with the amount of water specified on your brownie mix package. The soda is included as a flavor and texture variation, but it is not essential to making brownies.
5. How do I make the frosting bright green?
Use concentrated green gel food coloring. Add it a little at a time, mixing after each addition until you reach your desired shade. Avoid adding too much liquid coloring, which can thin the buttercream.
6. What can I use instead of candy canes for the tree trunks?
Small pretzel sticks, chocolate cookie sticks, or short pieces of wafer rolls make great alternatives.
7. Can I make these brownies gluten-free?
Yes, use a certified gluten-free brownie mix and check that all decorating ingredients are also gluten-free. Follow the mix’s instructions carefully.
8. Can children help decorate these brownies?
Definitely! Children can help add sprinkles, place the candy stars, and decorate the trees with colorful candies. An adult should handle the oven, hot brownie pan, and knife.
Estimated Nutrition
Approximate values per brownie, assuming 16 servings and including frosting and decorations:
- Calories: 240–300
- Carbohydrates: 32–40 g
- Protein: 2–4 g
- Fat: 12–16 g
- Sugar: 22–30 g
- Sodium: 100–200 mg
Actual nutrition depends on the brownie mix brand, amount of frosting used, and decorations. These estimates may vary considerably between products.
Final Thoughts
These Christmas Tree Brownies are a fun, festive, and delicious way to bring a little extra magic to your holiday baking. The rich, fudgy chocolate base, creamy green frosting, colorful sprinkles, and cute candy star decorations make every brownie look like a tiny edible Christmas tree.
They’re easy enough for a relaxed afternoon of family baking and adorable enough to impress guests at Christmas parties. Make a batch, decorate them with your favorite holiday colors, and enjoy a little Christmas sweetness in every bite! 🎄🍫