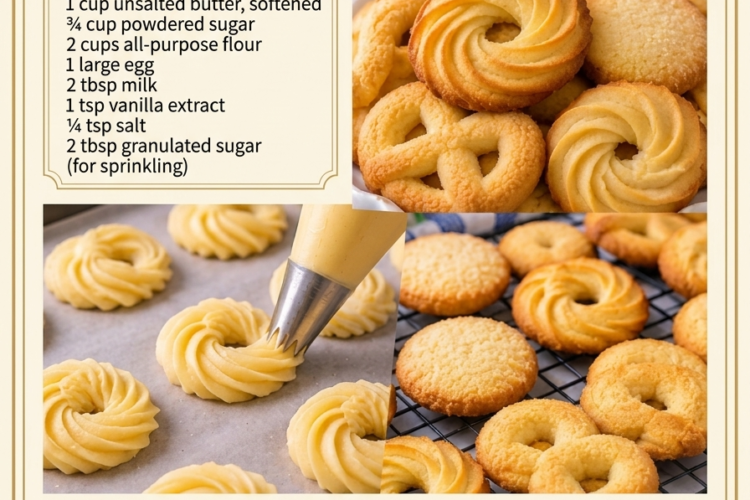
🍪 Danish Butter Cookies – Buttery, Crisp & Melt-in-Your-Mouth
Bring the taste of classic Danish bakery cookies right into your kitchen! These homemade Danish Butter Cookies are delicate, beautifully shaped, and wonderfully buttery, with lightly crisp edges and a tender, melt-in-your-mouth center.
Made with simple ingredients like butter, powdered sugar, flour, and eggs, these cookies have a rich buttery flavor and a lovely delicate sweetness. Their smooth dough is perfect for piping into elegant swirls, rings, and traditional cookie shapes.
They’re especially wonderful during Christmas, but delicious enough to enjoy all year round. Serve them with coffee, tea, or a glass of milk, or arrange them in a pretty tin for homemade holiday gifts. 🎄
Recipe Details
- Prep time: 20 minutes
- Chilling time: 15–20 minutes, optional
- Bake time: 10–14 minutes per batch
- Total time: Approximately 50 minutes
- Yield: 24–30 cookies
- Difficulty: Easy to moderate
- Oven temperature: 350°F (175°C)
Ingredients
For the Danish Butter Cookies
- 1 cup unsalted butter, softened (225 g)
- ¾ cup powdered sugar (90 g)
- 2 cups all-purpose flour (250 g)
- 1 large egg, at room temperature
- 2 tablespoons milk (30 ml)
- 1 teaspoon vanilla extract
- ¼ teaspoon salt
Ingredient tips:
- Use good-quality unsalted butter for the best classic buttery flavor.
- Powdered sugar creates a finer, more delicate cookie texture than granulated sugar.
- Full-fat milk works well, but regular milk is perfectly fine.
- Make sure the butter is softened enough to cream easily but not melted or greasy.
Instructions
Step 1: Prepare the Oven and Baking Sheets
Preheat your oven to 350°F (175°C).
Line two baking sheets with parchment paper or silicone baking mats.
Prepare a piping bag fitted with a large open-star tip for traditional ridged Danish butter cookies. A sturdy piping bag is recommended because the dough is thick.
Step 2: Cream the Butter and Powdered Sugar
Place the softened butter in a large mixing bowl.
Using an electric mixer, beat the butter on medium speed for approximately 2 minutes until smooth and creamy.
Gradually add the powdered sugar and continue beating for another 2–3 minutes, until the mixture becomes pale, fluffy, and light.
Scrape down the sides of the bowl as needed to ensure everything is evenly combined.
Step 3: Add the Egg and Vanilla
Add the egg and vanilla extract to the butter mixture.
Beat on medium-low speed until fully incorporated and smooth.
The mixture may look slightly separated at first, but continue mixing briefly until it becomes creamy again.
Step 4: Combine the Dry Ingredients
In a separate bowl, whisk together the flour and salt.
Gradually add the flour mixture to the butter mixture, mixing on low speed until a soft dough begins to form.
Avoid overmixing. Once most of the flour has disappeared, stop the mixer.
Step 5: Add the Milk
Add the milk one tablespoon at a time, mixing gently after each addition.
The finished dough should be soft, smooth, and thick enough to hold its shape while remaining easy to pipe.
Depending on the moisture in your flour and the size of your egg, you may not need the full amount of milk. Add only enough to make the dough pipeable.
Important: If the dough is too stiff, piping it may be difficult. Add a little more milk, about 1 teaspoon at a time. If it becomes too soft, refrigerate it briefly before shaping.
Step 6: Pipe the Cookies
Transfer the dough into the prepared piping bag fitted with a large star tip.
Pipe the dough onto the parchment-lined baking sheets, leaving approximately 1½–2 inches (4–5 cm) between each cookie.
You can create several traditional shapes:
- Swirls: Pipe small spirals starting from the center and moving outward.
- Rings: Pipe circles and gently connect the ends.
- S-shaped cookies: Pipe short curved lines for a classic decorative look.
- Rosettes: Pipe a small swirl with a ridged star-shaped finish.
Keep the cookies similar in size so they bake evenly.
If the dough is difficult to pipe, let it soften slightly at room temperature or add a tiny amount of milk. Avoid forcing very stiff dough through the piping tip, as this can split the bag.
Step 7: Chill the Shaped Cookies
Place the baking sheets in the refrigerator for approximately 15–20 minutes.
This optional step helps firm the butter and preserves the piped shapes during baking, particularly if your kitchen is warm.
Step 8: Bake Until Lightly Golden
Bake the cookies for 10–14 minutes, depending on their size and thickness.
The edges should become lightly golden, while the centers remain pale.
Do not wait for the entire cookie to turn brown. Danish butter cookies are traditionally light in color with gently golden edges.
Watch closely during the final few minutes because small cookies can brown quickly.
Step 9: Cool the Cookies
Remove the baking sheets from the oven and let the cookies rest for 5 minutes.
They will be delicate while hot, so allow them to firm up before transferring them.
Carefully move the cookies to a wire rack and let them cool completely.
Step 10: Serve and Enjoy!
Arrange the cooled cookies on a serving platter or place them in a decorative airtight cookie tin.
Enjoy them with a cup of coffee, black tea, hot chocolate, or a glass of cold milk.
Their delicate buttery flavor and crisp texture make them especially delicious with a warm drink!
Expert Tips for Perfect Danish Butter Cookies
Use properly softened butter. Butter should give slightly when pressed but should not look oily or melted. Butter that’s too warm can cause the cookies to spread excessively.
Cream the butter thoroughly. Beating the butter and powdered sugar until fluffy helps create a delicate texture.
Use a large piping tip. A wide star tip makes piping easier and produces the beautiful ridges associated with traditional Danish butter cookies.
Don’t add too much milk. The dough should be soft enough to pipe but firm enough to retain its shape. Add milk gradually.
Chill before baking. Chilling the piped cookies helps them maintain their decorative shapes in the oven.
Avoid overmixing. Once the flour is incorporated, stop mixing. Excessive mixing can develop gluten and make the cookies less tender.
Bake until just lightly golden. These cookies should remain mostly pale. Overbaking can make them dry and overly crisp.
Use parchment paper. It helps prevent sticking and makes it easier to transfer the delicate cookies after baking.
Delicious Variations
🍫 Chocolate-Dipped Danish Butter Cookies
Once completely cooled, dip half of each cookie into melted dark or milk chocolate. Place on parchment paper and allow the chocolate to set.
🍋 Lemon Danish Butter Cookies
Add 1 teaspoon finely grated lemon zest and ½ teaspoon lemon extract to the butter mixture for a fresh citrus flavor.
☕ Coffee Butter Cookies
Dissolve 1 teaspoon instant espresso powder in 1 teaspoon warm milk. Allow it to cool, then add it to the dough for a subtle coffee flavor.
🤍 Vanilla Almond Butter Cookies
Replace ½ teaspoon of the vanilla extract with almond extract for a delicate bakery-style almond aroma.
🎄 Christmas Danish Butter Cookies
Sprinkle the cookies with festive sanding sugar before baking or decorate them with melted white chocolate and colorful holiday sprinkles after cooling.
🥥 Coconut Butter Cookies
Replace ¼ cup (30 g) of the flour with finely desiccated coconut for a delicate coconut flavor.
🍓 Jam-Filled Butter Cookies
Pipe small rosettes, create a shallow indentation in each center, and add a small amount of thick strawberry or raspberry jam before baking. Keep the filling modest so it doesn’t spread over the cookies.
Serving Suggestions
These beautiful cookies are perfect for:
- Afternoon tea with black tea or green tea.
- Coffee, cappuccino, or espresso.
- Hot chocolate during the winter months.
- Holiday cookie platters and Christmas dessert tables.
- Homemade edible gifts in decorative tins.
- Dessert boards with chocolate truffles and shortbread.
For an elegant presentation, arrange the cookies in small paper liners and place them in a decorative serving box. They also make lovely homemade gifts when packed in layers with parchment paper.
Make-Ahead Instructions
Prepare the dough ahead: Make the dough, cover it tightly, and refrigerate for up to 24 hours. Before piping, allow it to soften slightly until manageable. If it becomes too firm, add a tiny amount of milk as needed.
Pipe ahead: Pipe the cookies onto parchment-lined baking sheets, cover carefully, and refrigerate for several hours before baking.
Freeze unbaked cookies: Pipe the shapes onto a lined tray and freeze until firm. Transfer them to a freezer-safe container with parchment between layers. Freeze for up to 2 months for best quality. Bake from frozen, adding a few extra minutes as needed.
Bake ahead: These cookies are excellent for preparing in advance. Once cooled completely, store them in an airtight container until ready to serve.
Storage Instructions
Room temperature: Store completely cooled cookies in an airtight container for up to 1 week in a cool, dry place.
Refrigerator: Refrigeration is generally unnecessary for plain butter cookies and can introduce moisture that affects their crisp texture.
Freezer: Place baked cookies in a freezer-safe container with parchment paper between layers. Freeze for up to 2 months for best quality.
Thawing: Allow frozen cookies to thaw at room temperature while still in their container. Once completely thawed, keep them sealed to preserve their texture.
To refresh: If the cookies become slightly soft, place them in a 300°F (150°C) oven for 3–4 minutes, then cool completely on a wire rack.
Frequently Asked Questions
1. Why is my Danish butter cookie dough too stiff to pipe?
The butter may have been too cold, or the dough may contain too much flour. Let the dough soften slightly at room temperature. Add milk 1 teaspoon at a time until it becomes smooth and pipeable.
2. Why did my cookies lose their shape?
The butter may have been too warm, the dough may have been too soft, or the shaped cookies may not have been chilled before baking. Refrigerate the piped cookies for 15–20 minutes before placing them in the oven.
3. Can I make these cookies without a piping bag?
Yes! You can use a cookie press or roll the dough into small balls and gently flatten them with a fork. The cookies will have a different appearance but will still taste buttery and delicious.
4. Can I use salted butter?
Yes. If using salted butter, omit the additional ¼ teaspoon salt from the recipe.
5. Can I use granulated sugar instead of powdered sugar?
Powdered sugar is recommended because it creates a smoother dough and delicate texture. Granulated sugar may make the cookies slightly grainier and change their spread and final texture.
6. Why are my cookies spreading too much?
The butter may have been too soft, the dough may have contained too much milk, or the baking sheets may have been warm. Chill the shaped cookies before baking and make sure the oven is fully preheated.
7. How do I know when Danish butter cookies are done?
The edges should be lightly golden and the centers should remain pale. They may feel soft when first removed from the oven but will become firmer as they cool.
8. Can I make these cookies gluten-free?
You can try a good-quality 1-to-1 gluten-free baking flour blend designed for cookies. The texture and piping consistency may differ, so adjust the milk gradually.
Estimated Nutrition
Approximate values per cookie, assuming a yield of 28 cookies:
- Calories: 125–145
- Carbohydrates: 13–16 g
- Protein: 1–2 g
- Fat: 7–9 g
- Saturated fat: 4–5 g
- Sugar: 5–7 g
- Sodium: 25–45 mg
These are estimates and will vary depending on the cookie size, exact ingredients, and how much milk is used.
Final Thoughts
These Danish Butter Cookies are a wonderful homemade version of a timeless bakery classic. With their delicate buttery flavor, crisp edges, tender centers, and beautiful piped shapes, they’re just as lovely to serve at a special gathering as they are to enjoy with your everyday cup of coffee.
Make them for Christmas, package them in decorative tins as thoughtful homemade gifts, or keep a batch in your cookie jar for whenever you crave something simple and delicious. One bite of these buttery little cookies, and you’ll understand why they’re such a beloved classic! 🍪❤️