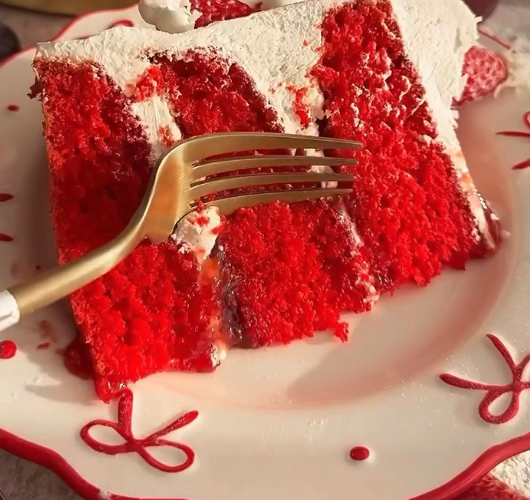
Bright, festive, and completely plant-based, this Vegan Strawberry Santa Hat Cake is the ultimate showstopping Christmas dessert! Featuring three layers of fluffy red velvet-style sponge infused with strawberry jam, wrapped in velvety dairy-free vanilla bean buttercream, and adorned with cute fresh strawberry “Santa hats” dusted with coconut “snow.”
Whether you are hosting a holiday dinner party, a Christmas potluck, or baking for family celebrations, this adorable centerpiece delivers pure holiday magic in every slice!
Quick Recipe Details
- Yield: 10–12 Slices
- Prep Time: 30 minutes
- Bake Time: 25–30 minutes
- Chill & Assemble Time: 45 minutes
- Total Time: 1 hour 45 minutes
Why You Will Love This Recipe
- 100% Dairy-Free & Egg-Free: Uses a simple homemade vegan buttermilk base to achieve an amazingly soft, springy cake crumb.
- Charming Holiday Presentation: Fresh strawberries double as tiny Santa hats decorated with fluffy piped buttercream and coconut snow.
- Delicious Flavor Contrast: Sweet vanilla buttercream pairs effortlessly with tart, fruity St. Dalfour strawberry jam.
- Great Make-Ahead Dessert: The sponge layers can be baked ahead of time to make holiday assembly smooth and stress-free.
Ingredients Breakdown
Red Velvet-Style Vegan Cake Base
- 480ml Dairy-Free Milk (soya milk works best for vegan buttermilk)
- 2 teaspoons Apple Cider Vinegar
- 420g Self-Raising Flour (sifted)
- 300g Caster Sugar (fine white sugar)
- 1 teaspoon Baking Powder
- 1 teaspoon Bicarbonate of Soda
- 120ml Sunflower Oil
- Red Food Gel (as needed for deep red color)
Fluffy Vanilla Bean Buttercream
- 530g Dairy-Free Butter (block-style butter works best, such as Flora)
- 500g Powdered / Icing Sugar (sifted)
- 1 teaspoon Vanilla Bean Paste
- Dairy-Free Milk (optional splash, as needed)
Filling, Assembly & Santa Hat Decor
- Fresh Strawberries (hull intact for top hats, halved for side hats)
- 1 jar St Dalfour Strawberry Jam
- 30g Desiccated Coconut
- Extra Powdered Sugar (for final dusting)
Ingredients Summary Table
| Component | Key Ingredients | Purpose & Prep Notes |
| Vegan Buttermilk | Dairy-free milk & apple cider vinegar | Curdles for 10 minutes to activate leavening agents and soften crumb. |
| Cake Batter | Self-raising flour, sugar, oil, baking soda, red gel | Creates three vibrant, springy red cake layers. |
| Buttercream | Dairy-free block butter, icing sugar, vanilla paste | Whipped for 5 minutes until light, smooth, creamy, and airy. |
| Filling & Decor | Strawberry jam, fresh strawberries, coconut | Adds fruitiness and forms the adorable Santa hat decorations. |
Step-by-Step Instructions
1.Prepare Oven & Batter Base:Make vegan buttermilk and sift dry ingredients.
Preheat your fan oven to 180°C (350°F) and line three 8-inch loose-base cake tins with parchment paper. Whisk 480ml dairy-free milk and 2 tsp apple cider vinegar together; set aside for 10 minutes to curdle into vegan “buttermilk”. In a large bowl, sift 420g self-raising flour, 300g caster sugar, 1 tsp baking powder, and 1 tsp bicarbonate of soda.
2.Mix Batter & Bake Layers:Mix oil and red gel into buttermilk, combine wet and dry, then divide.
Whisk 120ml sunflower oil and a drop of red food gel into the curdled milk mixture. Pour wet ingredients into dry and mix until combined. Divide batter evenly among the three prepared tins, tapping gently to release air bubbles. Bake in the center of the oven for 25 to 30 minutes until a skewer inserted into the center comes out clean. Cool completely on a rack.
3.Whip Vanilla Buttercream:Whip dairy-free butter, icing sugar, and vanilla until fluffy.
In a large bowl or stand mixer, whip 530g dairy-free butter until creamy. Sift in 500g icing sugar and 1 tsp vanilla bean paste. Whip on high speed for about 5 minutes until smooth, creamy, and airy (add a splash of plant milk if too thick, or more icing sugar if too soft). Transfer 3 heaped tablespoons to a piping bag fitted with a star nozzle.
4.Stack & Crumb Coat:Layer cakes with buttercream and strawberry jam wells.
Place the first cake layer on a serving plate. Spread a layer of buttercream over top, create a slight well in the middle with a spoon, and dollop in strawberry jam. Repeat with the second and third cake layers. Apply a thin crumb coat of buttercream over the whole cake and refrigerate for 15 to 20 minutes to firm up.
5.Smooth Final Frosting Coat:Apply smooth final coat and decorate top edge with jam and swirls.
Remove cake from the fridge and spread a thicker, final coat of buttercream all over, smoothing the sides with a cake scraper. Pipe decorative swirls or shells around the top rim with the reserved piping bag, then spoon and spread strawberry jam across the center top of the cake.
6.Assemble Santa Hats & Dust:Attach fresh strawberry halves and tops with buttercream and coconut snow.
Pat all sliced and whole strawberries completely dry with paper towels. Press strawberry halves around the cake sides with piped buttercream accents. Place 8 whole hulled strawberries upside down around the top edge, piping a small white buttercream bulb on each point for a Santa hat. Sprinkle desiccated coconut over top and dust the entire cake with icing sugar. Slice and serve!
Expert Baking Tips for Success
- Pat Strawberries Completely Dry: Excess surface moisture will prevent the strawberry halves from sticking to the buttercream. Always use paper towels to dry the fruit thoroughly before decorating.
- Use Block-Style Dairy-Free Butter: Tub spreads contain higher water content which can make buttercream runny. Using a block-style vegan butter (like Flora Block) ensures a firm, stable frosting that holds its piped shape.
- Don’t Overfill Jam Wells: When layering the cake, leave a generous ring of buttercream around the outer edge so the strawberry jam doesn’t squeeze out the sides when stacking.
Variations & Serving Suggestions
- Chocolate Red Velvet Swap: Replace 30g of the self-raising flour with cocoa powder for a deeper chocolate-flavored red velvet sponge layer.
- Sparkling Berry Garnish: Roll a few fresh whole cranberries in sugar syrup and caster sugar to add extra sparkle next to the strawberry hats.
- Peppermint Frosting Twist: Add ½ teaspoon of peppermint extract to the buttercream filling for a candy cane flavor profile.
Storage & Make-Ahead Instructions
- Refrigerator Storage: Store the finished cake in a sealed cake caddy or container in the fridge. Best enjoyed within 3 days of assembly.
- Serving Note: Remove the cake from the refrigerator about 15 minutes before serving to let the buttercream soften slightly for optimal texture.
- Un-iced Sponge Preparation: Baked, un-iced cake layers can be stored in an airtight container at room temperature for up to 2 days before frosting.