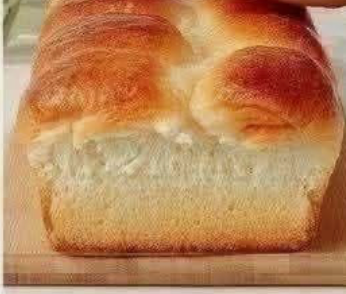
Social media posts often label this image as “Zero Carb / No Flour / No Knead / 3-Ingredient Magic Bread,” but the bread pictured is actually a classic enriched Japanese milk bread (Shokupan) made with standard wheat flour, yeast, and dairy. You cannot achieve this golden, shreddable, cotton-soft crumb without flour starches and gluten networks.
Here is the authentic, extended masterclass recipe to recreate this exact pull-apart, bakery-style sandwich loaf at home using an easy, hands-off no-knead method.
The Science Behind the Cottony Crumb
- High Hydration Gluten Auto-Development: Instead of vigorously kneading by hand or machine, letting a high-hydration dough rest for an extended first rise allows flour enzymes (protease and amylase) to naturally link wheat proteins into strong, elastic gluten sheets.
- Milk & Sugar Tenderizers: Whole milk provides natural fats and lactose, while granulated sugar retains moisture. This combination prevents the bread from turning crusty or dry like a French baguette, keeping the crumb soft and pillowy for days.
- The 4-Roll Modular Shaping: Dividing the dough into four rolled cylinders and placing them side by side in a loaf pan directs the oven spring upward rather than outward, creating the distinct domed ridges and vertical pull-apart shreds shown in the photos.
Ingredients & Exact Measurements
For the Yeast Base:
- 1 cup (240 ml) whole milk, warmed to 105°F–110°F (40°C–43°C)
- 2 ¼ teaspoons (7 g / 1 packet) active dry yeast
- 2 tablespoons (25 g) granulated sugar
For the Dough Matrix:
- 3 cups (375 g) bread flour (or unbleached all-purpose flour), spooned and leveled
- 1 teaspoon (6 g) fine sea salt
- 2 tablespoons (30 ml) neutral vegetable oil (or melted unsalted butter)
For the Bakery Glaze:
- 1 tablespoon whole milk (for brushing before baking)
- 1 tablespoon melted butter (for brushing hot out of the oven)
Step-by-Step Instructions
1. Activate the Yeast
In a measuring cup or small bowl, whisk together the 1 cup warm milk, 2 tbsp sugar, and 2 ¼ tsp yeast. Let sit for 5 to 8 minutes until a thick, foamy layer forms on the surface.
2. Mix the No-Knead Shaggy Dough
- In a large mixing bowl, whisk together the 3 cups flour and 1 tsp salt.
- Pour in the foamy yeast mixture and 2 tbsp oil.
- Stir with a sturdy spatula or wooden spoon for 1 to 2 minutes until all dry flour is absorbed and a wet, shaggy dough forms. (No kneading required).
3. First Bulk Rise (Natural Gluten Development)
- Scrape down the bowl, cover it tightly with plastic wrap or a damp kitchen towel.
- Let it rise in a warm, draft-free spot for 90 minutes to 2 hours, or until it triples in volume and shows a webbed, airy gluten structure when nudged.
4. Divide and Modular Shape
- Grease an 8.5×4.5-inch or 9×5-inch loaf pan with oil or non-stick spray.
- Turn the airy dough out onto a lightly floured surface. Gently press out large air pockets without tearing the dough.
- Divide the dough into 4 equal portions (approx. 160g each).
- Roll each piece into a small oval, fold both sides toward the center, and roll it up tightly from bottom to top into a smooth cylinder.
5. Pan Proof (The Second Rise)
- Arrange the 4 rolled dough cylinders side by side across the bottom of the prepared loaf pan.
- Cover loosely with a clean towel and let rise for 45 to 60 minutes, until the dough rises roughly ½ inch to 1 inch above the rim of the pan.
6. Precision Bake & Butter Glaze
- Preheat your oven to 350°F (175°C) with the rack placed in the center.
- Lightly brush the tops of the proofed dough with 1 tablespoon of milk.
- Bake at 350°F (175°C) for 28 to 32 minutes until deeply golden brown across the top domes and sounding hollow when tapped.
- Brush the hot crust immediately with 1 tablespoon of melted butter for a glossy shine, then cool in the pan for 10 minutes before turning out onto a wire rack.
Baker’s Troubleshooting
- Dense Crumb: Flour was scooped directly with the cup instead of spooned and leveled, adding too much dry weight to the dough.
- Top Browning Too Fast: Enriched milk breads brown rapidly due to milk sugars; loosely lay a sheet of aluminum foil over the top at the 18-minute mark if needed.
- Storage: Keep the fully cooled loaf in an airtight bread bag at room temperature for up to 4 days.