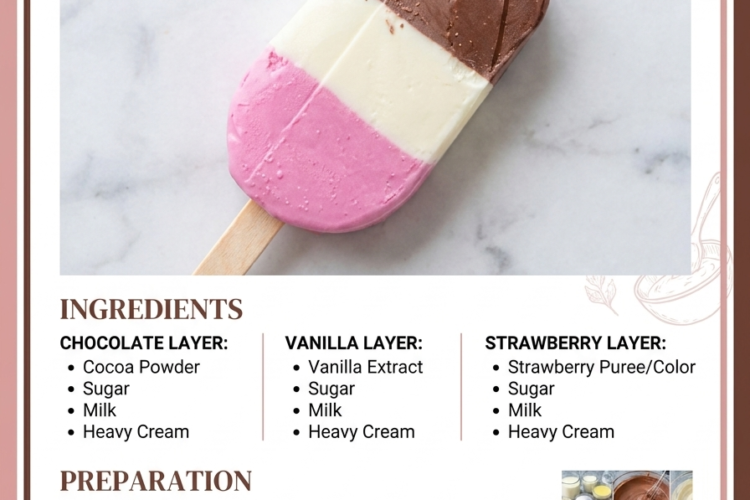
🍫🍦 Three-Layer Chocolate, Vanilla & Strawberry Ice Cream Popsicles
Three delicious flavors, three beautiful layers, and one irresistible frozen treat!
These homemade Chocolate, Vanilla, and Strawberry Ice Cream Popsicles bring together the rich taste of chocolate, the creamy sweetness of vanilla, and the fruity freshness of strawberries in one colorful, layered dessert. Each bite is smooth, milky, and wonderfully refreshing—just like a frozen treat you’d find at your favorite ice cream shop!
Made with whipping cream, evaporated milk, sweetened condensed milk, and milk powder, these popsicles have a rich, creamy texture without requiring an ice cream machine. The mixture is divided into three portions and flavored individually, then layered in popsicle molds to create beautiful stripes of chocolate brown, creamy white, and strawberry pink.
They’re perfect for summer afternoons, birthday parties, family gatherings, or even a small homemade frozen-dessert business. Prepare them ahead, freeze until firm, and keep a batch ready whenever you’re craving something sweet and refreshing! 🍓
Recipe Details
- Prep Time: 25 minutes
- Layer-Freezing Time: 1½–2 hours
- Final Freezing Time: 6–8 hours
- Total Time: Approximately 8–10 hours
- Yield: 8–10 popsicles, depending on mold size
- Course: Dessert, Frozen Treat
- Cuisine: Homemade, International
- Difficulty: Easy
- Cooking Method: No-bake, freezing
Ingredients
For the Creamy Ice Cream Base
- 2 cups (500 ml) liquid whipping cream, cold
- 1 cup (250 ml) evaporated milk, chilled
- ½ cup (approximately 150–160 g) sweetened condensed milk
- 1 teaspoon vanilla extract
- 3 tablespoons (24 g) milk powder
For the Chocolate Layer 🍫
- One-third of the prepared ice cream base
- 1½ tablespoons (8–10 g) unsweetened cocoa powder
- 1 tablespoon (15 ml) warm milk, as needed to dissolve the cocoa
- 1 tablespoon melted dark chocolate, optional, for a deeper chocolate flavor
For the Vanilla Layer 🍦
- One-third of the prepared ice cream base
- ½ teaspoon additional vanilla extract, optional, for a stronger vanilla flavor
For the Strawberry Layer 🍓
- One-third of the prepared ice cream base
- 3 tablespoons (approximately 20–25 g) freeze-dried strawberry powder, or ¼ cup (60 g) thick strawberry purée
- 1–2 teaspoons powdered sugar, optional, depending on the sweetness of the strawberries
Ingredient note: Your original ingredient list includes the ice cream base but stops before the flavoring ingredients. The cocoa, strawberry flavoring, and optional additions above are suggested quantities to complete the three-flavor recipe. Freeze-dried strawberry powder provides a concentrated strawberry taste with less added moisture, while fresh strawberry purée gives a more natural fruit flavor.
Instructions
Step 1: Prepare the Ice Cream Base
Make sure the whipping cream and evaporated milk are cold before you begin.
In a bowl, combine the chilled evaporated milk, sweetened condensed milk, milk powder, and vanilla extract. Whisk thoroughly until the milk powder dissolves and the mixture looks smooth.
In a separate large, chilled mixing bowl, pour in the cold whipping cream.
Using an electric mixer, beat the whipping cream on medium-high speed until soft to medium peaks form. The cream should look fluffy and hold its shape without becoming stiff or grainy.
Important: Stop beating as soon as the cream reaches the desired consistency. Overwhipped cream can become grainy and difficult to incorporate smoothly.
Step 2: Combine the Cream and Milk Mixture
Pour the evaporated milk mixture into the whipped cream in two or three additions.
Use a spatula to gently fold the mixture together, working from the bottom of the bowl upward until the ingredients are evenly combined.
Avoid stirring too vigorously, as this can deflate the whipped cream and make the finished popsicles less airy.
The mixture should be smooth, creamy, and thick enough to coat the back of a spoon.
Step 3: Divide the Base Into Three Portions
Divide the prepared ice cream base as evenly as possible among three bowls.
Keep one portion plain for the vanilla layer. The other two portions will become the chocolate and strawberry layers.
Work gently so the base stays light and creamy.
Step 4: Make the Chocolate Layer
Place the cocoa powder in a small bowl and mix it with the warm milk until it forms a smooth paste with no dry lumps.
Allow the cocoa paste to cool to room temperature. If using melted dark chocolate, let that cool slightly as well.
Add the cocoa paste to the first portion of ice cream base. Fold gently until the color is even and the chocolate is fully incorporated.
For a richer chocolate flavor, fold in the optional melted dark chocolate.
If the mixture becomes too thick, gently fold in a small spoonful of the reserved base or a little cold milk. Avoid adding too much liquid, which can affect the frozen texture.
Set the chocolate mixture aside in the refrigerator while you prepare the other flavors.
Step 5: Prepare the Vanilla Layer
The second portion can remain plain because the base already contains vanilla extract.
For a more pronounced vanilla flavor, gently fold in the optional extra ½ teaspoon vanilla extract.
Keep the vanilla mixture chilled until you’re ready to layer it into the molds.
Its pale, creamy color will create a beautiful contrast between the chocolate and strawberry layers.
Step 6: Prepare the Strawberry Layer
For the easiest and most consistent result, add the freeze-dried strawberry powder directly to the third portion of ice cream base.
Fold gently until the mixture turns a lovely strawberry-pink color and the powder is evenly distributed.
Taste a small amount and add the optional powdered sugar if your strawberries are particularly tart.
Using fresh strawberries instead: Blend about ½ cup fresh strawberries until smooth, then simmer the purée over low heat until reduced to approximately ¼ cup. Cool completely before folding it into the base. Reducing the purée removes excess moisture and helps prevent an icy strawberry layer.
If needed, add a little more strawberry powder to intensify the color and flavor.
Step 7: Add the First Layer to the Popsicle Molds
Place your clean, dry popsicle molds on a flat tray that will fit comfortably in the freezer.
Spoon or pipe the chocolate mixture into each mold, filling approximately one-third of the mold’s capacity.
Tap the molds gently against the counter to settle the mixture and release large air pockets.
Place the molds in the freezer for approximately 30–45 minutes, or until the chocolate layer is firm enough to support the next layer.
The timing depends on your mold size and freezer temperature. The layer should be set on top but does not need to be frozen completely solid.
Step 8: Add the Vanilla Layer
Carefully spoon or pipe the vanilla mixture over the chocolate layer.
Work slowly to avoid disturbing the chocolate layer underneath. A piping bag or small spoon makes this step easier.
Leave enough room for the strawberry layer and a little expansion during freezing.
Return the molds to the freezer for another 30–45 minutes, until the vanilla layer is sufficiently firm.
Step 9: Add the Strawberry Layer
Gently add the strawberry mixture to finish the final layer.
Smooth the surface with a spoon if necessary. Wipe any mixture from the rim of each mold so the lids can fit securely.
Insert the popsicle sticks according to the instructions for your molds. Some molds have holders that keep the sticks centered; others require you to freeze the mixture until firm enough to support the sticks.
If your mold design allows it, secure the lid or stick holder now.
Step 10: Freeze Until Completely Firm
Return the molds to the freezer and freeze for at least 6–8 hours, preferably overnight.
The popsicles should be completely solid before you attempt to remove them. Larger molds may need additional time.
Avoid moving or tilting the tray during freezing, as this may cause the layers to shift.
Step 11: Unmold the Popsicles
When ready to serve, remove the molds from the freezer.
If the popsicles are difficult to release, run the outside of the molds under lukewarm water for approximately 5–10 seconds. Keep the water away from the exposed popsicle surfaces.
Gently pull on the sticks to release the popsicles. If they resist, warm the molds for another few seconds rather than pulling forcefully.
Place the popsicles on a chilled tray or serve immediately.
Enjoy the beautiful chocolate, vanilla, and strawberry layers in every bite! 🍫🍦🍓
Expert Tips for Perfect Layered Popsicles
Keep the cream cold. Cold whipping cream whips more readily and creates a lighter base.
Use whipping cream with sufficient fat. Cream labeled for whipping generally gives a richer, more stable result than low-fat cream.
Dissolve cocoa before adding it. Mixing cocoa with a little warm milk prevents dry clumps from appearing in the chocolate layer.
Choose concentrated strawberry flavoring. Freeze-dried strawberry powder is especially useful because it gives strong flavor and color without adding much water.
Freeze each layer until just firm. If a layer is too soft, the next one may sink into it. If it freezes completely solid, the layers may separate more easily. A firm but slightly tacky surface is ideal.
Pipe for cleaner stripes. A piping bag makes it easier to place each layer neatly, particularly in narrow molds.
Avoid overfilling. Leave a small amount of room at the top according to your mold’s design.
Freeze on a level tray. A flat surface helps keep the layers even.
Don’t rush the final freeze. The popsicles need to be completely solid for clean unmolding and the best texture.
Delicious Variations
🍫 Double Chocolate Popsicles
Add finely chopped dark chocolate to the chocolate portion, or drizzle a little melted chocolate into the molds before adding the chocolate layer. Allow any chocolate addition to cool before mixing it with the cream base.
🍓 Strawberry Cheesecake Popsicles
Blend 2 tablespoons softened cream cheese with a little of the reserved base until smooth, then fold it into the strawberry portion. This adds a gentle cheesecake flavor and a richer texture.
🍦 Extra-Vanilla Popsicles
Add another ½ teaspoon vanilla extract or use the seeds from a small piece of vanilla bean. The extra vanilla makes the white layer taste especially rich.
🥭 Tropical Mango Popsicles
Replace the strawberry layer with ¼ cup thick, reduced mango purée. Use a similar layering method and allow the purée to cool completely before mixing.
☕ Mocha Popsicles
Mix ½–1 teaspoon instant espresso powder into the chocolate layer. The coffee enhances the cocoa flavor and adds a gentle café-style note.
🌈 More Colorful Layers
Use separate portions of the base with different fruit powders or fruit purées. Keep additions thick and concentrated so each layer maintains its texture.
🥥 Coconut Chocolate Popsicles
Replace part of the evaporated milk with coconut milk and add a small amount of finely shredded coconut to the chocolate layer. The result will have a subtle coconut flavor.
Serving Suggestions
These colorful popsicles are a fun dessert for all kinds of occasions.
- Summer parties: Arrange them in a chilled tray for a refreshing warm-weather treat.
- Birthday celebrations: Serve alongside cupcakes, cookies, and other frozen desserts.
- Kids’ treats: The three layers make them especially appealing to children. Adjust sweetness and portions to suit your needs.
- After-dinner dessert: Enjoy one after a family meal instead of a heavier dessert.
- Ice cream platter: Serve with fresh strawberries, banana slices, or a few chocolate shavings.
- Homemade dessert gifts: Package the frozen popsicles individually in food-safe wrappers for convenient serving.
For an extra-special presentation, drizzle the chocolate layer with a little melted chocolate before serving, or sprinkle the strawberry side with finely crushed freeze-dried strawberries.
Make-Ahead Instructions
These popsicles are ideal for preparing ahead of time.
Make them at least one day before a party or gathering so they have plenty of time to freeze completely.
Once unmolded, wrap each popsicle individually in freezer-safe plastic wrap or place it in a suitable airtight container. Return the popsicles to the freezer immediately.
For a homemade frozen-dessert business, prepare the layers in consistent batches, keep molds level during freezing, and package each popsicle only once fully frozen.
Storage and Freezing
Freezer Storage
Store the popsicles in an airtight, freezer-safe container at 0°F (-18°C) or below.
For the best flavor and texture, enjoy them within 2–4 weeks. They may remain safe longer if continuously frozen, but ice crystals and flavor changes can develop over time.
Preventing Ice Crystals
- Make sure the popsicles are completely frozen before packaging.
- Wrap them individually or store them in a well-sealed container.
- Keep them away from the freezer door, where temperatures fluctuate more often.
- Avoid repeated thawing and refreezing.
Can You Refreeze Melted Popsicles?
If they have softened slightly while being handled but remain very cold, return them to the freezer promptly. However, significant melting and refreezing can affect the creamy texture and may create ice crystals. Discard popsicles that have been left out too long or exposed to unsafe temperatures.
Frequently Asked Questions
Do I need an ice cream machine?
No. This recipe uses whipped cream to create a light, creamy base, so no ice cream machine is required.
Why are my popsicles icy instead of creamy?
Too much added liquid, insufficiently whipped cream, or excess moisture from fresh fruit can contribute to an icy texture. Whip the cream properly, measure the ingredients accurately, and use concentrated strawberry flavoring or reduced purée.
Why did my layers mix together?
The previous layer may not have been firm enough when the next one was added. Freeze each layer until it can support the next one without sinking.
Why did my layers separate after unmolding?
The layers may have frozen too hard between additions, or they may not have bonded well. Try adding each new layer when the previous layer is firm but not completely frozen solid.
Can I use fresh strawberry purée?
Yes. For the best result, reduce the purée over low heat and cool it completely before adding it to the base. This concentrates the flavor and minimizes excess moisture.
Can I use strawberry jam instead?
Yes. Stir a small amount of smooth strawberry jam into the base, beginning with 2–3 tablespoons. Reduce any extra sweetener if necessary because jam is already sweet.
Can I make the popsicles less sweet?
You can reduce the condensed milk slightly, but it also contributes to the texture of the frozen dessert. Changing the quantity too much may make the popsicles harder or icier, so make small adjustments.
How do I get the popsicles out of the molds easily?
Briefly run the outside of the molds under lukewarm water and gently pull on the sticks. Avoid using very hot water, which can melt the outer layer too quickly.
Can I make these without milk powder?
Yes, but milk powder contributes milk solids and helps create a richer texture. Omitting it may make the popsicles less creamy. If necessary, leave it out and expect a slight difference in the final result.
Can I use this recipe for selling?
Yes, the recipe can be a starting point for small-scale production. Standardize the portion size, use clean food-safe molds and packaging, keep the product consistently frozen, and check local food-business and labeling requirements before selling.
Estimated Nutrition Information
Approximate nutrition per popsicle, assuming 10 popsicles and using the suggested flavorings:
- Calories: 180–250
- Protein: 3–5 g
- Carbohydrates: 18–25 g
- Fat: 11–16 g
- Sugar: 15–22 g
Actual nutrition depends on the fat content of the whipping cream, the amount of condensed milk, the strawberry flavoring, and the size of each popsicle. Optional chocolate additions may increase the calorie and fat content.
Final Thoughts
These Three-Layer Chocolate, Vanilla, and Strawberry Ice Cream Popsicles are a delicious way to turn a handful of everyday ingredients into a colorful, homemade frozen dessert. The chocolate layer brings rich cocoa flavor, the vanilla layer adds creamy sweetness, and the strawberry layer provides a fruity finish.
Although they look impressive, they’re easy to prepare with a few bowls, a mixer, and popsicle molds. The key is to keep the base creamy, add concentrated flavorings, and allow each layer enough time to set before adding the next.
Make a batch for sunny afternoons, birthday parties, or whenever you crave a refreshing homemade treat. One popsicle delivers three irresistible flavors in every bite! 🍫🍦🍓