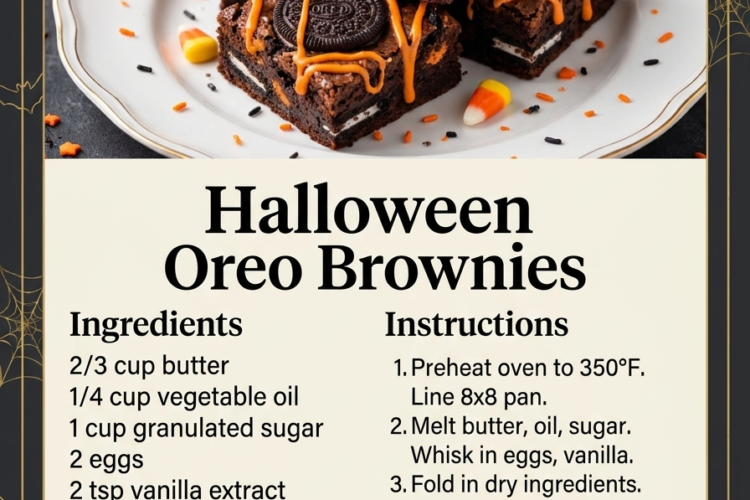
🎃 Halloween Oreo Brownies – Ultra-Fudgy, Chocolatey & Spookily Delicious!
Rich, fudgy chocolate brownies loaded with crunchy Oreo cookies and decorated with festive Halloween treats! 🍫👻
Get ready to make your Halloween dessert table extra delicious with these Halloween Oreo Brownies! They’re everything you love about homemade brownies—deep chocolate flavor, chewy edges, a soft fudgy center, and a crackly top—with a spooky Oreo twist that makes them perfect for October celebrations.
The secret to their incredible texture is the combination of melted butter and vegetable oil. Butter adds rich flavor, while oil helps keep the brownies moist. A blend of granulated and brown sugar creates the perfect balance of sweetness, chewiness, and subtle caramel notes.
Crushed Halloween Oreos add delightful crunchy cookie pieces throughout, while whole Oreo halves, orange and purple sprinkles, and festive candy decorations transform each square into a Halloween masterpiece.
Whether you’re preparing treats for a Halloween party, a school celebration, a spooky movie night, or a festive dessert platter, these brownies are guaranteed to disappear quickly!
Recipe Details
- Prep Time: 20 minutes
- Bake Time: 30–38 minutes
- Cooling Time: 1–2 hours
- Total Time: Approximately 2 hours
- Yield: 16 brownies
- Course: Dessert, Brownies
- Cuisine: American-inspired
- Difficulty: Easy
- Method: Baking
Ingredients
For the Fudgy Brownies
- ⅔ cup (150 g) unsalted butter
- ¼ cup (60 ml) vegetable oil
- 1 cup (200 g) granulated sugar
- ⅓ cup (70 g) packed brown sugar
- 3 large eggs, at room temperature
- 2 teaspoons vanilla extract
- ¾ cup (75 g) unsweetened cocoa powder
- ¾ cup (95 g) all-purpose flour
- ¼ teaspoon baking powder, optional for a slightly lighter texture
- ½ teaspoon salt
For the Oreo Filling
- 12–16 Oreo cookies, roughly chopped
- 4–6 additional Oreo cookies, halved or broken into pieces for the top
For the Halloween Decorations
- ¼ cup orange, purple, and black Halloween sprinkles
- ¼ cup orange or purple candy-coated chocolate pieces, optional
- ¼ cup white chocolate chips or orange candy melts, optional
- Candy eyes, optional, for a spooky monster effect
Ingredient note: Your original ingredient list includes the butter, oil, and two types of sugar. The remaining brownie ingredients and decorations above are suggested additions to complete the recipe. Regular Oreos work perfectly if Halloween-themed Oreos aren’t available.
Instructions
Step 1: Prepare the Oven and Baking Pan
Preheat your oven to 350°F (175°C).
Lightly grease an 8 × 8-inch (20 × 20 cm) square baking pan and line it with parchment paper. Leave a little parchment overhanging two sides so you can lift the brownies out easily after cooling.
For especially thick, fudgy brownies, an 8 × 8-inch pan is ideal. Using a larger pan will create thinner brownies and reduce the baking time.
Step 2: Melt the Butter
Place the butter in a microwave-safe bowl and microwave in short intervals until melted. Alternatively, melt it gently in a small saucepan over low heat.
Allow the butter to cool slightly, then whisk in the vegetable oil until combined.
The butter delivers rich, classic chocolate flavor, while the oil contributes extra moisture to the finished brownies.
Step 3: Combine the Sugars
Add the granulated sugar and brown sugar to the warm butter mixture.
Whisk thoroughly until the sugars are evenly distributed and the mixture looks glossy.
The granulated sugar helps create the brownies’ delicate, crackly top, while brown sugar adds moisture and a chewy texture.
The mixture may still look slightly grainy at this stage, which is normal.
Step 4: Add the Eggs and Vanilla
Add the eggs one at a time, whisking well after each addition.
Once all the eggs are incorporated, add the vanilla extract and whisk vigorously for approximately 1–2 minutes.
The mixture should become thicker and glossier. Properly incorporating the eggs helps create a rich texture and a beautiful brownie surface.
Avoid adding the eggs while the butter is very hot, as this could partially cook them.
Step 5: Add the Cocoa Powder
Sift the cocoa powder into the wet mixture to remove any lumps.
Whisk until the cocoa is fully incorporated and the batter looks dark, smooth, and chocolatey.
Scrape the sides of the bowl with a spatula to ensure no dry cocoa remains.
Helpful tip: Use unsweetened cocoa powder rather than sweetened drinking chocolate. Unsweetened cocoa gives these brownies their deep chocolate flavor.
Step 6: Fold in the Flour
Add the flour, salt, and optional baking powder.
Using a spatula, gently fold the ingredients into the chocolate mixture just until no large streaks of dry flour remain.
Do not overmix. Excessive mixing develops gluten and can make brownies tough instead of soft and fudgy.
The batter should be thick, glossy, and rich.
Step 7: Add the Oreo Cookies
Roughly chop 12–16 Oreo cookies into bite-sized pieces.
Fold most of the chopped cookies into the brownie batter, reserving a few pieces for the top.
Try to distribute the cookies evenly so every brownie square has delicious Oreo pieces throughout.
You can leave some pieces relatively large for crunchy cookie pockets or chop them smaller for more even distribution.
Step 8: Transfer the Batter to the Pan
Scrape the batter into the prepared baking pan.
Spread it evenly into the corners using a spatula.
Scatter the reserved Oreo pieces across the top and gently press them into the batter.
For a festive Halloween finish, add a few orange or purple candy-coated chocolates now. Reserve delicate sprinkles and candy eyes for decorating after baking if you want their colors and shapes to remain especially vivid.
Step 9: Bake the Brownies
Place the pan on the center rack of the preheated oven.
Bake for 30–38 minutes, checking around the 28-minute mark.
The brownies are ready when:
- The edges look set.
- The center no longer looks liquid.
- A toothpick inserted near the center comes out with moist crumbs attached, rather than wet batter.
Do not wait for the toothpick to come out completely clean, as that can indicate overbaking.
Remember that Oreo pieces can make the toothpick test less reliable if you insert it directly into a cookie. Test a section of brownie without a large Oreo piece.
Step 10: Cool Completely
Remove the pan from the oven and place it on a wire rack.
Allow the brownies to cool in the pan for at least 1 hour, or until completely cool.
The brownies will continue setting as they cool, giving them that desirable dense, fudgy texture.
For especially clean slices, refrigerate the cooled brownies for 30–45 minutes before cutting.
Important: Cutting brownies while they’re hot can cause them to crumble or appear underbaked in the center.
Step 11: Add the Halloween Decorations
Once the brownies have cooled, melt the white chocolate chips or orange candy melts according to the package instructions.
Drizzle the melted chocolate across the surface in zigzags or spooky web-like patterns.
Add orange, purple, and black sprinkles, candy eyes, or additional Oreo pieces while the drizzle is still soft.
For a monster-themed effect, place two candy eyes on individual Oreo pieces and arrange them on top of the brownies.
Allow the chocolate decorations to set before slicing.
Step 12: Slice and Serve
Lift the brownies out of the pan using the parchment overhang.
Place them on a cutting board and slice into 16 squares using a sharp knife.
For clean cuts, wipe the knife between slices.
Arrange the brownies on a Halloween platter and serve them at room temperature for the softest texture.
Enjoy every fudgy, chocolate-packed bite! 🎃🍫
Expert Tips for Perfect Halloween Oreo Brownies
Don’t overbake. Brownies continue to set as they cool. Remove them when the center is just set and a toothpick reveals moist crumbs.
Measure the flour accurately. Too much flour can make brownies cakey and dry. Weighing the flour is the most reliable option.
Use room-temperature eggs. They blend more smoothly into the butter and sugar mixture.
Whisk the eggs and sugar thoroughly. This helps create a glossy batter and contributes to a delicate, crackly brownie top.
Fold rather than beat the flour. Gentle mixing keeps the brownies tender and fudgy.
Choose your favorite Oreos. Regular, chocolate, golden, or Halloween-colored sandwich cookies can all work.
Let the brownies cool fully. Cooling is essential for clean cuts and a properly set center.
Decorate after cooling. Candy melts and white chocolate will stay where you put them instead of melting into the warm brownie surface.
Use a parchment sling. It makes removal easier and reduces the risk of breaking the brownies.
Delicious Halloween Variations
🧡 Orange Cream Oreo Brownies
Use Golden Oreos and orange candy melts for a bright orange-and-chocolate appearance. Add a little orange zest to the batter for a subtle citrus note.
💜 Purple Monster Brownies
Decorate the cooled brownies with purple candy melts, candy eyes, and colorful sprinkles. Place the eyes in pairs on top for a playful monster look.
🍫 Triple Chocolate Oreo Brownies
Fold ½ cup (85 g) chocolate chips into the batter along with the Oreo pieces. Finish with a drizzle of melted dark chocolate.
🕸️ Spiderweb Brownies
Drizzle white chocolate or white candy melts over the cooled brownies in circles. Use a toothpick to draw lines from the center outward, creating a spiderweb effect.
👻 Ghost Oreo Brownies
Top each brownie with an Oreo half or a small marshmallow ghost and add candy eyes. Use melted white chocolate as the adhesive.
🎃 Pumpkin Spice Oreo Brownies
Add ½ teaspoon ground cinnamon and ¼ teaspoon pumpkin pie spice to the dry ingredients. Use orange decorations for an extra festive appearance.
🥜 Peanut Butter Oreo Brownies
Swirl 2–3 tablespoons of smooth peanut butter across the batter before baking. Use a knife to create a marbled pattern, then add Oreo pieces on top.
🌶️ Mexican-Inspired Chocolate Brownies
Add a small pinch of cayenne pepper and a little extra cinnamon for a warm, subtle spice that contrasts with the sweetness of the cookies.
What to Serve with Halloween Oreo Brownies
These brownies make a fantastic centerpiece for a Halloween dessert table. Pair them with:
- Vanilla ice cream: The cool, creamy flavor balances the rich chocolate.
- Chocolate milk: A simple favorite for kids and adults.
- Hot chocolate: Especially lovely for a chilly Halloween evening.
- Fresh strawberries: Their brightness cuts through the richness.
- Caramel popcorn: A fun combination for a spooky movie night.
- Halloween sugar cookies: Create a colorful assortment of festive sweets.
- Candy apples: Add another classic autumn treat to your dessert spread.
For a party, arrange the brownies alongside cookies, popcorn, mini cupcakes, and fruit for a fun, colorful Halloween buffet.
Make-Ahead Instructions
These brownies are ideal for preparing ahead of a party.
Bake the day before: Bake the brownies and allow them to cool completely. Store them in an airtight container, then decorate shortly before serving.
Prepare the decorations ahead: Chop the Oreo cookies, portion the sprinkles, and keep the candy melts ready. Store each component separately until needed.
For party platters: Bake and chill the brownies in advance, but add delicate decorations such as candy eyes and detailed chocolate drizzle close to serving time for the best appearance.
Storage and Freezing
Room Temperature
Store completely cooled brownies in an airtight container at room temperature in a cool, dry place for up to 3 days for best quality.
If your kitchen is warm or the brownies contain perishable toppings or fillings, refrigerate them instead.
Refrigerator
Refrigerate in an airtight container for up to 5–7 days for best quality.
Chilled brownies become firmer and more fudgy. Let them sit at room temperature briefly before serving if you prefer a softer bite.
Freezing
These brownies freeze well, especially before adding delicate decorations.
- Cool the brownies completely.
- Cut them into squares or freeze the slab whole.
- Wrap portions individually or separate layers with parchment paper.
- Place in a freezer-safe airtight container.
- Freeze for up to 2–3 months for best quality.
Thaw overnight in the refrigerator or at room temperature until fully thawed. Add fresh Halloween decorations after thawing if desired.
Reheating
For a warm, gooey brownie, microwave a plain brownie square for about 8–12 seconds and check the texture.
Avoid microwaving brownies with candy eyes or delicate decorations, as they may melt or become sticky.
Frequently Asked Questions
Are these brownies fudgy or cakey?
They’re designed to be fudgy, with a dense, moist center. The butter, oil, and sugar combination helps create that texture, while avoiding overbaking keeps them from becoming dry.
Can I use regular Oreos instead of Halloween Oreos?
Absolutely! Regular Oreo cookies taste just as delicious. You can create the Halloween appearance using orange, purple, and black sprinkles or colored chocolate drizzles.
Why are my brownies dry?
They may have been overbaked or contain too much flour. Measure the ingredients carefully, begin checking early, and remove the brownies when a toothpick comes out with moist crumbs.
Why did my brownies sink in the center?
A slight dip can be normal with fudgy brownies. A large collapse can occur if the center is underbaked, the batter is over-aerated, or the oven door is opened too early.
How do I get the perfect crackly top?
Whisk the eggs and sugars thoroughly, avoid reducing the sugar too much, and make sure the butter mixture isn’t excessively hot when the eggs are added.
Can I use Dutch-process cocoa powder?
Yes. Dutch-process cocoa produces a smoother, darker chocolate flavor. Natural cocoa powder also works. Since the recipe contains only a small optional amount of baking powder, either can be used.
Can I make these brownies without vegetable oil?
You can replace the oil with additional melted butter, but the brownies may have a slightly firmer texture after cooling. The combination of butter and oil helps balance flavor and moisture.
Can I use a larger baking pan?
Yes, but the brownies will be thinner and may bake faster. Begin checking early and remove them once the center is set.
Can I make the brownies gluten-free?
You can try substituting a reliable 1:1 gluten-free baking flour and using certified gluten-free sandwich cookies. Results vary by flour blend, so check doneness carefully.
Can I prepare these for a Halloween party in advance?
Yes. Bake them a day ahead, cool completely, and store them in an airtight container. Add decorations close to serving time for the freshest appearance.
Estimated Nutrition Information
Approximate nutrition per brownie, assuming 16 servings and including Oreo pieces but excluding optional decorative chocolate:
- Calories: 280–340
- Protein: 3–5 g
- Carbohydrates: 35–43 g
- Fat: 14–19 g
- Sugar: 25–32 g
- Fiber: 2–4 g
Actual values vary depending on the Oreo variety, cocoa powder, ingredient brands, decorations, and brownie size.
Final Thoughts
Halloween Oreo Brownies are everything a festive chocolate dessert should be: rich, fudgy, easy to make, and wonderfully fun to decorate. The combination of buttery chocolate brownie batter and crunchy Oreo cookies makes every square an irresistible treat, while colorful Halloween decorations add a playful finish.
Make them for a Halloween party, share them during a spooky movie marathon, or package them as homemade treats for friends and family. However you decorate them, these brownies are sure to bring plenty of chocolatey delight to your celebration.
Grab your Oreos, prepare your favorite spooky decorations, and get ready to bake a batch of Halloween magic! 🎃👻🍫