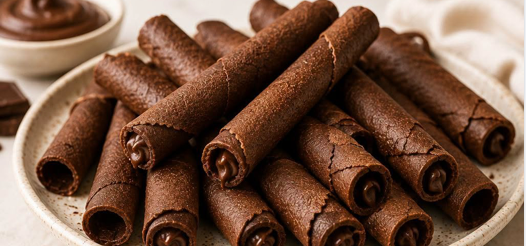
Light, crispy, and filled with deep cocoa flavor, Homemade Chocolate Wafer Rolls (often known as pirouettes or chocolate cigarillos) are a classic confectionery treat. While commercial wafer rolls typically require specialized industrial waffle irons, this clever Pan Version lets you make golden, hollow wafer rolls directly on your stovetop using a standard non-stick frying pan.
As the thin batter spreads across the warm pan, it cooks into a delicate, lace-like crepe. Rolled immediately while still pliable around a wooden dowel or chopstick, the wafer crisps up as it cools into a light, shattering wafer roll. Enjoy them hollow with a cup of hot espresso, or pipe them full of chocolate ganache, hazelnut Nutella spread, or vanilla cream for a bakery-style indulgence.
Recipe Overview
- Prep Time: 10 minutes
- Cook Time: 20–25 minutes (approx. 2 minutes per roll)
- Cooling/Crisping Time: 5 minutes
- Total Time: ~35 minutes
- Yield: Approximately 12 to 15 wafer rolls
- Estimated Calories: ~85 kcal per roll (unfilled)
- Skill Level: Intermediate / Fast-Hands Technique
Why This Stovetop Pan Recipe Works
- Milk Powder for Caramelization & Crunch: Adding a tablespoon of dry milk powder introduces concentrated dairy proteins and lactose sugars. As the wafer cooks in the pan, these solids brown rapidly, giving the rolls a snap that stays crisp for hours.
- Liquid Oil for Batter Fluidity: Unlike melted butter, which can firm up in cool milk, neutral vegetable oil keeps the chocolate batter silky, smooth, and easily spreadable with the back of a spoon or ladle.
- Balanced Icing Sugar: Using finely powdered icing sugar rather than coarse granulated sugar guarantees that the batter dissolves completely with zero grit, producing a thin, paper-like wafer that rolls cleanly without tearing.
Equipment Checklist
- 8-inch or 10-inch completely flat non-stick frying pan or crepe pan (essential for easy release)
- Fine-mesh sifter
- Whisk and silicone spatula
- Small ladle or 2-tablespoon measuring spoon
- Thin wooden rolling dowel, clean wooden chopstick, or metal cannoli tube
- Clean, heatproof cotton kitchen towel or thin cotton gloves (to protect fingertips while rolling hot wafers)
- Wire cooling rack
Detailed Ingredient Breakdown
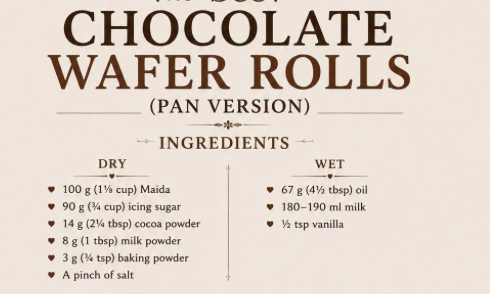
Dry Ingredients:
- 100 g (1 ⅛ cup) Maida (All-Purpose Flour): Provides the light gluten structure required to hold the thin wafer together when rolled hot.
- 90 g (¾ cup) Icing Sugar (Confectioners’ Sugar): Dissolves immediately into the milk, ensuring a completely smooth, lump-free batter that browns evenly.
- 14 g (2 ¼ tbsp) Unsweetened Cocoa Powder: High-quality Dutch-processed or natural cocoa powder provides rich chocolate color and a deep cocoa aroma.
- 8 g (1 tbsp) Milk Powder: Adds subtle dairy sweetness and enhances the crisp, toasted crunch of the wafer shell.
- 3 g (¾ tsp) Baking Powder: Introduces tiny micro-bubbles into the batter, preventing the wafer from turning into a tough, leathery sheet.
- A pinch of Fine Salt: Balances the sweetness and sharpens the chocolate profile.
Wet Ingredients:
- 67 g (4 ½ tbsp) Neutral Vegetable Oil: Canola, sunflower, or corn oil keeps the batter fluid and prevents the wafer from sticking to the pan.
- 180–190 ml Whole Milk: Bring to room temperature. Adjust slightly to achieve a fluid, pourable, runny consistency (resembling thin heavy cream).
- ½ tsp Pure Vanilla Extract: Melds the cocoa and dairy notes together.
Step-by-Step Instructions
1. Sift the Dry Ingredients
Place a fine-mesh sifter over a medium mixing bowl. Add the 100 g Maida (flour), 90 g icing sugar, 14 g cocoa powder, 8 g milk powder, 3 g baking powder, and a pinch of salt. Sift the ingredients thoroughly into the bowl to break up any packed cocoa or sugar lumps. Whisk gently to combine the dry mixture evenly.
2. Whisk in the Wet Ingredients
Make a small well in the center of the sifted dry ingredients. Pour in the 67 g vegetable oil, ½ tsp vanilla extract, and approximately 180 ml of the milk (reserving the remaining 10 ml to adjust consistency if needed).
Whisk continuously from the center outward until a smooth, glossy, lump-free chocolate batter forms.
(Texture Check: The batter should be thin, fluid, and run freely off the whisk like a thin crepe batter. If it feels thick or sludge-like, whisk in the remaining 10 ml of milk).
3. Heat the Pan
Place your non-stick pan over low heat. Do not add extra butter or oil to the pan; excess fat will cause the batter to slip and slide rather than spread into a thin, even circle. Let the pan warm gently for 2 to 3 minutes.
4. Spread the Wafer Batter
Ladle about 1 ½ to 2 tablespoons of the chocolate batter into the center of the pan.
Using the rounded bottom of your small ladle or the back of a spoon, quickly spread the batter outward in a circular motion (just like making a crepe or dosa) into a very thin, even 5-to-6-inch disc.
5. Cook Until Set and Dry
Cook the wafer over low heat for 1 ½ to 2 minutes.
- The batter will turn matte, small bubbles will appear across the surface, and the outer edges will begin to lift slightly from the pan.
- Slide a thin silicone or offset spatula gently beneath the wafer. If the bottom is lightly toasted and dry, carefully flip the disc over and cook the second side for another 20 to 30 seconds.
6. Roll Immediately (Work Quickly!)
(Crucial: Wafers only stay soft and pliable for about 5 to 8 seconds after leaving the pan before crisping solid).
Slide the hot wafer directly onto a clean cutting board or flat surface (or roll right inside the pan if comfortable).
Place your clean wooden chopstick or thin dowel at one edge of the hot wafer disc. Quickly roll the hot wafer tightly around the dowel from one end to the other.
Gently press down on the seam for 3 to 5 seconds so it bonds shut. Slide the rolled wafer off the dowel and transfer it onto a wire cooling rack.
7. Cool to Full Crispness
As the rolled wafer cools to room temperature (about 2 to 3 minutes), the sugars and starch will fully harden into a crisp, shattering chocolate shell.
Repeat the process with the remaining batter.
Master Secrets for Perfect Wafer Rolls
- Low Heat is Non-Negotiable: If the pan is too hot, the batter will seize and cook before you have time to spread it thin, resulting in thick, rubbery pancakes that crack when rolled. Keep your burner on consistent low heat.
- Protect Your Fingertips: Hot wafer discs must be rolled immediately. If you have sensitive fingertips, wear a pair of clean, thin cotton food-prep gloves or use a small folded kitchen towel to help guide the hot edges over the wooden dowel.
- Spread as Thin as Possible: The secret to that iconic “store-bought pirouette” snap is a paper-thin layer of batter. The thinner you spread it, the crispier it becomes upon cooling.
- Saving a Cracked Wafer: If a wafer starts hardening before you finish rolling and cracks, place it back into the warm pan for 5 to 10 seconds; the heat will soften the sugar slightly, allowing you to finish the roll.
Filling & Serving Ideas
- Nutella / Chocolate Hazelnut Cream: Warm Nutella slightly, place it into a piping bag fitted with a long narrow round tip, and pipe it into both open ends of the cooled wafer rolls.
- Vanilla Cream / White Chocolate Ganache: Melt equal parts white chocolate and warm heavy cream, chill until pipeable, and fill the centers for a black-and-white contrast.
- Dipped Ends: Melt semi-sweet dark chocolate or white chocolate in a small bowl. Dip the ends of each cooled wafer roll into the chocolate, then dip into finely crushed roasted hazelnuts or rainbow sprinkles. Let set on parchment paper.
- Ice Cream & Coffee Garnish: Serve whole, unfilled wafer rolls as an elegant stirrer in iced lattes, cappuccinos, or tucked into bowls of vanilla bean and mint chocolate chip ice cream.
Storage and Crispness Maintenance
Re-Crisping Technique: If your wafer rolls absorb ambient moisture over time and lose their crunch, arrange them in a single layer on a baking sheet and pop them into a preheated oven at 300°F (150°C) for 3 to 4 minutes. Let them cool completely on a wire rack to restore their original shattering crunch.
Airtight Storage: Moisture in the air is the enemy of crispy wafers. Once the wafer rolls are 100% cool, store them immediately in a completely dry, airtight glass container or metal tin at room temperature for up to 7 to 10 days.
Do Not Refrigerate (Unfilled): Storing unfilled wafers in the refrigerator will soften their crisp structure due to humidity.