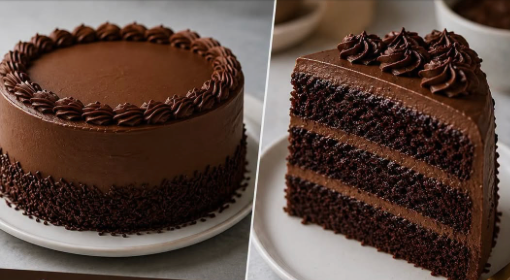
A truly great chocolate cake should be intensely rich, deeply chocolatey, and stay tender for days. This Ultimate Moist Chocolate Cake achieves that coveted, melt-in-your-mouth crumb without complicated steps or specialized kitchen equipment. By combining unsweetened cocoa powder with hot liquid and using vegetable oil instead of butter in the cake batter, every layer turns out tender, deeply fudgy, and soft.
Paired with a creamy, whipped chocolate buttercream that spreads effortlessly over each tier, this classic two-layer (or three-layer) showstopper is the ultimate recipe for birthdays, family celebrations, holiday dinners, or weekend cravings.
Recipe Overview
- Prep Time: 20 minutes
- Bake Time: 30 to 35 minutes
- Cooling Time: 1 hour
- Total Time: ~1 hour 55 minutes
- Yield: One 9-inch two-layer cake (or three 8-inch tiers), yielding 12 to 16 generous slices
- Estimated Calories: ~490 kcal per frosted slice
- Skill Level: 100% Beginner-friendly
The Science of a Super-Moist Chocolate Cake
Understanding the simple food chemistry behind this recipe guarantees bakery-quality results every single time:
- Oil vs. Butter in the Batter: While butter brings wonderful flavor to frostings, it solidifies at room temperature and contains about 18% water, which can lead to a dry cake crumb. Pure vegetable oil stays 100% liquid at room temperature, coating the flour proteins to inhibit excess gluten formation and locking in long-lasting moisture.
- Blooming the Cocoa with Hot Water: Pouring boiling water into cocoa powder dissolves the solids instantly, breaking down tiny cocoa starch clusters to release deep, aromatic chocolate flavor compounds that cold liquids cannot unlock.
- Dual Leavening Action: Balancing baking powder with baking soda counteracts the natural acidity of unsweetened cocoa powder and milk, providing a steady, gentle rise that keeps the crumb tight, tender, and velvety rather than coarse or spongy.
Equipment Checklist
- Two 9-inch round cake pans (or three 8-inch round cake pans)
- Parchment paper rounds
- Large mixing bowl & medium sifter
- Whisk and flexible silicone spatula
- Electric hand mixer or stand mixer (for the frosting)
- Wire cooling racks
- Offset spatula (for spreading frosting)
- Measuring cups, spoons, or a kitchen digital scale
Detailed Ingredient Breakdown
For the Chocolate Cake Layers:
- 2 cups (250g) All-Purpose Flour: Spooned and leveled to maintain an accurate flour-to-liquid balance.
- 1 ¾ cups (350g) Granulated White Sugar: Sweetens and tenderizes the crumb by retaining moisture.
- ¾ cup (75g) Unsweetened Cocoa Powder: Standard natural unsweetened cocoa powder (such as Hershey’s or Ghirardelli) or Dutch-processed cocoa.
- 1 ½ tsp Baking Soda & 1 tsp Baking Powder: The leavening power that lifts the dense, rich batter.
- 1 tsp Fine Salt: Enhances chocolate flavor and balances sweetness.
- 2 Large Eggs: Brought to room temperature to blend smoothly into the emulsion.
- 1 cup (240ml) Whole Milk: Adds dairy sweetness and richness.
- ½ cup (120ml) Vegetable Oil: Neutral cooking oil (canola, vegetable, or melted refined coconut oil) for enduring moisture.
- 2 tsp Pure Vanilla Extract: Melds the dairy and cocoa notes.
- 1 cup (240ml) Very Hot Water (or Hot Freshly Brewed Coffee): Blooms the cocoa. (Using hot black coffee will not make the cake taste like coffee; it simply intensifies the natural chocolate depth).
For the Rich Chocolate Buttercream Frosting:
- 1 cup (2 sticks / 225g) Unsalted Butter: Softened to room temperature for effortless creaming.
- 3 ½ cups (440g) Powdered Sugar (Confectioners’ Sugar): Sifted smooth to eliminate lumps.
- ¾ cup (75g) Unsweetened Cocoa Powder: Sifted to ensure a silky, lump-free frosting.
- ¼ cup (60ml) Whole Milk (or Heavy Cream): To achieve a spreadable, fluffy texture.
- 1 tsp Pure Vanilla Extract: Adds warm aroma and balances the cocoa bite.
Step-by-Step Instructions
1. Prepare Your Oven and Cake Pans
Preheat your oven to 350°F (175°C) with a rack positioned in the center.
Grease the bottom and sides of two 9-inch round cake pans with softened butter or non-stick baking spray. Line the bottom of each pan with a circle of parchment paper, then lightly grease the parchment and dust with a light coating of flour or cocoa powder, tapping out any excess.
2. Sift and Whisk Dry Ingredients
Set a large fine-mesh sifter over your main mixing bowl. Add the 2 cups (250g) all-purpose flour, 1 ¾ cups (350g) granulated sugar, ¾ cup (75g) unsweetened cocoa powder, 1 ½ tsp baking soda, 1 tsp baking powder, and 1 tsp salt. Sift the mixture directly into the bowl to break up any packed cocoa or baking soda lumps. Whisk thoroughly with a balloon whisk to distribute the leaveners evenly.
3. Combine the Wet Ingredients
Make a well in the center of the dry ingredients. Add the 2 large room-temperature eggs, 1 cup (240ml) milk, ½ cup (120ml) vegetable oil, and 2 tsp pure vanilla extract.
Using an electric hand mixer on medium speed (or a sturdy balloon whisk), beat the mixture for 2 full minutes. The batter will turn thick, dark, and glossy. Scrape down the sides and bottom of the bowl with a silicone spatula to make sure no dry flour pockets remain hidden.
4. Bloom with Hot Liquid
Pour the 1 cup (240ml) of very hot water (or hot brewed coffee) into the batter.
Stir gently by hand with a whisk or spatula until the liquid is fully incorporated.
(Note: Do not panic—the finished batter will be very thin and liquid, resembling melted chocolate milk. This liquid consistency is the exact secret to the cake’s tender, fudgy texture).
5. Divide and Bake
Evenly divide the thin batter between your two prepared 9-inch round cake pans (approx. 3 cups of batter per pan). Tap each pan flat on the countertop once to dislodge large surface air bubbles.
Transfer to the preheated oven and bake at 350°F (175°C) for 30 to 35 minutes.
- Doneness Test: The cake is ready when the center springs back lightly when pressed and a clean toothpick or wooden skewer inserted into the middle comes out clean or with a few moist crumbs (no wet liquid batter).
6. Cool the Cake Layers
Remove the pans from the oven and place them on wire cooling racks. Allow the cakes to cool inside the pans for 10 minutes.
Gently run a thin, flexible knife around the perimeter of each pan, then invert the cakes onto the wire cooling racks. Peel off and discard the parchment paper rounds. Let the cakes cool 100% completely to room temperature (approx. 45 to 60 minutes) before frosting.
7. Make the Fluffy Chocolate Buttercream
In a large mixing bowl (or stand mixer bowl fitted with the paddle attachment), beat the 1 cup (225g) of softened unsalted butter on medium-high speed for 2 to 3 minutes until pale, smooth, and creamy.
Add the ¾ cup (75g) sifted unsweetened cocoa powder and mix on low speed until combined.
Gradually alternate adding the 3 ½ cups (440g) powdered sugar and the ¼ cup (60ml) milk, mixing on low speed to prevent sugar clouds. Once all ingredients are in, add the 1 tsp vanilla extract.
Increase the mixer speed to medium-high and beat for 2 to 3 full minutes until the frosting is light, fluffy, silky, and spreadable.
8. Assemble and Frost the Cake
If your cooled cake layers have rounded tops, level them flat using a long serrated knife.
Place the first cake layer flat on a serving plate or cake stand. Spread about 1 cup of chocolate buttercreamevenly across the top with an offset spatula.
Place the second cake layer on top (cut side down for a flat surface). Cover the top and sides of the entire cake with a thin crumb coat of frosting, then chill in the refrigerator for 15 minutes to set.
Spread the remaining chocolate frosting generously over the top and sides of the cake. Use the back of a spoon or offset spatula to create decorative swirls, or pipe borders with a star tip and garnish with chocolate sprinkles or chocolate shavings.
Pro Baker’s Tips for Success
- Use Hot Water or Coffee: Do not substitute cold water for the hot liquid. Heat is necessary to melt the cocoa butter solids and activate the chocolate flavor compounds.
- Sift the Dry Ingredients: Cocoa powder and confectioners’ sugar naturally clump in humid environments. Sifting ensures your cake crumb and frosting remain silky and free of dry pockets.
- Cool Completely Before Frosting: Applying real butter frosting to a warm cake will melt the butterfat immediately, causing the frosting to slide off the cake. Ensure layers are cool to the touch.
Storage and Freezing Instructions
- Room Temperature Storage: Store frosted cake under a cake dome or in an airtight container at cool room temperature for up to 3 days.
- Refrigerator Storage: Keep in the refrigerator for up to 5 to 6 days. Bring slices to room temperature for 20 minutes before serving to restore the frosting’s creamy texture.
- Freezing Baked Layers: Unfrosted cake layers can be wrapped tightly in a double layer of plastic wrap and a layer of foil, then frozen for up to 3 months. Thaw overnight in the refrigerator before frosting.