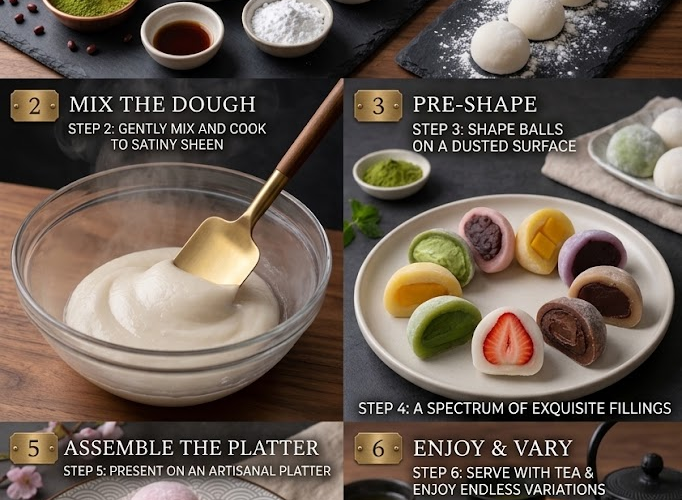
🍡 Soft Homemade Mochi
Soft, chewy, stretchy, and wonderfully delicate, this homemade Mochi recipe is an easy Japanese-inspired treat that can be filled with your favorite sweet filling.
Made with glutinous rice flour, sugar, water, and a little oil, the mochi dough comes together with simple ingredients and can be flavored with matcha, vanilla, strawberry, or other favorite flavors.
Each piece is wrapped around a creamy filling for a delicious combination of chewy mochi and rich, smooth sweetness.
⏱️ Recipe Information
Prep Time: 25 minutes
Cook Time: 8–10 minutes
Cooling Time: 10 minutes
Total Time: About 45 minutes
Yield: 12–14 mochi
Difficulty: Intermediate
Method: Stovetop
🛒 Ingredients
For the Mochi Dough
- 1 cup (160 g) glutinous rice flour, also called sweet rice flour
- ¾ cup (180 ml) water
- ¼ cup (50 g) granulated sugar
- 2 tbsp (16 g) cornstarch
- 1 tbsp (15 ml) neutral oil
- 1 tsp vanilla extract
- 1–2 tsp matcha powder, optional
- Food coloring or flavoring of your choice, optional
- Cornstarch or potato starch, for dusting
For the Filling
Choose one filling or make several varieties:
- ½ cup (120 g) sweetened red bean paste
- ½ cup (120 g) sweetened condensed milk cream
- ½ cup (120 g) Nutella or chocolate hazelnut spread
- ½ cup (120 g) sweetened cream cheese
- ½ cup (120 g) strawberry or fruit jam
- ½ cup (120 g) whipped cream, preferably stabilized
For a simple creamy filling:
- 4 oz (115 g) cream cheese, softened
- ¼ cup (30 g) powdered sugar
- ½ tsp vanilla extract
- 2 tbsp heavy cream
👩🍳 Instructions
🍓 Prepare the Filling
1. Make the Creamy Filling
If using the cream cheese filling, beat the softened cream cheese and powdered sugar together until smooth.
Add the vanilla and heavy cream.
Beat until creamy and slightly fluffy.
Refrigerate until needed.
If using red bean paste, chocolate spread, or jam, simply portion it into approximately 1-tablespoon portions.
For an especially neat mochi shape, chill the filling portions for 15–20 minutes before wrapping.
🍡 Make the Mochi Dough
2. Combine the Dry Ingredients
In a medium heatproof bowl, whisk together:
- Glutinous rice flour
- Sugar
- Cornstarch
If making matcha mochi, add the matcha powder at this stage.
Whisk until evenly combined.
3. Add the Liquid Ingredients
Gradually pour in the water while whisking.
Add the neutral oil and vanilla extract.
Continue whisking until the mixture is completely smooth and free of lumps.
If using food coloring or additional flavoring, add it now.
4. Cook the Mochi
Pour the mixture into a nonstick saucepan.
Cook over low to medium-low heat, stirring constantly with a silicone spatula.
After several minutes, the mixture will begin to thicken.
Continue stirring and folding until it becomes very thick, stretchy, glossy, and pulls away from the sides of the pan.
This usually takes approximately 5–8 minutes.
The dough should resemble a very thick, sticky paste.
5. Continue Cooking
Once the dough has become thick and stretchy, continue cooking for another 1–2 minutes, stirring and folding continuously.
This helps ensure the glutinous rice flour is fully cooked.
Remove from the heat.
✨ Shape the Mochi
6. Prepare the Work Surface
Generously dust a clean work surface or large baking sheet with cornstarch or potato starch.
Transfer the hot mochi dough onto the starch.
Be careful—the dough will be extremely hot and sticky.
Allow it to cool for approximately 5–10 minutes, until it is comfortable enough to handle.
7. Dust and Divide
Dust the top of the mochi generously with starch.
Gently flatten it and divide it into approximately 12–14 equal pieces.
Use a knife or bench scraper dusted with starch to make cutting easier.
8. Flatten Each Piece
Take one piece of mochi dough.
Dust your fingers with starch and gently flatten the dough into a small circle approximately 3–4 inches (8–10 cm) wide.
Keep the center slightly thicker than the edges.
9. Add the Filling
Place approximately 1 tablespoon of filling in the center.
Be careful not to overfill.
10. Wrap the Mochi
Gently pull the edges of the dough up and around the filling.
Pinch the edges together firmly to seal.
Turn the mochi seam-side down and gently roll it between your palms to create a smooth round shape.
Dust lightly with starch to prevent sticking.
Repeat with the remaining dough.
11. Finish
Brush or gently shake off any excess starch.
Arrange the finished mochi on a parchment-lined plate or tray.
For the best texture, allow them to rest for 10–15 minutes before serving.
⭐ Chef’s Tips
Use glutinous rice flour: Regular rice flour will not produce the stretchy, chewy texture required for mochi.
Keep the dough warm while shaping: Mochi becomes firmer as it cools, so work while it is still pliable.
Use plenty of starch: The cooked dough is extremely sticky. Don’t be afraid to generously dust your hands and work surface.
Don’t overfill: Too much filling makes the mochi difficult to seal and can cause it to burst.
Keep fillings chilled: Cold fillings are easier to wrap and help the finished mochi hold its shape.
Cook thoroughly: The finished dough should be glossy, stretchy, and cohesive rather than grainy or powdery.
🍵 Flavor Variations
🍵 Matcha Mochi
Add 1–2 teaspoons matcha powder to the dry ingredients.
Pair with red bean paste or white chocolate filling.
🍓 Strawberry Mochi
Add a few drops of strawberry flavoring and pink food coloring.
Fill with strawberry jam or strawberry cream.
🍫 Chocolate Mochi
Add 1 tablespoon cocoa powder to the flour mixture.
Fill with chocolate hazelnut spread or chocolate ganache.
🥭 Mango Mochi
Use mango-flavored dough or plain vanilla dough and fill with chilled mango cream.
🫐 Blueberry Mochi
Add blueberry flavoring and a small amount of purple food coloring.
Fill with blueberry jam and cream cheese.
🥥 Coconut Mochi
Add 2 tablespoons finely shredded coconut to the filling and dust the finished mochi with toasted coconut.
🌸 Vanilla Mochi
Leave the dough white and use a creamy vanilla or sweet red bean filling.
🍽️ Serving Suggestions
Mochi is delicious served with:
- Green tea
- Matcha latte
- Coffee
- Japanese milk tea
- Fresh fruit
- Ice cream
For a beautiful dessert platter, make several colors and flavors and arrange them together.
🧊 Storage
Place finished mochi in an airtight container at room temperature.
For the best texture, enjoy within 1–2 days.
Keep them away from excessive moisture and direct heat.
If your filling contains fresh dairy or whipped cream, refrigerate the mochi and consume within 1–2 days.
Tip: Refrigeration can make the mochi dough firmer, so allow chilled mochi to sit at room temperature for a few minutes before serving.
❄️ Freezing
Unfilled mochi dough is best used fresh, but filled mochi can be frozen.
Place individual mochi pieces on a parchment-lined tray and freeze until firm.
Transfer them to an airtight freezer-safe container.
Freeze for up to 1 month.
Thaw at room temperature before serving.
🍡✨ Final Result
These Soft Homemade Mochi are delightfully chewy, stretchy, tender, and sweet, with a creamy center tucked inside each delicate piece.
Whether you fill them with red bean paste, chocolate, fruit jam, cream cheese, or matcha-flavored filling, they’re a fun homemade treat that’s endlessly customizable.
Soft outside, creamy inside, and completely irresistible! 🍡🍵✨