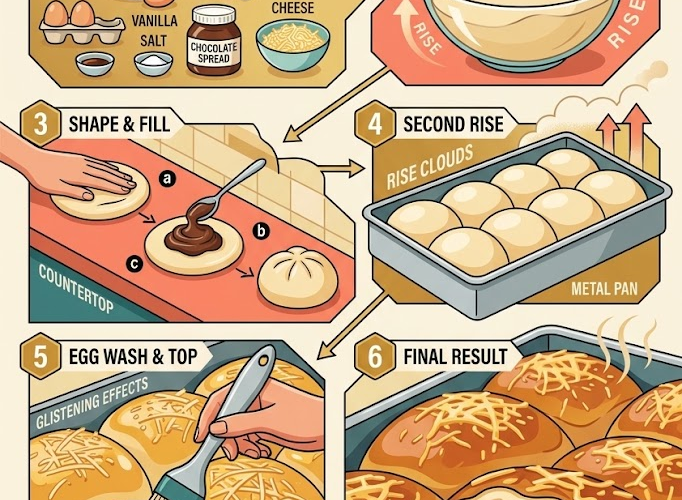
🍫🥛 Soft & Fluffy Chocolate-Filled Milk Buns
Pillowy-soft milk buns filled with rich, melty chocolate—light, fluffy, buttery, and absolutely irresistible.
These homemade chocolate-filled milk buns have a tender, slightly sweet crumb and a decadent chocolate center. The enriched dough is made with warm milk, butter, egg, and vanilla, then filled with chocolate before baking until beautifully golden.
They’re perfect for breakfast, afternoon tea, lunchboxes, weekend baking, or a sweet homemade snack.
⏱️ Recipe Information
Prep Time: 25 minutes
Rising Time: 1½–2 hours
Bake Time: 15–18 minutes
Total Time: About 2½ hours
Servings: 10–12 buns
Difficulty: Intermediate
Method: Oven-Baked
🛒 Ingredients
🥛 For the Milk Bun Dough
- 3 cups (375 g) all-purpose flour
- ¾ cup (180 ml) warm milk
- ¼ cup (50 g) granulated sugar
- 1 large egg
- 2¼ teaspoons (7 g) instant yeast
- ½ teaspoon salt
- 3 tablespoons (42 g) unsalted butter, softened
- ½ teaspoon vanilla extract
🍫 For the Chocolate Filling
Since the filling ingredients weren’t included, use one of these easy options:
- ½ cup chocolate chips
- ½ cup chopped chocolate
- ½ cup chocolate-hazelnut spread
- Chocolate baking bars, cut into small pieces
For the easiest filling, chocolate-hazelnut spread can be portioned into small dollops and chilled or frozen briefly before shaping.
For the Egg Wash
- 1 egg, beaten
- 1 tablespoon milk
Optional Topping
- Powdered sugar
- Melted chocolate
- Chocolate chips
- Sesame seeds
👩🍳 Instructions
1. Prepare the Dough
Add the warm milk, sugar, and instant yeast to a large mixing bowl.
Whisk gently and let stand for 5 minutes.
The milk should be warm rather than hot. Very hot liquid can damage the yeast.
2. Add the Wet Ingredients
Add the egg and vanilla extract.
Whisk until combined.
3. Add the Flour and Salt
Gradually add the flour and salt.
Mix with a wooden spoon or dough hook until a shaggy dough forms.
4. Add the Butter
Add the softened butter a little at a time.
Continue mixing until the butter is fully incorporated.
Knead the dough for approximately 8–10 minutes by hand, or 5–7 minutes with a stand mixer, until it becomes smooth, soft, and elastic.
The dough may feel slightly tacky, but it shouldn’t be excessively sticky.
Avoid adding too much extra flour, as this can make the finished buns dense.
🌡️ First Rise
5. Let the Dough Rise
Shape the dough into a ball and place it in a lightly greased bowl.
Cover with plastic wrap or a clean kitchen towel.
Place in a warm, draft-free area and allow it to rise for approximately 1–1½ hours, or until doubled in size.
🍫 Fill the Buns
6. Divide the Dough
Gently press the dough down to release excess air.
Transfer it to a lightly floured work surface.
Divide into 10–12 equal pieces.
Shape each piece into a small ball.
7. Add the Chocolate
Flatten one dough ball into a small circle.
Place approximately 1–2 teaspoons of chocolate filling in the center.
Bring the edges of the dough up around the filling and pinch firmly to seal.
Turn the bun seam-side down and gently roll it between your palms to create a smooth ball.
Repeat with the remaining dough.
Make sure the filling is completely enclosed. Any exposed chocolate can leak during baking.
🌡️ Second Rise
8. Arrange the Buns
Place the filled buns on a parchment-lined baking sheet, leaving a little space between them.
Cover loosely with a clean kitchen towel.
Allow them to rise for approximately 30–45 minutes, or until noticeably puffy.
🔥 Bake the Milk Buns
9. Preheat the Oven
Preheat your oven to 350°F (175°C).
10. Apply the Egg Wash
Whisk together the beaten egg and milk.
Gently brush the tops of the risen buns with the egg wash.
This gives them a beautiful golden, glossy finish.
11. Bake
Bake for 15–18 minutes, or until the buns are puffed and golden brown.
Keep an eye on them during the final few minutes so the tops don’t become too dark.
12. Cool Slightly
Remove the buns from the oven and transfer them to a wire rack.
Allow them to cool for approximately 10 minutes.
The chocolate filling will remain hot after baking, so allow the buns to cool slightly before biting into them.
🍫 Finish and Serve
Serve the buns warm for a soft, melty chocolate center.
For an extra-special finish, drizzle them with melted chocolate or dust lightly with powdered sugar.
They’re especially delicious with a cup of coffee, tea, or cold milk.
⭐ Chef’s Tips
Don’t overheat the milk
The milk should feel comfortably warm, not hot. Excessive heat can interfere with the yeast.
Don’t add too much flour
A slightly soft, tacky dough produces lighter and fluffier buns. Adding too much flour can make them heavy.
Seal the chocolate carefully
Pinch the seams firmly and place them seam-side down. This helps prevent the filling from escaping during baking.
Give the dough enough time to rise
The first and second rises are what create the light, airy texture. Don’t rush either stage.
Use chilled filling
If using chocolate-hazelnut spread, portion it onto parchment and chill or freeze briefly before filling the dough. This makes shaping much easier.
Don’t overbake
Milk buns should be soft and tender. Once the tops are golden brown, remove them from the oven.
🍫 Easy Filling Variations
Chocolate-Hazelnut
Use chocolate-hazelnut spread for a creamy, gooey center.
Double Chocolate
Fill with chocolate chips and add a teaspoon of chocolate-hazelnut spread.
Peanut Butter Chocolate
Add a small spoonful of creamy peanut butter alongside the chocolate.
Chocolate and Marshmallow
Add a few mini marshmallows with the chocolate for a gooey filling.
White Chocolate
Use chopped white chocolate for a sweet, creamy alternative.
Chocolate Orange
Add a little finely grated orange zest to the dough and fill with dark chocolate.
🥛 Serving Suggestions
These chocolate milk buns are delicious with:
- Hot coffee
- Tea
- Hot chocolate
- Cold milk
- Fresh berries
- Whipped cream
- Vanilla ice cream
They can be served for breakfast, brunch, dessert, or an afternoon snack.
🧊 Storage
Store cooled buns in an airtight container at room temperature for up to 2–3 days.
For the softest texture, keep them tightly covered.
🔥 Reheating
Warm individual buns in the microwave for approximately 10–15 seconds.
Alternatively, place them in a 300°F (150°C) oven for a few minutes.
Warm them just enough to soften the bread and gently melt the chocolate center.
❄️ Freezing
Freeze completely cooled buns in a freezer-safe airtight container or bag for up to 2 months.
For best results, wrap them individually before freezing.
Thaw at room temperature and gently warm before serving.
🍫🥛 Final Result
These Soft & Fluffy Chocolate-Filled Milk Buns are everything a homemade sweet bun should be: pillowy, buttery, lightly sweet, and filled with luscious chocolate.
The tender milk-bread dough makes every bite soft and satisfying, while the warm chocolate center turns these simple buns into an irresistible treat.
Soft bread + melty chocolate = pure homemade comfort! 🍫🥛🥖✨