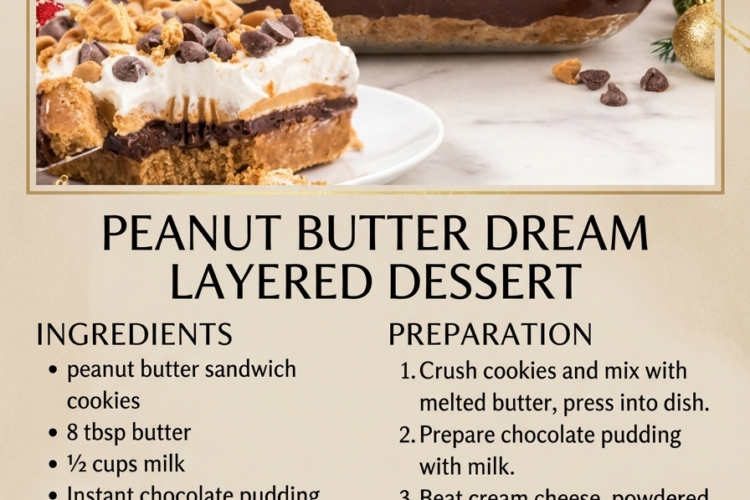
🎄🥜 Peanut Butter Dream Bars – No-Bake, Creamy & Irresistible!
Looking for a crowd-pleasing dessert for the holidays? These Peanut Butter Dream Bars are the perfect addition to festive celebrations, family get-togethers, potlucks, and homemade treat platters!
With a buttery peanut butter cookie crust, a rich and fluffy peanut butter cheesecake layer, smooth chocolate pudding, and a cloud of whipped topping, every bite is pure dessert heaven. Finished with crushed peanut butter sandwich cookies, these bars are creamy, crunchy, chocolatey, and wonderfully indulgent.
Best of all, they’re completely no-bake and can be prepared ahead of time, making holiday entertaining so much easier! ❤️
Recipe Details
- Prep Time: 25 minutes
- Cook Time: None
- Chilling Time: 4–6 hours
- Total Time: Approximately 4 hours 25 minutes
- Yield: 16 bars
- Course: Dessert
- Cuisine: American
- Difficulty: Easy
- Method: No-Bake
Ingredients
For the Cookie Crust
- 16 oz (454 g) peanut butter sandwich cookies, crushed
- 8 tablespoons (½ cup / 113 g) unsalted butter, melted
- 8–9 additional peanut butter sandwich cookies, reserved and crushed for topping
For the Peanut Butter Cheesecake Layer
- 8 oz (226 g) cream cheese, softened
- ¾ cup (90 g) powdered sugar
- ½ cup (125 g) creamy peanut butter
- 1 teaspoon vanilla extract
- 1 cup (240 ml) whipped topping, thawed
For the Chocolate Pudding Layer
- 1 package (3.9 oz / 110 g) instant chocolate pudding mix
- 1¾ cups (420 ml) cold milk
For the Whipped Topping Layer
- 1½ cups (360 ml) whipped topping, thawed
- 2 tablespoons mini chocolate chips, optional
- 2 tablespoons chopped peanuts, optional
Recipe note: The original ingredients provided were for the cookie crust and its topping. The cream cheese filling, chocolate pudding, and whipped topping ingredients are suggested additions to create a complete layered Peanut Butter Dream Bars dessert.
Instructions
1. Prepare the Baking Pan
Line a 9 × 13-inch (23 × 33 cm) baking dish with parchment paper, leaving some overhang on the sides.
The parchment will make it easier to lift the chilled dessert out of the pan and cut it into neat squares.
2. Make the Peanut Butter Cookie Crust
Crush the 16 ounces of peanut butter sandwich cookies in a food processor until they become fine crumbs.
If you don’t have a food processor, place the cookies in a large resealable bag and crush them with a rolling pin.
Transfer the crumbs to a mixing bowl and pour in the melted butter.
Stir until all the crumbs are evenly moistened and resemble wet sand.
Reserve the additional 8–9 crushed cookies separately for the topping.
3. Press and Chill the Crust
Pour the cookie crumb mixture into the prepared baking dish.
Use the bottom of a measuring cup or a flat spatula to press the crumbs firmly and evenly across the bottom of the pan.
Make sure the crust reaches all the corners and has a consistent thickness.
Place the pan in the refrigerator for at least 20–30 minutes while preparing the filling.
4. Prepare the Peanut Butter Cheesecake Layer
In a large mixing bowl, beat the softened cream cheese until smooth and creamy.
Add the powdered sugar, creamy peanut butter, and vanilla extract.
Beat again until the mixture is completely smooth, scraping down the sides of the bowl as needed.
Gently fold in 1 cup of thawed whipped topping until the filling becomes light and fluffy.
Spread the peanut butter mixture evenly over the chilled cookie crust.
Use an offset spatula to smooth the surface.
Return the pan to the refrigerator while preparing the pudding.
5. Make the Chocolate Pudding Layer
Pour the cold milk into a medium mixing bowl.
Add the instant chocolate pudding mix and whisk for approximately 2 minutes, or until the mixture begins to thicken.
Allow it to stand for another 2–3 minutes.
The pudding should be thick enough to spread without running over the peanut butter layer.
6. Add the Chocolate Pudding
Remove the baking dish from the refrigerator.
Carefully spread the chocolate pudding over the peanut butter cheesecake layer.
Spread gently and evenly, taking care not to disturb the layer underneath.
Return the dish to the refrigerator for approximately 10–15 minutes to allow the pudding to firm up slightly.
7. Add the Whipped Topping
Once the pudding has begun to set, spread the remaining 1½ cups of whipped topping over the chocolate layer.
Smooth the top with a spatula, creating an even, fluffy finish.
8. Add the Festive Toppings
Sprinkle the reserved crushed peanut butter sandwich cookies over the whipped topping.
For an extra-special finish, add mini chocolate chips and chopped peanuts.
You can also drizzle a little melted peanut butter or chocolate over the top for a beautiful bakery-style presentation.
9. Chill Until Firm
Cover the dish carefully and refrigerate for at least 4–6 hours, preferably overnight.
This chilling time allows all the layers to firm up and the flavors to blend together.
10. Slice and Serve
Once completely chilled, lift the dessert from the pan using the parchment paper.
Place it on a cutting board and slice into 16 squares with a sharp knife.
For clean slices, dip the knife into warm water and wipe it dry between cuts.
Serve chilled and enjoy every creamy, chocolatey, peanut butter-filled bite! 🥜
Expert Tips for Perfect Peanut Butter Dream Bars
- Use softened cream cheese: Room-temperature cream cheese blends more easily and prevents lumps in the filling.
- Choose creamy peanut butter: Regular creamy peanut butter works best for a smooth cheesecake layer. Natural peanut butter may separate and make the filling less stable.
- Crush the cookies finely: Fine crumbs create a more compact crust that holds together when sliced.
- Press the crust firmly: A well-packed crust helps keep the bars from crumbling when removed from the pan.
- Use cold milk for the pudding: Instant pudding needs cold milk to thicken properly.
- Let the pudding thicken before layering: This helps prevent the chocolate layer from mixing into the peanut butter filling.
- Spread gently: Use a spatula and work carefully when adding each layer.
- Chill overnight: The longer chilling time makes the bars easier to cut and gives the layers time to set completely.
- Keep them cold: These bars contain cream cheese and whipped topping, so refrigerate them until ready to serve.
Delicious Variations
Chocolate Peanut Butter Dream Bars: Add ½ cup mini chocolate chips to the peanut butter cheesecake filling for extra chocolate in every bite.
Extra Peanut Butter Version: Drizzle melted peanut butter over the top before adding the crushed cookies.
Oreo Peanut Butter Dream Bars: Replace the peanut butter sandwich cookies with chocolate sandwich cookies for a delicious chocolate-and-peanut-butter combination.
Crunchy Peanut Butter Bars: Add ½ cup chopped roasted peanuts to the cheesecake filling for extra texture.
White Chocolate Peanut Butter Bars: Replace the chocolate pudding with instant white chocolate pudding and garnish with white chocolate curls.
Holiday Chocolate Drizzle: Drizzle melted chocolate over the finished dessert and decorate with festive sprinkles for Christmas parties.
What to Serve With Peanut Butter Dream Bars
These rich dessert bars are delicious on their own, but they pair wonderfully with:
- Hot coffee or espresso
- Hot chocolate
- A glass of cold milk
- Vanilla ice cream
- Fresh strawberries
- Raspberries
- Chocolate-covered pretzels
- A holiday cookie assortment
For a festive dessert platter, arrange the bars alongside brownies, peppermint cookies, fudge, and chocolate truffles.
Make-Ahead Instructions
These Peanut Butter Dream Bars are ideal for preparing ahead of time.
You can assemble the entire dessert one day before serving and refrigerate it overnight.
In fact, making them ahead allows the layers to become firmer and makes slicing much easier.
For the freshest-looking presentation, add the crushed cookie topping shortly before serving if you prefer it to remain extra crunchy.
Storage and Freezing
Refrigeration: Store the bars in an airtight container or tightly covered baking dish in the refrigerator for up to 3–4 days.
Freezing: Freeze individual bars on a parchment-lined tray until firm. Transfer them to a freezer-safe airtight container with parchment paper between layers. Freeze for up to 1 month for best texture.
Thawing: Thaw frozen bars overnight in the refrigerator or for approximately 20–30 minutes in the refrigerator before serving, depending on size.
Serving: Keep the dessert refrigerated until ready to eat. Avoid leaving cream cheese-based desserts at room temperature for more than 2 hours, or 1 hour in temperatures above 90°F (32°C).
Frequently Asked Questions
Do Peanut Butter Dream Bars need to be baked?
No! This is a completely no-bake dessert. The cookie crust firms up with melted butter and refrigeration, while the cream cheese and pudding layers set in the refrigerator.
Can I use homemade whipped cream instead of whipped topping?
Yes. Use chilled heavy whipping cream whipped with a little powdered sugar until stiff peaks form. Homemade whipped cream is delicious, although the bars may be softer and less stable over several days.
Can I use crunchy peanut butter?
You can, but creamy peanut butter produces a smoother cheesecake layer. Crunchy peanut butter adds extra texture if that’s what you prefer.
Can I make these bars without chocolate pudding?
Absolutely! Vanilla, cheesecake, or butterscotch instant pudding can be used instead. Each variation creates a different flavor combination.
Why is my pudding layer runny?
The pudding may not have thickened enough, or too much milk may have been added. Measure the milk carefully and allow the pudding to stand until thick before spreading it over the cheesecake layer.
Why is my crust crumbly?
The cookie crumbs may not have been thoroughly mixed with the melted butter or pressed firmly enough into the pan. Make sure the crumbs are evenly moistened and firmly packed before chilling.
Can I make the bars in advance for Christmas?
Yes! Assemble them the day before your celebration and refrigerate overnight. Add the final garnish before serving for the prettiest presentation.
Can I use a different pan size?
A 9 × 13-inch pan creates nicely balanced layers. An 8 × 8-inch pan will produce thicker bars, but you may have leftover filling or need to adjust the amount of ingredients.
Estimated Nutrition
Approximate values per serving, based on 16 bars and the suggested ingredients. Actual values vary with cookie brands, peanut butter, pudding mix, and whipped topping.
- Calories: 390
- Protein: 6 g
- Carbohydrates: 43 g
- Fat: 23 g
- Saturated Fat: 10 g
- Fiber: 2 g
- Sugar: 31 g
- Sodium: 290 mg
A Holiday Dessert Worth Sharing! 🎄❤️
These Peanut Butter Dream Bars are the kind of dessert that disappears quickly from the holiday table! Between the buttery cookie crust, fluffy peanut butter cheesecake filling, smooth chocolate pudding, and crunchy cookie topping, every layer brings something delicious.
They’re easy to make, beautiful to serve, and perfect for sharing with friends and family during the festive season.
Prepare them ahead, cut them into generous squares, and watch everyone come back for seconds. One bite of these creamy peanut butter dream bars, and they’ll become a holiday favorite!