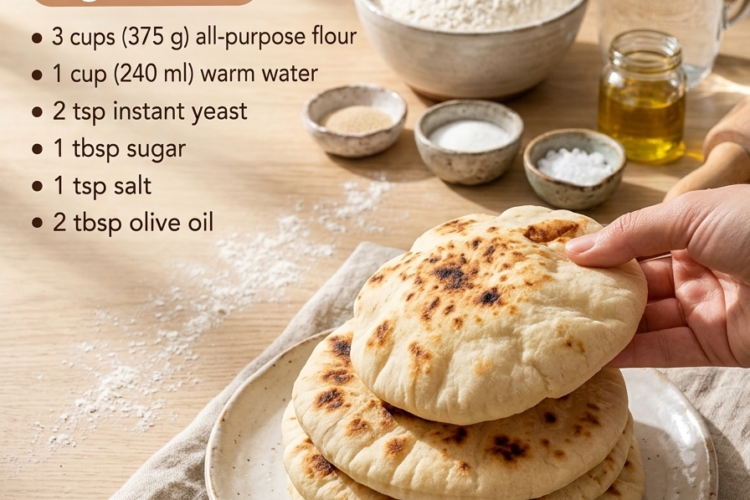
🫓 Mini Homemade Pita Bread – Soft, Fluffy & Perfectly Pocketed!
There’s nothing quite like freshly baked homemade pita bread! These Mini Homemade Pita Breads are soft, fluffy, lightly golden, and wonderfully delicious. Made with simple pantry ingredients, they puff up beautifully in the oven, creating those classic pockets that are perfect for stuffing with your favorite fillings.
With a tender inside and a slightly chewy exterior, these little breads are ideal for sandwiches, wraps, dipping, or serving alongside your favorite Mediterranean and Middle Eastern dishes.
They’re surprisingly easy to make, and once you try them fresh from the oven, you may never want to buy store-bought pita again!
Recipe Details
- Prep Time: 20 minutes
- Rising Time: 1–1½ hours
- Cook Time: 2–4 minutes per batch
- Total Time: Approximately 2 hours
- Yield: 10–12 mini pita breads
- Difficulty: Easy
- Category: Bread, Side Dish
- Method: Oven-Baked
Ingredients
For the Mini Pita Dough
- 3 cups (375 g) all-purpose flour
- 1 cup (240 ml) warm water
- 2 teaspoons instant yeast
- 1 tablespoon granulated sugar
- 1 teaspoon salt
- 2 tablespoons (30 ml) olive oil
These quantities are from your supplied ingredient list.
Instructions
1. Prepare the Yeast Mixture
In a large mixing bowl, combine the warm water, instant yeast, and granulated sugar.
Stir gently and allow the mixture to stand for approximately 5 minutes.
Instant yeast can be mixed directly with the flour, so this resting step is optional. It simply gives the yeast a little time to hydrate.
Make sure the water is comfortably warm, around 100–110°F (38–43°C), rather than hot, to avoid damaging the yeast.
2. Combine the Dry Ingredients
In a separate large bowl, whisk together the all-purpose flour and salt.
Mix until evenly distributed.
Make a small well in the center of the flour mixture.
3. Make the Dough
Pour the yeast mixture into the well.
Add the olive oil.
Stir everything together using a wooden spoon or spatula until a rough dough begins to form.
Once the ingredients are combined, transfer the dough to a lightly floured work surface.
4. Knead Until Smooth
Knead the dough for approximately 8–10 minutes until it becomes smooth, soft, and elastic.
Alternatively, use a stand mixer fitted with a dough hook and knead on low to medium speed for approximately 5–7 minutes.
The dough should feel soft and slightly tacky but should not stick excessively to your hands.
If it feels too sticky, add a little flour, one tablespoon at a time. Avoid adding too much, as a dry dough can produce tough pita bread.
5. Allow the Dough to Rise
Lightly grease a clean mixing bowl with olive oil.
Place the dough inside and turn it once to coat the surface lightly.
Cover the bowl with plastic wrap or a clean kitchen towel.
Place it in a warm, draft-free location and allow it to rise for approximately 1–1½ hours, or until doubled in size.
The rising time will depend on the temperature of your kitchen.
6. Divide the Dough into Mini Portions
Once the dough has doubled in size, gently press it down to release excess air.
Transfer it to a lightly floured work surface.
Divide the dough into 10–12 equal portions, depending on how small you want your pita breads.
Roll each portion into a smooth ball.
Cover the dough balls with a clean kitchen towel and allow them to rest for approximately 10–15 minutes.
This resting period relaxes the gluten and makes rolling much easier.
7. Roll Out the Pita Breads
Take one dough ball and place it on a lightly floured surface.
Using a rolling pin, roll it into a circle approximately 5–6 inches (13–15 cm) in diameter and about ¼ inch (6 mm) thick.
Try to keep the thickness as even as possible.
An even thickness is important because it helps the pita puff up properly and develop its signature pocket.
Repeat with the remaining dough balls.
Arrange the rolled pita rounds on a lightly floured surface, cover loosely, and let them rest for another 10–15 minutes.
8. Preheat the Oven
Preheat your oven to 475°F (245°C).
Place a heavy baking sheet, pizza stone, or baking steel inside the oven while it preheats.
The baking surface needs to become very hot to help the pita breads puff rapidly.
Allow the oven and baking surface to preheat fully before baking.
9. Bake Until Puffy
Carefully place 2–3 pita rounds onto the hot baking surface, depending on its size.
Bake for approximately 2–4 minutes.
The pita breads should begin to puff up dramatically as steam forms inside the dough, separating the layers and creating a pocket.
Once they have puffed and look lightly cooked, remove them from the oven.
Avoid baking too long, as this can make the pita dry and crispy rather than soft and flexible.
Repeat with the remaining dough rounds.
10. Keep the Pita Bread Soft
Transfer the freshly baked pita breads to a clean kitchen towel.
Cover them immediately with another towel while they cool slightly.
The trapped warmth and moisture help keep the pita soft, tender, and easy to fold.
11. Serve and Enjoy!
Serve the mini pita breads warm with hummus, garlic sauce, grilled chicken, falafel, fresh vegetables, or your favorite filling.
You can slice them open to create pockets, fold them into wraps, or cut them into wedges for dipping.
Enjoy your delicious homemade pita bread!
Alternative Cooking Method: Stovetop Pita Bread
Don’t have an oven or pizza stone? You can also cook these pita breads in a skillet!
- Place a heavy, dry skillet or cast-iron pan over medium-high heat.
- Allow the pan to become thoroughly hot before cooking.
- Place one rolled pita round into the hot skillet.
- Cook for approximately 30–60 seconds, until bubbles begin to appear.
- Flip the pita and cook for another 30–60 seconds.
- Flip again if necessary and cook until it puffs up and develops light golden spots.
- Transfer to a clean kitchen towel and cover to keep warm.
Repeat with the remaining dough rounds.
Cooking times may vary depending on the thickness of the dough and the heat of your skillet. Avoid using excessive heat, which can burn the outside before the inside cooks.
Expert Tips for Perfect Homemade Pita Bread
- Use warm water, not hot water: Water that’s too hot can damage the yeast and prevent the dough from rising.
- Measure the flour accurately: Too much flour can make pita bread dense and dry. Spoon it into your measuring cup and level it off.
- Knead sufficiently: Proper kneading develops the gluten needed to create soft, stretchy pita bread.
- Allow the dough to double: Don’t rush the first rise. Proper fermentation helps create a lighter texture.
- Rest the dough before rolling: This relaxes the gluten and makes the dough easier to shape.
- Roll evenly: Uneven thickness can prevent the pita from puffing properly.
- Avoid excessive flour when rolling: Too much extra flour can make the bread dry.
- Preheat the baking surface: A very hot baking sheet or pizza stone is one of the secrets to creating a beautiful pita pocket.
- Don’t overbake: Remove the pita once it puffs and is lightly cooked. Longer baking can make it tough.
- Cover after baking: Wrapping the warm pita in a clean towel helps retain moisture and keeps it flexible.
- Don’t worry if every pita doesn’t puff perfectly: Even when a complete pocket doesn’t form, the bread will still be soft and delicious.
Delicious Variations
Whole Wheat Mini Pita Bread: Replace up to half the all-purpose flour with whole wheat flour. You may need to add a little extra water because whole wheat flour absorbs more moisture.
Garlic Pita Bread: Add ½ teaspoon garlic powder to the flour mixture for a subtle garlic flavor.
Herb Pita Bread: Add 1 teaspoon dried oregano, thyme, or Italian seasoning to the dough for a fragrant variation.
Cheesy Pita Bread: Sprinkle shredded mozzarella or grated Parmesan over the warm pita and return it briefly to the oven until melted.
Za’atar Pita Bread: Brush the baked pita with olive oil and sprinkle with za’atar seasoning for a delicious Middle Eastern-inspired treat.
Sesame Pita Bread: Sprinkle sesame seeds over the rolled dough and gently press them into the surface before baking.
Whole Grain Pita: Replace some of the all-purpose flour with a mixture of whole wheat flour and oat flour for a heartier texture.
Soft Butter Pita: Brush freshly baked pita with a little melted butter and chopped parsley for extra richness.
Spicy Pita Bread: Add ½ teaspoon paprika and a pinch of cayenne pepper to the dry ingredients for a lightly spicy flavor.
What to Serve with Mini Homemade Pita Bread
These versatile little breads pair wonderfully with:
- Homemade hummus
- Creamy tzatziki
- Garlic yogurt sauce
- Baba ganoush
- Falafel
- Grilled chicken or beef
- Shawarma
- Kofta kebabs
- Greek salad
- Fresh cucumber and tomatoes
- Feta cheese
- Roasted vegetables
- Shakshuka
- Mediterranean dips
For a delicious homemade meal, cut a warm pita in half and fill it with grilled chicken, lettuce, tomatoes, cucumber, and creamy garlic sauce.
You can also cut the pita into small triangles, brush them lightly with olive oil, and bake until crispy to make homemade pita chips.
Make-Ahead and Storage Instructions
Make Ahead: Prepare the dough a day in advance and refrigerate it in a lightly oiled, covered bowl. Allow it to come closer to room temperature and become puffy before dividing and shaping.
Room Temperature: Once completely cooled, store the pita breads in an airtight food-safe bag or container for up to 2 days for best quality.
Refrigerator: Store cooled pita bread in an airtight bag or container for up to 4–5 days. Refrigeration may make the bread slightly firmer, so warm it before serving.
Freezing: Allow the pita breads to cool completely. Stack them with small pieces of parchment paper between them and place them in a freezer-safe airtight bag. Freeze for up to 2–3 months for best quality.
Thawing: Remove the desired number of pita breads and thaw at room temperature while covered.
Reheating: Warm in a skillet over medium-low heat for approximately 20–30 seconds per side, or wrap in foil and heat in a 300°F (150°C) oven for about 5–8 minutes.
Refreshing Dry Pita: Lightly sprinkle the bread with water before warming it in a covered skillet or wrapped in foil. This helps restore some softness.
Frequently Asked Questions
Why didn’t my pita bread puff up?
The baking surface may not have been hot enough, the dough may have been rolled unevenly, or the dough may have rested too long and lost some of its elasticity. Make sure your oven and baking sheet are fully preheated, and roll the rounds evenly.
Can I use active dry yeast instead of instant yeast?
Yes! Use the same quantity. Dissolve the yeast in the warm water with the sugar and allow it to stand for approximately 5–10 minutes until foamy before adding the other ingredients.
Can I make pita bread without a stand mixer?
Absolutely! This small dough batch is easy to prepare by hand. Knead on a lightly floured surface until smooth and elastic.
Why is my homemade pita bread hard?
It may have been overbaked, the dough may have been too dry, or the finished breads may have cooled uncovered. Use the correct amount of water, avoid overbaking, and cover the warm pita with a clean towel.
Can I make larger pita breads instead of mini ones?
Yes! Divide the dough into 6–8 larger portions and roll each into a 7–8-inch circle. Depending on the thickness, you may need to increase the baking time slightly.
Can I use bread flour instead of all-purpose flour?
Yes! Bread flour can create a slightly chewier pita because it contains more protein. You may need to adjust the water slightly depending on the flour.
Can I make this recipe without sugar?
Yes! The sugar helps the yeast get started and adds a little flavor, but you can omit it. The dough may take slightly longer to rise.
Can I cook pita bread in an air fryer?
You can experiment with small pita rounds in an air fryer, but the results may be less consistent than using a fully preheated oven or hot skillet. Watch carefully to avoid drying them out.
Why does my pita bread have no pocket?
A pocket forms when moisture inside the dough turns into steam and separates the layers. The most important factors are evenly rolled dough, proper dough hydration, and a very hot baking surface.
How do I keep pita bread soft after baking?
Place the freshly baked pita breads inside a clean kitchen towel and cover them while they cool. Store completely cooled bread in an airtight container.
Approximate Nutrition Information
Per mini pita bread, assuming 12 servings:
- Calories: 145 kcal
- Carbohydrates: 26 g
- Protein: 4 g
- Fat: 3 g
- Saturated Fat: Less than 1 g
- Sugar: 2 g
- Fiber: 1 g
- Sodium: 200 mg
Nutrition values are estimates and may vary depending on the flour brand, exact portion size, and amount of additional flour used during kneading.
Fresh, Fluffy & Made with Love! 🫓
These Mini Homemade Pita Breads are wonderfully soft, easy to prepare, and perfect for just about any meal. With simple ingredients and a little patience while the dough rises, you can create beautiful homemade breads with those classic fluffy pockets.
Serve them warm with your favorite dips, fill them with grilled chicken and fresh vegetables, or enjoy them alongside a delicious homemade dinner.
Once you experience the taste and texture of freshly baked pita bread, this simple recipe is sure to become a regular favorite in your kitchen!