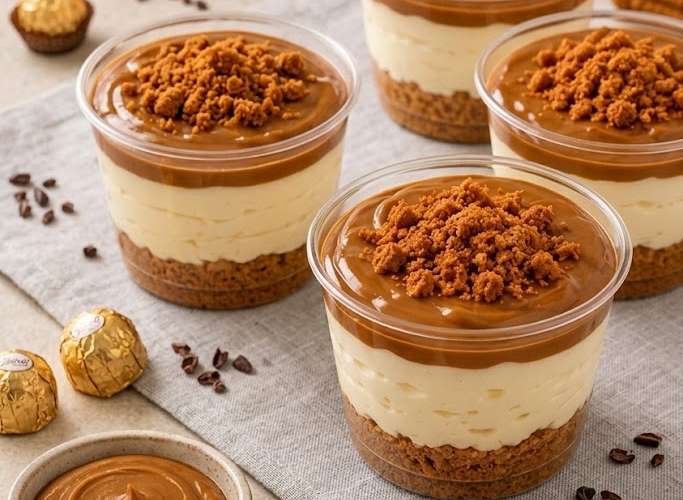
Lotus Biscoff Cheesecake Cups
Creamy, silky, and packed with the irresistible caramelized flavor of Lotus Biscoff cookies, these individual Biscoff Cheesecake Cups are an easy no-bake dessert that’s perfect for parties, dinner guests, or a sweet treat whenever you don’t want to turn on the oven.
A buttery Biscoff crumb base is layered with a smooth cheesecake filling and finished with extra cookie crumbs or Biscoff spread. Served in individual cups, they’re both elegant and incredibly easy to make.
⏱ Recipe Information
Prep Time: 20 minutes
Chill Time: 3 hours
Total Time: 3 hours 20 minutes
Servings: 6–8 cups
Difficulty: Easy
Method: No-Bake
Ingredients
Biscoff Biscuit Base
- 120 g Lotus Biscoff biscuits
- 4 tablespoons (60 g) unsalted butter, melted
Cheesecake Filling
- 225 g cream cheese, softened
- ½ cup (120 g) Biscoff cookie butter
- ½ cup (60 g) powdered sugar
- 1 teaspoon vanilla extract
- 1 cup (240 ml) cold heavy whipping cream
Optional Toppings
- Extra Biscoff biscuits
- Biscoff cookie crumbs
- Biscoff cookie butter, melted
- Whipped cream
- Mini Biscoff biscuits
Instructions
1. Prepare the Biscoff Crumbs
Place the Biscoff biscuits in a food processor.
Pulse until finely crushed.
If you don’t have a food processor, place the biscuits in a sealed bag and crush them with a rolling pin until they resemble fine crumbs.
Reserve a small amount of crumbs for decorating the finished cheesecake cups.
2. Add the Melted Butter
Transfer the crushed biscuits to a bowl.
Pour in the melted butter and stir until the crumbs are evenly coated.
The mixture should resemble wet sand and hold together when pressed.
3. Build the Biscuit Base
Divide the Biscoff crumb mixture evenly between 6–8 small dessert cups or glasses.
Press the crumbs down firmly using the back of a spoon.
Don’t pack them excessively tightly—you want a firm base that’s still easy to scoop.
Place the cups in the refrigerator while preparing the cheesecake filling.
4. Prepare the Cream Cheese
Place the softened cream cheese in a large mixing bowl.
Beat with an electric mixer for 1–2 minutes, until completely smooth and creamy.
Make sure there are no lumps.
5. Add the Biscoff Spread
Add the Biscoff cookie butter, powdered sugar, and vanilla extract.
Beat until smooth and fully combined.
Scrape down the sides of the bowl as needed.
6. Whip the Cream
In a separate chilled bowl, beat the cold heavy whipping cream until stiff peaks form.
The whipped cream should be thick enough to hold its shape.
Be careful not to overbeat.
7. Fold the Cream Into the Cheesecake Mixture
Add approximately one-third of the whipped cream to the Biscoff cream cheese mixture.
Gently fold it in with a spatula.
Add the remaining whipped cream in two additions, folding gently until the filling becomes light, fluffy, and completely combined.
8. Fill the Cups
Remove the chilled biscuit bases from the refrigerator.
Spoon or pipe the cheesecake filling evenly into each cup.
For a professional presentation, transfer the filling to a piping bag fitted with a large round or star tip and pipe it into the cups.
Smooth the tops if desired.
9. Add the Biscoff Topping
Crush a few additional Biscoff biscuits and sprinkle the crumbs over the cheesecake filling.
For an extra-decadent finish, gently warm a few tablespoons of Biscoff spread until pourable.
Drizzle a small amount over each cheesecake cup.
10. Chill
Cover the cups and refrigerate for at least 3 hours.
For the best texture and flavor, chill them overnight.
The cheesecake filling will firm up while the Biscoff base becomes perfectly tender.
11. Garnish and Serve
Just before serving, top each cheesecake cup with:
- A small Biscoff biscuit
- Extra cookie crumbs
- A drizzle of Biscoff spread
- Whipped cream
Serve chilled.
Chef’s Tips
Soften the Cream Cheese
Room-temperature cream cheese creates a much smoother filling and prevents lumps.
Use Cold Heavy Cream
Cold cream whips faster and holds its structure better.
Don’t Overmix
Once the whipped cream has been folded into the cheesecake mixture, mix only until combined. Overmixing can deflate the filling.
Chill Properly
At least 3 hours is recommended, but overnight chilling gives the cups an even better texture.
Make Them Extra Biscoff
For an even stronger Biscoff flavor, add a thin layer of Biscoff spread between the biscuit base and cheesecake filling.
Optional Biscoff Drizzle
For a beautiful glossy finish, place 2–3 tablespoons Biscoff cookie butter in a microwave-safe bowl.
Warm for approximately 10–15 seconds, then stir.
If necessary, warm for another few seconds until smooth and pourable.
Drizzle over the chilled cheesecake cups immediately before serving.
Make-Ahead Instructions
These cheesecake cups are ideal for entertaining because they can be prepared ahead of time.
Assemble them up to 24 hours before serving.
Keep covered and refrigerated.
Add the final biscuit garnish shortly before serving so it stays crisp.
Storage
Store the cheesecake cups covered in the refrigerator.
Refrigerator: Up to 3 days.
Keep the toppings separate if you want the biscuits to remain crunchy.
Freezing Instructions
The cheesecake cups can be frozen without the final cookie garnish.
Cover tightly and freeze for up to 1 month.
Thaw overnight in the refrigerator before serving.
Add fresh Biscoff crumbs and biscuits after thawing.
Serving Ideas
These individual cheesecake cups are perfect for:
- Dinner parties
- Birthday celebrations
- Afternoon tea
- Holiday dessert tables
- Potlucks
- Valentine’s Day
- Baby or bridal showers
For an elegant dessert table, serve them in small clear glasses so the golden Biscoff layers are visible.
Recipe Summary
These Lotus Biscoff Cheesecake Cups combine a buttery Biscoff biscuit base with a light, creamy cheesecake filling packed with caramelized cookie-butter flavor.
They’re completely no-bake, easy to prepare ahead, and perfectly portioned for entertaining.
Crunchy Biscoff base + creamy cookie-butter cheesecake + extra Biscoff on top = pure no-bake indulgence.