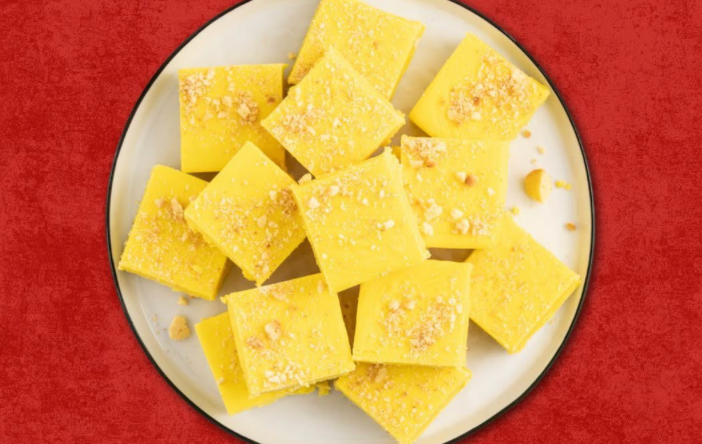
A quintessential mid-century holiday confection, 1950’s Original Banana Fudge captures the sweet, retro charm of old-fashioned candy shops and vintage Christmas tins. Unlike dense chocolate fudges, this nostalgic treat combines rich dairy cream, salted sweet cream butter, melted white chocolate chips, and marshmallow fluff to create a soft, melt-in-your-mouth texture. Infused with aromatic banana flavoring and finished with a buttery Nilla wafer crumble, it delivers a bite that tastes just like classic banana cream pudding in fudge form.
Recipe Overview
- Prep Time: 10 minutes
- Cook Time: 12–15 minutes
- Setting Time: 3–4 hours (at room temperature or chilled)
- Yield: One 9×9-inch or 8×8-inch pan (approx. 36 bite-sized squares)
- Skill Level: Intermediate (Candy thermometer recommended)
Why This Retro Recipe Works
- Marshmallow Fluff Stability: Using marshmallow creme prevents the boiling sugar syrup from crystallizing, guaranteeing a silky-smooth, non-grainy fudge every time.
- White Chocolate Structure: Premium white baking chips provide the cocoa butter backbone that allows the fudge to set firmly while maintaining a melt-away chew.
- Balanced Sweetness: Salted sweet cream butter cuts through the intense sweetness of granulated sugar and marshmallow, rounding out the bold banana notes.
Equipment Checklist
- 8×8-inch or 9×9-inch square baking pan
- Parchment paper or heavy-duty aluminum foil
- Heavy-bottomed 3- to 4-quart saucepan
- Candy thermometer (instant-read or clip-on)
- Flat-edged wooden spoon or heatproof silicone spatula
- Offset spatula (for smoothing the top)
- Measuring cups and spoons
Detailed Ingredient Breakdown
- ¾ cup (1 ½ sticks / 170g) Salted Sweet Cream Butter: The salted dairy fat balances the high sugar content and enriches the syrup.
- 3 cups + 2 tbsp Granulated Sugar: Forms the candy syrup base when boiled with the dairy.
- ½ cup Half-and-Half & ⅓ cup Heavy Cream: A blend of creams provides the exact dairy-fat ratio needed for a tender fudge body without excess water.
- 1 ¾ cups White Baking Chips (such as Ghirardelli): High-quality white chips containing real cocoa butter ensure clean melting and proper setting.
- 7 oz (1 jar) Marshmallow Fluff: Adds stability, volume, and that classic old-fashioned chewy fudge texture.
- 2 tsp Banana Flavoring (or Banana Extract): Delivers distinct vintage confectionery banana flavor.
- 1 tsp Clear Vanilla Flavoring: Adds depth without muddying the bright yellow color.
- ½ tsp Yellow Food Color Gel: Gives the fudge its signature pastel yellow retro appearance (liquid food coloring can also be used, adjusted to desired shade).
- 2 tbsp Crushed Vanilla Wafers (such as Nilla Wafers): Crumbled finely to garnish the top, adding a hint of baked crust flavor and visual appeal.
Step-by-Step Instructions
1. Prepare the Pan
Line an 8×8-inch or 9×9-inch square baking pan with parchment paper or heavy-duty aluminum foil, leaving an overhang on the sides to act as handles for easy removal later. Lightly grease the parchment with a touch of butter or non-stick spray.
2. Measure Out Add-Ins in Advance
Candy making moves fast once the syrup reaches temperature. Have your white baking chips, marshmallow fluff, banana flavoring, clear vanilla, and yellow food coloring measured and placed directly next to the stove.
3. Boil the Sugar Syrup
In a heavy-bottomed 3-to-4-quart saucepan, combine the ¾ cup salted butter, ½ cup half-and-half, ⅓ cup heavy cream, and 3 cups + 2 tbsp granulated sugar.
Place the saucepan over medium heat and stir constantly with a wooden spoon until the butter melts and the sugar dissolves. Bring the mixture to a full, rolling boil.
4. Cook to Soft-Ball Stage
Once boiling, clip a candy thermometer to the side of the pot (ensuring the bulb does not touch the pan bottom). Boil the syrup, stirring frequently to prevent scorching on the bottom, until the thermometer reaches 234°F to 238°F (112°C to 114°C)—the soft-ball stage. This typically takes 8 to 10 minutes of active boiling.
5. Fold in White Chips and Fluff
Immediately remove the saucepan from the heat. Add the 1 ¾ cups of white baking chips and the 7 oz jar of marshmallow fluff. Stir vigorously with a wooden spoon or spatula until the chips are completely melted and the marshmallow fluff is fully dissolved into the hot syrup.
6. Flavor and Color
Stir in the 2 tsp banana flavoring, 1 tsp clear vanilla flavoring, and ½ tsp yellow food color gel. Beat the mixture vigorously for 1 to 2 minutes until the color is vibrant and uniform, and the glossy sheen begins to turn slightly matte.
7. Pour and Garnish
Quickly pour the warm fudge into the prepared square pan. Use an offset spatula to smooth the surface evenly. Immediately scatter the 2 tablespoons of crushed Nilla wafers across the top, gently pressing the crumbs with your fingertips so they adhere to the setting fudge.
8. Cool and Set Completely
Allow the fudge to cool undisturbed at room temperature for 3 to 4 hours, or place it in the refrigerator for 2 hours until fully firm.
9. Slice into Squares
Use the parchment paper overhang to lift the entire fudge slab out of the pan and onto a cutting board. Use a large, sharp chef’s knife to slice into neat 1-inch to 1.5-inch squares. Wipe the blade clean with a damp paper towel between cuts for sharp, professional edges.
Confectioner’s Secrets for Perfect Fudge
- Mind the Temperature: Boiling fudge even a few degrees too low will leave it soft and runny; boiling it past 240°F will make it dry, crumbly, and hard. A calibrated candy thermometer ensures perfect results.
- Use Quality White Chips: Look for baking chips that list cocoa butter or milk solids early on the ingredient list for smooth melting. Low-grade white baking melts containing only palm kernel oil can separate into oily pockets when stirred into hot syrup.
- Clear Vanilla vs. Pure Vanilla: Using clear vanilla extract keeps the yellow hue crisp and bright, whereas dark pure vanilla extract can tint the yellow slightly beige.
Storage and Gifting Tips
- Room Temperature Storage: Store fudge squares in an airtight container with sheets of parchment or wax paper between layers at cool room temperature for up to 2 weeks.
- Refrigerator Storage: Keep in an airtight container in the fridge for up to 3 to 4 weeks. Bring squares to room temperature for 15 minutes before serving for the best texture.
- Freezing: Wrap the entire uncut fudge block (or individual squares) tightly in plastic wrap, then seal in a zip-top freezer bag. Freeze for up to 3 months. Thaw in the refrigerator overnight before slicing.