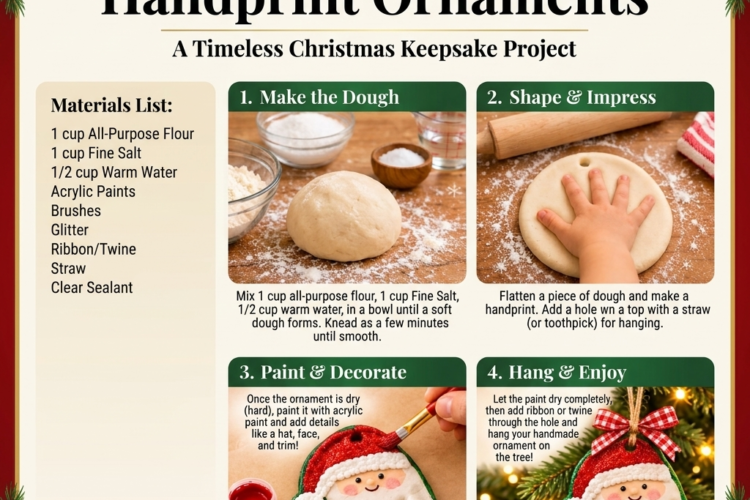
❤️ How to Make Salt Dough Ornaments
Easy Homemade Christmas Decorations for Your Tree, Gifts, and Holiday Crafts
Create beautiful, personalized holiday decorations with this simple homemade salt dough recipe! Salt dough ornaments are inexpensive, easy to make, and perfect for a fun Christmas activity with kids and family. Use cookie cutters, stamps, fingerprints, or handprints to create keepsake ornaments that you can decorate and enjoy year after year.
Prep Time: 20 minutes
Drying Time: 1–2 days (air-drying) or 2–3 hours (oven-drying)
Decorating Time: 30–60 minutes
Total Time: Approximately 3 hours to 2 days
Yield: 15–25 ornaments, depending on size
Difficulty: Easy
Ingredients
- 2 cups (250 g) all-purpose flour
- 1 cup (290 g) fine table salt
- ¾–1 cup (180–240 ml) warm water, added gradually
Optional Decorating Supplies
- Acrylic craft paints
- Paintbrushes
- Glitter
- Ribbon, twine, or decorative string
- Clear acrylic sealer or craft varnish
- Small cookie cutters
- Drinking straw or skewer for making hanging holes
- Rubber stamps or textured objects for decorating
Instructions
1. Mix the Dry Ingredients
In a large mixing bowl, combine the flour and salt. Stir until evenly distributed.
2. Add the Water
Gradually pour in the warm water, mixing as you go. Start with ¾ cup and add more only as needed until a firm dough forms.
3. Knead the Dough
Transfer the dough to a lightly floured surface. Knead for approximately 5–7 minutes until smooth, soft, and pliable.
If the dough is too sticky, add a little flour. If it feels too dry or crumbly, add water a teaspoon at a time.
4. Roll Out the Dough
Use a rolling pin to roll the dough to approximately ¼ inch (6 mm) thick. Try to keep the thickness even so the ornaments dry uniformly.
5. Cut Out the Ornaments
Use Christmas-themed cookie cutters to cut out shapes such as stars, trees, snowflakes, bells, hearts, and gingerbread people.
Carefully remove the extra dough around each shape.
6. Make Hanging Holes
Use a drinking straw or skewer to make a small hole near the top of each ornament. Make sure the hole is large enough for ribbon or twine to pass through.
Remember to make the holes before drying.
7. Add Personal Designs
Decorate the ornaments before drying if desired. Press fingerprints, handprints, rubber stamps, lace, or textured objects gently into the dough.
For handprint keepsakes, gently press a child’s hand into the dough and cut around the impression.
8. Dry the Ornaments
Oven-Drying Method:
- Preheat the oven to its lowest practical temperature, ideally 200°F (95°C).
- Place the ornaments on a parchment-lined baking sheet.
- Bake for approximately 2–3 hours, turning them occasionally if necessary.
- Thicker ornaments may require additional drying time.
Dry them slowly to reduce puffing and cracking. The ornaments should be completely dry and hard before decorating.
Air-Drying Method:
Arrange the ornaments on a flat surface or wire rack in a dry, well-ventilated area. Turn them occasionally and allow 1–2 days or longer, depending on thickness and humidity.
9. Cool and Paint
Allow oven-dried ornaments to cool completely.
Paint them with acrylic craft paint. Try classic Christmas colors, metallic gold, silver, white, red, or green. Let each coat dry before adding another.
10. Add Finishing Touches
Once the paint is completely dry, decorate with glitter, painted details, or small patterns.
For extra protection, apply a suitable clear craft sealer or acrylic varnish according to the product instructions. Allow it to dry completely.
11. Add Ribbon and Display
Thread ribbon or twine through each hanging hole and tie a secure knot.
Hang your handmade ornaments on the Christmas tree, attach them to gift packages, or display them around your home!
Helpful Tips for Perfect Salt Dough Ornaments
- Measure carefully: The basic ratio is 2 parts flour to 1 part salt by volume.
- Add water slowly: Too much water makes the dough sticky and difficult to shape.
- Roll evenly: Uniform thickness helps the ornaments dry at the same rate.
- Don’t make them too thick: Thicker pieces take much longer to dry and may crack.
- Make the holes generously sized: Small holes can shrink slightly during drying.
- Dry slowly: High oven temperatures can cause bubbling, puffing, and uneven drying.
- Check the centers: An ornament may feel dry outside while still containing moisture inside.
Fun Salt Dough Ornament Ideas
- Handprint Ornaments: Preserve little handprints as holiday keepsakes.
- Fingerprint Christmas Lights: Use fingerprints to create colorful Christmas light designs.
- Personalized Name Ornaments: Add names and the year with stamps or paint.
- Rustic Stars: Paint white or leave natural for a farmhouse-style look.
- Snowflake Ornaments: Use snowflake cutters and add silver or white details.
- Gingerbread Ornaments: Paint them brown and decorate with white icing-style patterns.
- Pet Paw Print Keepsakes: Make a gentle paw impression, ensuring your pet does not lick or eat the dough.
Storage and Care
- Before Decorating: Store unused dough in an airtight container in the refrigerator for up to 2 days.
- Finished Ornaments: Store completely dry, sealed ornaments in a cool, dry place.
- Long-Term Storage: Wrap ornaments individually in tissue paper and keep them in a sturdy box.
- Avoid Moisture: Salt dough is not waterproof, so keep ornaments away from damp areas.
Frequently Asked Questions
Can I make salt dough ornaments without baking?
Yes! You can air-dry them. Depending on their thickness and the humidity, they may take several days to dry completely.
Why did my ornaments puff up?
This usually happens when the oven temperature is too high or the dough is too thick. Use a low temperature and dry them slowly.
Can I make salt dough ornaments with children?
Absolutely! Kids can help mix, roll, cut, and decorate the dough with adult supervision. Keep the dough away from mouths, and wash hands after crafting.
Are salt dough ornaments edible?
No. Although they are made from common kitchen ingredients, they contain a very high amount of salt and are not food. Keep them away from children and pets who might put them in their mouths.
Do I need to seal my ornaments?
Sealing is optional, but a suitable clear craft sealer can help protect painted decorations. It does not make salt dough ornaments waterproof or food-safe.
A Homemade Christmas Keepsake ❤️
These homemade salt dough ornaments are a wonderful way to add a personal touch to your holiday decorations. Whether you make tiny stars, personalized Christmas trees, or precious little handprint keepsakes, each ornament becomes a special memory to treasure for years.
A little flour, salt, and water can turn into some of the sweetest Christmas memories!