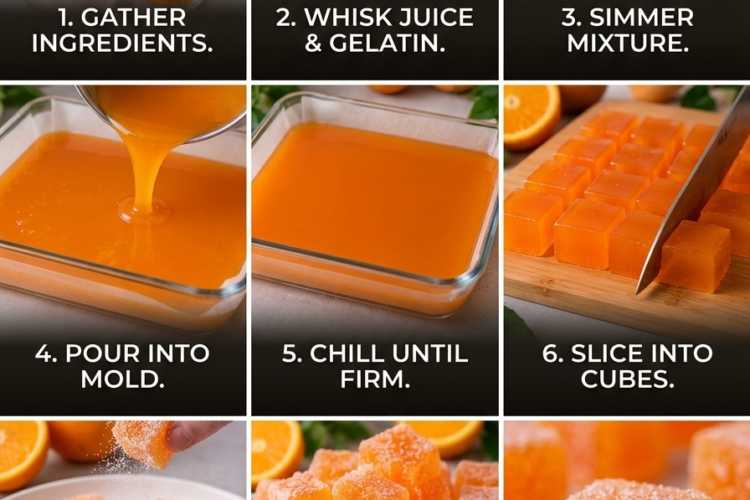
🍊 Homemade Orange Jelly Candy — Sweet, Chewy & Bursting with Fresh Citrus Flavor
Bright, fruity, and delightfully chewy, these Homemade Orange Jelly Candies are a delicious way to enjoy the fresh flavor of oranges in a fun, bite-sized treat! Made with real orange juice, a touch of lemon, sugar, and unflavored gelatin, these beautiful orange candies have a vibrant citrus taste and a sparkling sugar coating that makes every piece irresistible.
Unlike store-bought sweets, these homemade jelly candies let the natural orange flavor shine through. The lemon juice adds a refreshing tang, while the sugar creates the perfect balance of sweetness. Once set, the jelly can be cut into neat little cubes or fun shapes and rolled in granulated sugar for a classic candy-shop finish.
They’re perfect for holiday treats, homemade gifts, party platters, dessert tables, or simply enjoying a fruity candy whenever you crave something sweet!
Recipe Information
- Prep Time: 15 minutes
- Cook Time: 10–15 minutes
- Setting Time: 4–6 hours, preferably overnight
- Total Time: Approximately 4 hours 30 minutes
- Yield: 30–40 pieces, depending on cutting size
- Course: Candy, Dessert, Sweet Treat
- Difficulty: Easy
- Method: Stovetop, refrigerator-set
Ingredients
For the Orange Jelly
- 2 cups (500 ml) fresh orange juice
- ¾ cup (150 g) granulated sugar
- 2 tablespoons (30 ml) fresh lemon juice
- 3 tablespoons unflavored gelatin powder (approximately 27 g, depending on brand)
- ¼ cup (60 ml) cold water
For the Sugar Coating
- ½ cup granulated sugar, or as needed
Optional Additions
- 1 teaspoon finely grated orange zest, for a more intense citrus flavor
- 1–2 drops natural orange extract, if you prefer a stronger orange aroma
Ingredient note: These candies are gelatin-based jelly sweets. Their texture is firm and chewy rather than identical to traditional pectin-based fruit pâte de fruit.
Instructions
Step 1: Prepare the Gelatin
Pour the cold water into a small heatproof bowl.
Sprinkle the unflavored gelatin evenly over the surface of the water. Let it sit for approximately 5–10 minutes, until the powder absorbs the water and forms a thick, spongy mixture.
This process is called blooming. It allows the gelatin to hydrate evenly and helps prevent lumps in the finished candy.
Do not stir aggressively while the gelatin is blooming.
Step 2: Prepare the Orange Juice
If using fresh oranges, squeeze enough juice to obtain 2 cups (500 ml).
For a smoother candy, strain the juice through a fine-mesh sieve to remove pulp and seeds. If you prefer a more rustic texture, you can leave a small amount of fine pulp in the juice.
Pour the orange juice into a medium saucepan and add the lemon juice and granulated sugar.
Stir well to begin dissolving the sugar.
Step 3: Heat the Orange Mixture
Place the saucepan over medium-low heat.
Stir continuously or frequently for approximately 5–8 minutes, until the sugar dissolves completely and the liquid is hot.
Avoid boiling the mixture vigorously. Gentle heating preserves the fresh citrus flavor and prevents excessive evaporation.
If using orange zest, stir it in at this stage.
Step 4: Melt the Bloomed Gelatin
Reduce the heat to low.
Add the bloomed gelatin to the hot orange mixture, stirring gently until it dissolves completely.
Continue stirring for 1–3 minutes, checking that no gelatin granules remain and that the liquid looks smooth.
Important: Do not boil the mixture after adding the gelatin. Excessive heating can weaken gelatin’s setting ability and may affect the finished texture.
Step 5: Prepare the Mold
Lightly rinse a small square or rectangular dish with cold water, then line it with parchment paper, leaving some overhang to help lift out the jelly later.
A dish approximately 8 × 8 inches (20 × 20 cm) will produce moderately thick jelly pieces. Use a slightly smaller dish for thicker candies.
Make sure the parchment lies as smoothly as possible against the bottom and sides.
Step 6: Pour and Remove Bubbles
Carefully pour the warm orange mixture into the prepared dish.
If small bubbles appear on the surface, let the mixture stand for a minute or skim them gently with a spoon.
Allow the dish to cool briefly at room temperature, then transfer it to the refrigerator.
Step 7: Chill Until Firm
Refrigerate the orange jelly for at least 4–6 hours, or preferably overnight.
The jelly should be fully set, firm to the touch, and easy to lift out of the dish without flowing or sticking excessively.
If the center remains soft, give it additional chilling time before cutting.
Step 8: Cut into Candy Pieces
Once fully set, lift the jelly from the dish using the parchment overhang.
Place it on a clean cutting board and peel away the parchment.
Using a sharp knife lightly moistened with water, cut the jelly into small cubes, rectangles, or decorative shapes.
Wipe the blade between cuts to keep the pieces neat.
If the jelly feels too sticky to handle, return it to the refrigerator for another 20–30 minutes.
Step 9: Coat with Granulated Sugar
Pour the extra granulated sugar into a shallow bowl.
Roll each jelly piece in the sugar until coated on all sides. Gently shake off any excess sugar.
Place the coated candies on a parchment-lined tray in a single layer.
For a sparkling finish, coat each piece just before serving. If the candies release moisture, the sugar coating may gradually dissolve, especially in humid conditions.
Step 10: Serve and Enjoy
Arrange the finished orange jelly candies in a small candy dish or on a dessert platter.
For a colorful presentation, mix them with lemon jelly candies or other homemade fruit sweets.
Enjoy their bright citrus flavor and pleasantly chewy texture!
Tips for the Best Orange Jelly Candy
- Bloom the gelatin properly. Allow it to absorb the cold water fully before adding it to the hot liquid.
- Use fresh, flavorful oranges. Sweet, ripe oranges create the best natural flavor.
- Strain the juice if desired. Removing pulp helps produce a smooth, even jelly.
- Dissolve the sugar completely. Undissolved sugar can create an uneven texture.
- Avoid boiling after adding gelatin. Gentle heat is enough to dissolve it.
- Chill thoroughly. Cutting the jelly before it is fully set can cause it to smear or lose its shape.
- Use a sharp knife. Slightly dampening the blade can help create cleaner cuts.
- Coat shortly before serving. This reduces the chance of the sugar dissolving on the moist jelly.
- Adjust the sweetness to your taste. The amount of sugar can be reduced slightly, although this will make the candies less sweet and may change their final texture.
- Remember that fresh juice varies. Tart or less-sweet oranges can produce a more tangy candy.
Delicious Variations
🍋 Lemon Jelly Candy
Replace the orange juice with an equal quantity of lemon juice diluted with water to taste. Since lemon juice is much more acidic, start with a smaller amount of lemon juice and adjust the water and sugar to balance the flavor.
🍊 Orange-Lemon Jelly Candy
Use 1½ cups orange juice and ½ cup lemon juice for a brighter, tangier citrus flavor. Taste the mixture before heating and adjust the sugar if needed.
🍓 Strawberry Jelly Candy
Replace the orange juice with strained strawberry purée diluted with a little water. The result will have a softer, fruity strawberry flavor and a beautiful pink color.
🍇 Grape Jelly Candy
Use clear grape juice instead of orange juice for a sweet, fruity candy with a different flavor profile.
🍍 Pineapple Jelly Candy
Use pineapple juice for a tropical variation. Avoid using fresh kiwi, fresh pineapple, or fresh papaya without suitable heat treatment because enzymes in these fruits can interfere with gelatin setting. Commercial pasteurized juice is a convenient option.
🍊 Extra-Intense Orange Candy
Add 1 teaspoon finely grated orange zest and, if desired, a small amount of natural orange extract. Keep the extract quantity modest so the flavor remains fresh rather than artificial.
🍬 Two-Layer Citrus Candy
Prepare an orange jelly mixture and a separate lemon jelly mixture. Allow the first layer to become partially set before gently adding the second cooled mixture. Chill until both layers are completely firm, then cut into colorful two-tone squares.
What to Serve with Orange Jelly Candy
These bright little sweets pair beautifully with a variety of treats and drinks.
- Black tea: Complements the citrus flavor without adding too much sweetness.
- Coffee: Provides a pleasant contrast to the fruity candy.
- Chocolate truffles: Create a delicious combination of citrus and chocolate.
- Shortbread cookies: Offer a buttery contrast to the chewy jelly.
- Fresh strawberries: Add color and fruity freshness.
- Homemade fruit candies: Create a colorful assortment for gifting or parties.
- Vanilla biscuits: Pair nicely with the refreshing orange flavor.
For a homemade candy gift, place the jelly pieces in small paper candy cups and arrange them in a decorative box.
Make-Ahead and Storage Instructions
Make ahead: Prepare the jelly a day before serving and let it set overnight. For the best appearance, coat the pieces in sugar closer to the time of serving.
Refrigeration: Store the uncoated candies in an airtight container in the refrigerator at 40°F (4°C) or below. For best quality, consume within 5–7 days. Always check their appearance, texture, and smell before eating.
Sugar coating: Sugar may absorb moisture from the jelly and become wet or sticky during storage. For the prettiest finish, roll the pieces in sugar shortly before serving.
Freezing: Freezing is not recommended because thawing can cause gelatin-based candies to release moisture and develop a softer texture.
Room temperature: These homemade fruit candies contain fresh juice and added water, and this recipe has not been tested for shelf stability. Keep them refrigerated rather than storing them in a candy jar at room temperature for extended periods.
Frequently Asked Questions
Why didn’t my orange jelly candy set?
The gelatin may not have dissolved completely, the mixture may have been boiled vigorously after adding the gelatin, or the gelatin quantity may not have matched the product’s strength. Make sure the gelatin is properly bloomed and dissolved, then allow enough refrigeration time.
Why is my candy too soft?
The juice-to-gelatin ratio, gelatin brand, or measuring method may affect the final firmness. Weighing the gelatin is more reliable than using tablespoons because powder density varies. Refrigerate the mixture overnight before deciding whether it has failed to set.
Can I use packaged orange juice?
Yes. Use plain orange juice without excessive added water. A pasteurized juice works well, although the finished candy may taste less fresh or fragrant than one made with freshly squeezed juice.
Can I use agar-agar instead of gelatin?
Agar-agar behaves differently from gelatin and generally requires boiling to activate. It will produce a firmer, sometimes more brittle texture, so it should not be substituted in equal quantities without adjusting the recipe.
Why does the sugar coating become wet?
Gelatin jelly contains moisture that can migrate to the surface, especially in warm or humid conditions. Coat the pieces shortly before serving and keep the candies chilled.
Can I make these candies less sweet?
Yes. You can reduce the sugar slightly, but changing the sugar level will affect the flavor balance and may alter the candy’s texture. Start by reducing it modestly rather than omitting it entirely.
Can I make these candies without fresh orange pulp?
Absolutely. Straining the juice through a fine-mesh sieve creates a smoother, more uniform jelly and makes cutting and coating the candy easier.
Are these candies suitable for gifting?
Yes, provided they are kept refrigerated and the recipient knows they are homemade, perishable candies. Package them in a clean container and maintain refrigeration during storage and transport.
Final Thoughts
Homemade Orange Jelly Candy is a simple, fruity treat that brings the refreshing taste of oranges into every chewy bite. With fresh citrus juice, a hint of lemon, and a sparkling sugar coating, these colorful candies are perfect for parties, homemade gifts, or a fun afternoon in the kitchen.
The key to success is blooming the gelatin properly, heating the mixture gently, and allowing plenty of time for the jelly to set before cutting. Coat the pieces just before serving, and enjoy their bright flavor and delightful texture!
Sweet, tangy, sparkling, and bursting with orange flavor—these homemade Orange Jelly Candies are little bites of sunshine! 🍊🍬