🧅 Homemade Onion Rings — Golden, Crispy & Delicious
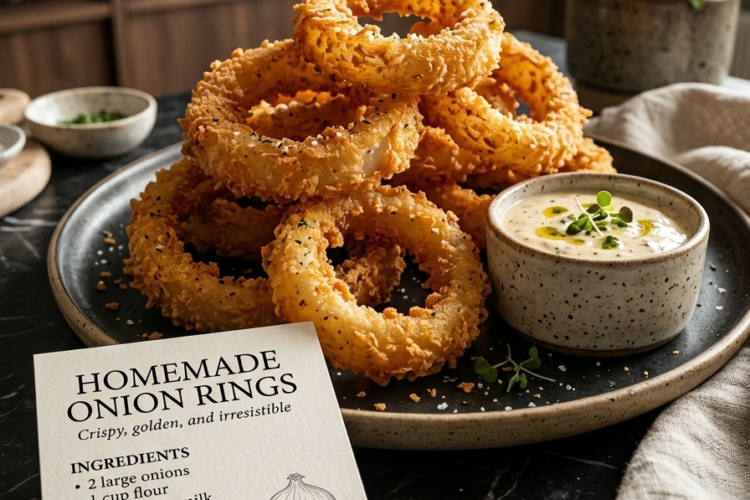
Nothing beats a batch of homemade onion rings fresh from the fryer! These onion rings feature sweet, tender onion slices wrapped in a golden, crunchy breadcrumb coating. Made with simple ingredients like flour, buttermilk, egg, and breadcrumbs, they are easy to prepare and taste even better than many restaurant versions.
Serve them alongside burgers, sandwiches, grilled chicken, or your favorite dipping sauce. Whether you’re making them for a family dinner, game day, or a weekend snack, these crispy onion rings are guaranteed to disappear quickly!
Recipe Information
- Prep Time: 15 minutes
- Cook Time: 15–20 minutes
- Total Time: Approximately 35 minutes
- Servings: 4
- Yield: Approximately 20–24 onion rings, depending on onion size
- Course: Appetizer, Snack, Side Dish
- Cuisine: American
- Difficulty: Easy
- Cooking Method: Deep-frying
Ingredients
For the Onion Rings
- 2 large yellow or sweet onions
- 1 cup (125 g) all-purpose flour
- 1 cup (240 ml) buttermilk
- 1 large egg
- 1 cup (100–120 g) plain breadcrumbs or panko breadcrumbs
- 1 teaspoon salt, divided, or to taste
- ½ teaspoon black pepper, or to taste
- ½ teaspoon garlic powder, optional
- ½ teaspoon paprika, optional
- Vegetable, canola, or sunflower oil, for frying
For Serving (Optional)
- Ranch dressing
- Garlic mayonnaise
- Ketchup
- Barbecue sauce
- Spicy mayonnaise
Instructions
Step 1: Prepare the Onions
Peel the onions and cut them crosswise into slices approximately ½ inch (1.25 cm) thick.
Separate the slices gently into individual rings, keeping the larger rings intact. Reserve the very small inner pieces for another recipe, or fry them separately.
Pat the onion rings dry with paper towels. Removing excess moisture helps the coating stick more effectively and encourages a crispier finish.
Step 2: Set Up the Breading Station
Prepare three shallow bowls.
Bowl 1 — Seasoned Flour: Combine the flour with about ½ teaspoon of salt, the black pepper, garlic powder, and paprika, if using. Mix well.
Bowl 2 — Buttermilk and Egg: Whisk together the buttermilk and egg until completely blended.
Bowl 3 — Breadcrumbs: Pour the breadcrumbs into the third bowl. Panko breadcrumbs give the onion rings an especially crunchy coating, while regular breadcrumbs create a finer, more traditional crust.
Arrange the bowls in order beside your work surface.
Step 3: Coat the Onion Rings
Working with a few onion rings at a time, coat each ring in the seasoned flour. Shake off any excess.
Dip the floured ring into the buttermilk-and-egg mixture, making sure it is coated on all sides.
Transfer it to the breadcrumbs and press gently so the crumbs adhere to the entire surface, including the edges.
For an extra-thick, crunchy coating, repeat the buttermilk-and-breadcrumb steps once more.
Place the coated rings on a baking tray or wire rack. Let them rest for 5–10 minutes while you heat the oil. This brief resting period helps the coating adhere during frying.
Step 4: Heat the Oil
Pour vegetable, canola, or sunflower oil into a heavy-bottomed pot or deep skillet to a depth of approximately 2 inches (5 cm). Leave plenty of space at the top to prevent bubbling oil from overflowing.
Heat the oil to 350°F (175°C), using a kitchen thermometer if available.
If the oil is too cool, the breadcrumbs can absorb excess oil and become greasy. If it is too hot, the exterior may brown before the onion softens.
Safety tip: Never leave hot oil unattended, and keep water away from the pan. Do not overcrowd the pot.
Step 5: Fry Until Golden and Crispy
Carefully lower a small batch of onion rings into the hot oil using kitchen tongs. Avoid dropping them from a height, which can cause splashing.
Fry for approximately 2–3 minutes per batch, turning once if needed, until the coating is golden brown and crisp and the onion is tender.
The precise cooking time will depend on the thickness of the onion slices and the size of the rings.
Remove the finished onion rings with a slotted spoon or spider strainer. Let excess oil drain back into the pot.
Step 6: Drain and Season
Transfer the cooked onion rings to a wire rack set over a baking tray. This allows air to circulate around them and helps preserve their crispness.
Alternatively, place them briefly on paper towels to absorb excess oil.
While the onion rings are still hot, sprinkle lightly with the remaining salt, adjusting to taste.
Repeat with the remaining batches, allowing the oil to return to 350°F (175°C) between batches.
Step 7: Serve Immediately
Arrange the onion rings on a serving platter and serve while they’re hot and crunchy.
Pair them with garlic mayonnaise, ranch dressing, ketchup, barbecue sauce, or your favorite spicy dipping sauce.
For a classic restaurant-style presentation, serve them alongside a juicy burger and crispy fries.
Tips for Extra-Crispy Onion Rings
- Choose the right onions: Sweet onions give a mild, pleasant flavor, while yellow onions provide a more traditional savory taste.
- Dry the onion slices: Surface moisture can cause the coating to slide off.
- Use panko breadcrumbs: Their larger flakes create a lighter, crunchier crust.
- Keep one hand for dry ingredients: Use one hand for the flour and breadcrumbs and the other for the wet mixture to reduce clumping on your fingers.
- Don’t skip the flour coating: It helps the buttermilk-and-egg mixture cling to the onion and gives the breadcrumbs something to adhere to.
- Fry in small batches: Too many onion rings at once lower the oil temperature and can make the coating greasy.
- Use a wire rack: Stacking hot onion rings or covering them traps steam and softens the crust.
- Season while hot: A little salt immediately after frying brings out the flavor.
Variations
Spicy Onion Rings
Add ½ teaspoon cayenne pepper or chili powder to the seasoned flour for a little heat.
Parmesan Onion Rings
Mix ¼ cup finely grated Parmesan cheese into the breadcrumbs for a savory, cheesy crust.
Beer-Battered Style
For a different texture, replace the buttermilk-and-egg dip with a thin batter made from flour, egg, and a little cold beer. Dip the floured rings into the batter and fry until golden. This creates a batter-style coating rather than the traditional breadcrumb crust.
Extra-Crunchy Double-Coated Rings
After the first breadcrumb coating, dip each ring into the buttermilk mixture again and coat it with a second layer of panko.
Oven-Baked Onion Rings
Preheat the oven to 425°F (220°C). Arrange the breaded onion rings on a lightly greased wire rack set over a baking sheet, and lightly spray the coating with oil. Bake for approximately 18–25 minutes, turning halfway through, until golden and tender. The texture will differ slightly from deep-fried onion rings.
Air Fryer Onion Rings
Preheat the air fryer to 375°F (190°C). Arrange the coated rings in a single layer and spray lightly with oil. Cook for approximately 8–12 minutes, turning halfway through, until crisp and golden. Work in batches and avoid overcrowding.
Best Dipping Sauces
Creamy Garlic Mayo: Mix ½ cup mayonnaise with one minced garlic clove, 1 teaspoon lemon juice, and a pinch of salt.
Spicy Mayo: Combine ½ cup mayonnaise with 1–2 tablespoons hot sauce and a squeeze of lime juice.
Quick Burger Sauce: Mix ¼ cup mayonnaise, 1 tablespoon ketchup, 1 teaspoon mustard, and 1 teaspoon finely chopped pickles.
Honey Barbecue Dip: Combine ¼ cup barbecue sauce with 1 teaspoon honey for a sweet and smoky finish.
What to Serve with Homemade Onion Rings
These crispy rings are perfect alongside cheeseburgers, fried chicken, grilled steak, hot dogs, sandwiches, or homemade fish and chips. They also make an excellent party appetizer served with a selection of dipping sauces.
For a casual snack, pile them into a basket lined with parchment paper and serve with cold lemonade or your favorite refreshing drink.
Storage and Reheating
Best enjoyed fresh: Onion rings are crispiest immediately after frying.
Refrigerator: Store leftover onion rings in an airtight container in the refrigerator for up to 3 days. Allow them to cool before storing, and refrigerate within 2 hours.
Oven reheating: Place the rings on a wire rack over a baking sheet and heat at 400°F (200°C) for approximately 5–10 minutes, until hot and crisp.
Air fryer reheating: Reheat at 350°F (175°C) for approximately 3–5 minutes, checking frequently.
Freezing uncooked onion rings: Arrange breaded, uncooked rings in a single layer on a tray and freeze until solid. Transfer to a freezer-safe bag or container. Fry from frozen in small batches, taking care to avoid ice crystals and splattering; cooking will take a little longer.
Avoid microwaving if you want to preserve the crunchy coating, as it tends to make the breadcrumbs soft.
Frequently Asked Questions
Why does the coating fall off my onion rings?
The onions may be too wet, or the flour layer may have been skipped. Pat the rings dry, coat them thoroughly in seasoned flour, and let the breaded rings rest for a few minutes before frying.
Why are my onion rings soggy?
The oil may not have been hot enough, the pot may have been overcrowded, or the rings may have been stacked while hot. Maintain the oil temperature around 350°F (175°C), fry in batches, and drain on a wire rack.
Can I make onion rings ahead of time?
You can slice the onions and prepare the breading station ahead of time, but for the best results, coat and fry the rings shortly before serving. Breaded rings can also be frozen uncooked for later use.
Can I make them without buttermilk?
Yes. Mix 1 cup of milk with 1 tablespoon of lemon juice or white vinegar and let it stand for 5–10 minutes. Use this mixture in place of buttermilk.
Are onion rings vegetarian?
Yes, this recipe is vegetarian when prepared with vegetarian-friendly breadcrumbs and sauces. Check ingredient labels if you follow a strict vegetarian diet.
Final Thoughts
These Homemade Onion Rings are simple, satisfying, and packed with crunchy goodness. The seasoned flour, creamy buttermilk-and-egg coating, and crisp breadcrumbs create the perfect contrast with the naturally sweet, tender onion inside.
Make a batch for your next family meal, serve them with your favorite burger, or enjoy them as a delicious snack with homemade dipping sauce.
Golden on the outside, tender on the inside, and irresistibly crunchy—these homemade onion rings are a classic comfort food worth making again and again! 🧅✨