🍦 Homemade Ice Cream
This Homemade Ice Cream is incredibly creamy, smooth, and easy to make without an ice cream machine. Made with just a handful of ingredients, this no-churn recipe combines cold whipped cream with sweetened condensed milk and vanilla for a rich, silky dessert that freezes beautifully.
The optional powdered milk adds extra creaminess and helps give the finished ice cream a fuller, scoopable texture.
Recipe Information
- Prep Time: 15 minutes
- Freezing Time: 6–8 hours
- Total Time: About 6–8 hours 15 minutes
- Yield: About 1.2–1.3 liters
- Servings: 8–10
- Difficulty: Very Easy
- Method: No-churn
Ingredients
- 500 ml (about 2 cups) cold whipping cream
- 397 g sweetened condensed milk
- 1 teaspoon vanilla extract
- 1 pinch salt
- 2–3 tablespoons powdered milk, optional
Instructions
1. Chill Your Equipment
For the best results, place your mixing bowl and beaters in the refrigerator or freezer for about 10–15 minutes before beginning.
Make sure the whipping cream is thoroughly chilled.
Cold ingredients whip faster and create a more stable ice cream base.
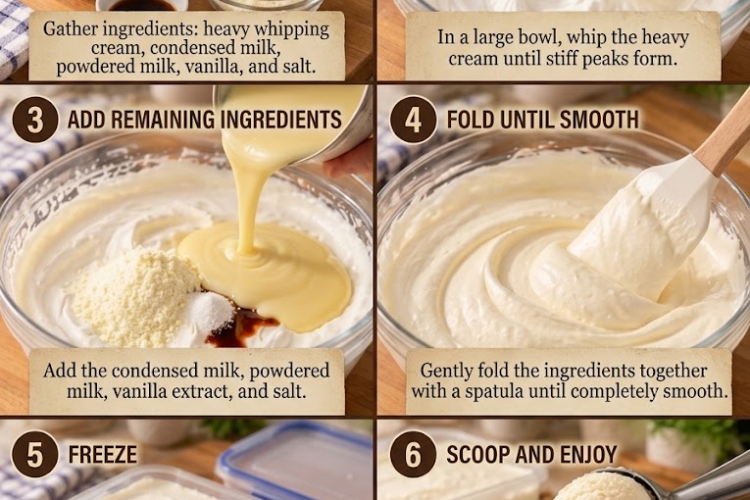
2. Whip the Cream
Pour the cold whipping cream into the chilled mixing bowl.
Using a hand mixer or stand mixer, whip on medium-high speed until the cream forms soft to medium-stiff peaks.
The cream should be thick and fluffy but not grainy.
Be careful not to overwhip it.
3. Add the Condensed Milk
Reduce the mixer speed to low.
Gradually pour in the sweetened condensed milk while mixing gently.
Add the vanilla extract and pinch of salt.
Mix just until everything is evenly combined.
4. Add the Powdered Milk
If using powdered milk, sift it into the mixture.
Gently fold it in with a rubber spatula until completely incorporated.
The powdered milk is optional, but it can add a slightly richer, creamier texture.
5. Taste and Adjust
Taste the mixture before freezing.
If you prefer a stronger vanilla flavor, add another ½ teaspoon vanilla extract.
Keep in mind that the flavor will taste slightly less sweet once frozen.
6. Transfer to a Container
Pour the ice cream mixture into a 1½–2 liter freezer-safe container.
A shallow container is ideal because the ice cream will freeze more quickly and evenly.
Smooth the surface with a spatula.
7. Cover and Freeze
Press a piece of plastic wrap or parchment directly against the surface of the ice cream to help prevent ice crystals.
Cover the container tightly with its lid.
Freeze for at least 6–8 hours, preferably overnight, until completely firm.
8. Soften Before Serving
Remove the ice cream from the freezer and let it stand at room temperature for approximately 5–10 minutes before scooping.
This allows it to soften slightly and makes it easier to serve.
Use a warm ice cream scoop for especially smooth scoops.
9. Serve
Scoop the homemade ice cream into bowls or cones.
Serve plain or add your favorite toppings.
Chef’s Tips
- Keep the cream very cold: This is essential for achieving maximum volume.
- Don’t overwhip the cream: Once stiff peaks form, stop mixing.
- Fold gently: Excessive mixing can deflate the whipped cream.
- Use full-fat whipping cream: Lower-fat creams may not whip properly or produce the same creamy texture.
- Cover the surface: Direct contact with plastic wrap helps prevent unwanted ice crystals.
- Use a shallow container: It helps the ice cream freeze more evenly.
- Let it soften slightly before scooping: Freshly frozen no-churn ice cream can be quite firm.
Delicious Variations
🍫 Chocolate Ice Cream
Sift ¼ cup (25 g) unsweetened cocoa powder into the condensed milk mixture before combining it with the whipped cream.
For extra chocolate flavor, fold in ½ cup mini chocolate chips.
🍪 Cookies and Cream
Fold in 10–12 crushed chocolate sandwich cookies before freezing.
Reserve some cookie crumbs for sprinkling over the top.
🍓 Strawberry Ice Cream
Fold in 1 cup finely chopped strawberries.
For the best texture, use ripe strawberries and pat them dry before chopping.
🍌 Banana Ice Cream
Mash 2 ripe bananas until smooth and fold them into the mixture.
Add ½ teaspoon cinnamon for a warm, cozy flavor.
🥜 Peanut Butter Ice Cream
Warm ½ cup creamy peanut butter until easily stirrable and swirl it through the finished ice cream mixture.
Add chopped roasted peanuts for crunch.
🍫 Chocolate Chip Ice Cream
Fold in ¾ cup mini chocolate chips and add a little extra vanilla.
🍯 Salted Caramel Ice Cream
Swirl ½ cup caramel sauce through the ice cream before freezing.
Finish with a small pinch of flaky sea salt.
🍪 Biscoff Ice Cream
Fold in ½ cup Biscoff cookie butter and ½ cup crushed Biscoff biscuits for a rich caramelized-cookie version.
No-Churn Ice Cream Texture Tips
For an extra smooth result, avoid repeatedly opening the freezer during the first several hours.
The ice cream should remain tightly covered throughout freezing.
Using enough fat from the whipping cream and sugar from the condensed milk helps reduce the formation of large ice crystals and keeps the ice cream creamy.
Serving Suggestions
Serve homemade ice cream with:
- Chocolate syrup
- Caramel sauce
- Fresh berries
- Chopped nuts
- Sprinkles
- Crushed cookies
- Whipped cream
- Fresh banana slices
- Brownie pieces
- Chocolate shavings
It is also delicious alongside warm brownies, apple pie, waffles, pancakes, or freshly baked cookies.
Storage
Keep the ice cream tightly covered in the freezer.
For the best texture and flavor, enjoy within 2–3 weeks.
Always use a clean scoop or spoon to prevent contamination and excess ice crystals.
Final Result
A beautifully creamy Homemade Ice Cream with a rich vanilla flavor, silky texture, and satisfying scoopable consistency—all without an ice cream machine. It’s a simple freezer dessert that’s easy to customize with your favorite cookies, fruits, chocolate, nuts, or sauces.