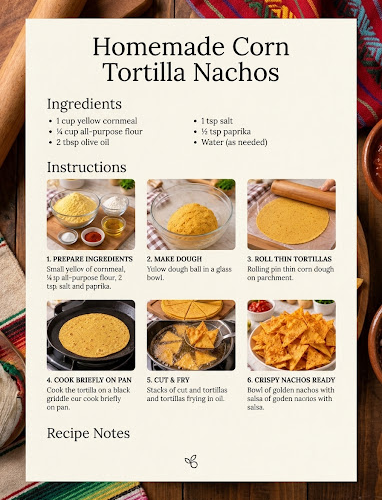
🌮 Homemade Crispy Nachos Corn Tortillas – Golden, Crunchy & Perfect for Dipping!
Turn simple corn flour into irresistibly crispy homemade nachos with a satisfying crunch and a hint of chili spice! 🌶️✨
These Homemade Crispy Nachos Corn Tortillas are a delicious snack for movie nights, game days, family gatherings, or whenever you’re craving crunchy chips with your favorite dips. Made with maize flour, a little all-purpose flour, salt, chili powder, and oil, they’re easy to prepare at home and can be seasoned just the way you like them.
The dough is rolled thin, cut into classic tortilla triangles, and deep-fried until golden and crisp. The result is a batch of crunchy, flavorful nacho chips that are perfect for scooping up salsa, guacamole, queso, or creamy cheese dip.
The secret to great homemade nachos is rolling the dough evenly, keeping the oil at the correct temperature, and allowing the chips to cool before serving. Once you master these simple steps, you’ll have a tasty homemade alternative to packaged tortilla chips!
Recipe Details
- Prep Time: 20 minutes
- Resting Time: 10 minutes
- Cook Time: 15–25 minutes per batch, depending on batch size
- Total Time: Approximately 45–60 minutes
- Yield: Approximately 6–8 snack servings
- Course: Snack, Appetizer
- Cuisine: Mexican-inspired homemade snack
- Difficulty: Easy to Moderate
- Cooking Method: Deep-frying
Ingredients
For the Nacho Dough
- 2 cups maize flour (makki atta), approximately 240–280 g depending on the grind
- 2 tablespoons all-purpose flour (about 15–16 g)
- 1 teaspoon salt
- ½ teaspoon red chili powder
- 2 tablespoons neutral cooking oil (about 30 ml)
- Approximately ¾–1 cup warm water, added gradually as needed
For Deep-Frying
- Neutral oil, such as sunflower, canola, or vegetable oil, enough for a depth of about 2 inches (5 cm)
Optional Seasonings
- ½ teaspoon garlic powder
- ½ teaspoon onion powder
- ½ teaspoon paprika
- A pinch of black pepper
- 1–2 teaspoons lime juice or lime zest for a tangy finish
- A pinch of extra salt to season the chips after frying
Ingredient note: Maize flour sold as makki atta can vary significantly in texture. It is not always the same as finely ground masa harina used for traditional Mexican corn tortillas. The small amount of all-purpose flour helps bind the dough, but the final texture may vary with the maize flour you use. Add the water gradually until the dough holds together without becoming sticky.
Instructions
Step 1: Mix the Dry Ingredients
In a large mixing bowl, combine the maize flour, all-purpose flour, salt, and red chili powder.
If you’re using optional garlic powder, onion powder, paprika, or black pepper, add them now.
Whisk or mix with your fingers until the seasonings are evenly distributed throughout the flour.
This ensures that every chip has a balanced flavor rather than some pieces being much spicier or saltier than others.
Step 2: Add the Oil and Warm Water
Pour the 2 tablespoons of oil into the flour mixture and rub it through the dry ingredients with your fingertips.
Gradually add warm water, starting with about ¾ cup. Mix with a spoon or your hand until the flour begins to come together.
Add more water a little at a time until a firm, pliable dough forms.
The dough should hold together when pressed without crumbling apart, but it should not be wet or sticky.
Helpful tip: Because maize flour absorbs water differently depending on its grind, you may need slightly more or less water than suggested.
Step 3: Knead the Dough
Transfer the dough to a clean work surface and knead for approximately 3–5 minutes.
Press and fold it gently until it becomes more cohesive and evenly hydrated.
Maize flour does not develop gluten in the same way as wheat flour, so the dough may remain less elastic than ordinary bread dough. This is normal.
If the dough cracks badly around the edges, knead in a little more warm water. If it feels sticky, dust the surface very lightly with maize flour.
Step 4: Rest the Dough
Cover the dough with a clean kitchen towel or place it in a covered bowl.
Let it rest for about 10 minutes. This gives the maize flour time to absorb moisture and makes the dough easier to roll.
Keep the dough covered while working so the surface doesn’t dry out and develop cracks.
Step 5: Divide and Roll the Dough
Divide the dough into 4–6 smaller portions.
Place one portion between two sheets of parchment paper or on a lightly dusted work surface.
Roll it out as thinly and evenly as possible, ideally about 1–2 mm thick.
Thin, evenly rolled dough is the key to crisp nachos. Thick areas may remain hard or chewy in the center while thinner areas brown too quickly.
If the edges crack, gently press them together. For easier cutting, you can trim the rolled dough into a rough rectangle before making the chips.
Repeat with the remaining portions, keeping unused dough covered.
Step 6: Cut into Nacho Triangles
Use a sharp knife, pizza cutter, or pastry wheel to cut the rolled dough into small squares, then cut each square diagonally into triangles.
Aim for evenly sized pieces so they fry at approximately the same rate.
You can also cut the dough into smaller triangles for bite-sized nachos.
Separate the pieces gently and place them on a clean tray in a single layer. Avoid stacking them while they’re still damp, as they may stick together.
Step 7: Heat the Frying Oil
Pour the frying oil into a deep, heavy-bottomed pan, filling it no more than halfway.
Heat the oil to 350°F (175°C), using a kitchen thermometer for the most reliable result.
If you don’t have a thermometer, test one small piece of dough. It should begin bubbling steadily when added, without immediately turning dark brown.
Keep the temperature steady throughout frying. Oil that’s too cool can make the chips greasy, while oil that’s too hot can brown them before they become crisp.
Safety tip: Never leave hot oil unattended, keep water away from the pan, and lower the dough carefully to prevent splashing.
Step 8: Fry the Nachos
Carefully add a small batch of tortilla triangles to the hot oil.
Avoid overcrowding the pan, as adding too many pieces at once will lower the oil temperature and cause uneven frying.
Fry for approximately 2–4 minutes, turning gently if necessary, until the chips are golden and crisp.
The exact time will depend on the thickness of the dough and the size of each triangle.
If the chips brown very quickly but still feel soft, reduce the heat slightly. If they remain pale and oily, allow the oil to return to the correct temperature before continuing.
Step 9: Drain and Cool
Remove the nachos with a slotted spoon or spider strainer.
Transfer them to a wire rack or a tray lined with paper towels, arranging them in a single layer.
Sprinkle lightly with extra salt or your favorite seasoning while the chips are still warm, if desired.
Allow them to cool for several minutes. The chips will become crisper as they cool, so don’t judge their final texture while they’re still hot.
Repeat with the remaining dough, allowing the oil to return to temperature between batches.
Step 10: Serve Your Homemade Nachos
Arrange the cooled nacho chips in a serving bowl or on a platter.
Serve them with salsa, guacamole, queso, sour cream, or your favorite dip.
For a more indulgent snack, scatter the chips in an oven-safe dish, top with shredded cheese and your favorite toppings, and bake briefly until the cheese melts.
Enjoy your homemade crunchy nachos fresh for the best flavor and texture! 🌮
Expert Tips for Perfectly Crispy Nachos
Roll the dough thinly. Thickness is one of the biggest factors affecting crispness. Aim for an even layer of approximately 1–2 mm.
Add water gradually. Different maize flour varieties absorb different amounts of liquid, so avoid adding all the water at once.
Keep the dough covered. Uncovered dough dries out quickly, leading to cracking and uneven rolling.
Cut evenly sized triangles. Uniform pieces cook at a similar speed, reducing the chance of burning some chips while others remain soft.
Maintain the oil temperature. A thermometer makes it much easier to achieve golden, crisp chips without excess oil absorption.
Fry in small batches. Leaving room around each piece helps the oil circulate evenly.
Cool before storing. Trapping steam in a container makes the chips lose their crunch. Wait until they have cooled completely before packaging.
Season while warm. Dry seasonings adhere more easily before the chips cool completely.
Test the first batch. Fry a few pieces first to check the thickness, color, and crispness. Adjust the dough or temperature before frying the remaining chips.
Delicious Seasoning Variations
🌶️ Spicy Chili Nachos
Increase the red chili powder slightly and add a pinch of cayenne pepper. Start with a small amount and adjust to your preferred heat level.
🧄 Garlic Parmesan Nachos
After frying, toss the warm chips with a little garlic powder and finely grated Parmesan cheese. Use less added salt because Parmesan is already salty.
🧀 Cheesy Nacho Chips
Sprinkle the warm chips with a cheese-flavored seasoning powder or a small amount of finely grated cheese. For a loaded snack, use the chips as the base for melted cheese and toppings.
🍋 Tangy Lime Nachos
Add a little lime zest to the dry ingredients and finish with a small sprinkle of lime-flavored seasoning after frying. Avoid adding too much liquid lime juice after frying, as it can soften the chips.
🌿 Herb-Seasoned Nachos
Combine dried oregano, garlic powder, onion powder, and black pepper for a savory, herb-forward variation.
🔥 Smoky Paprika Nachos
Add smoked paprika and a pinch of cumin for a deep, smoky flavor that pairs especially well with salsa and bean dips.
🧂 Classic Salted Nachos
Keep the dough simple and season lightly with salt immediately after frying. This is an excellent option when serving strongly flavored dips.
What to Serve with Homemade Nachos
These crunchy chips are perfect with a variety of dips and toppings.
- Fresh tomato salsa: Adds juicy, tangy flavor.
- Guacamole: Creamy avocado contrasts beautifully with the crunchy chips.
- Queso cheese dip: A rich, cheesy accompaniment for a party snack.
- Sour cream: Provides a cool, tangy balance to the chili seasoning.
- Bean dip: Adds a hearty, savory element.
- Pico de gallo: Fresh tomatoes, onion, cilantro, lime, and chili make a bright topping.
- Spicy yogurt dip: A cooling option with a little garlic and lime.
- Loaded nachos: Top with cooked minced beef or beans, cheese, tomatoes, and jalapeños, then bake until melted.
For an easy snack platter, arrange the chips around three bowls of salsa, guacamole, and cheese dip so everyone can choose their favorite.
Make-Ahead Instructions
You can prepare the dough and cut the chips ahead to save time.
Prepare the dough: Mix and knead the dough, cover it tightly, and use it shortly afterward for the best handling. Because maize flour dough can dry out, keep it well covered.
Cut ahead: Roll and cut the triangles, then arrange them in a single layer. Keep them covered and fry soon after cutting.
Fry before a gathering: For the best crunch, fry the chips close to serving time. If preparing earlier, allow them to cool completely before storing in an airtight container.
Prepare dips separately: Make salsa, guacamole, or other dips ahead and refrigerate them according to their ingredients. Serve them separately from the chips to keep the nachos crisp.
Storage and Reheating
Room Temperature
Allow the nachos to cool completely, then store them in an airtight container in a cool, dry place.
They are best enjoyed within 3–5 days for optimal crispness, provided they were thoroughly cooked and kept dry.
Keep them away from humidity, which can soften the chips.
How to Restore Crispness
If the chips become slightly soft, spread them in a single layer on a baking sheet.
Warm them in an oven at 300°F (150°C) for approximately 3–6 minutes, checking frequently. Allow them to cool before serving, since they become crisper as they cool.
Can You Freeze the Nachos?
Freezing fried chips is generally unnecessary and can introduce moisture when they thaw. For the best texture, prepare them fresh or store them in an airtight container after cooling completely.
Can You Store Unfried Dough?
Yes, but maize flour dough can dry out quickly. Keep it tightly covered in the refrigerator and use it within about a day for best results. Let it soften slightly before rolling and add a little warm water if it has become too firm.
Frequently Asked Questions
Can I use maize flour without all-purpose flour?
You can try, but the chips may be more fragile because some maize flours lack the binding properties needed to hold thin dough together. The small amount of all-purpose flour in this recipe helps with handling and structure.
Is makki atta the same as masa harina?
Not always. Makki atta is commonly used for Indian-style maize preparations, while masa harina is a corn flour treated with lime in a process called nixtamalization. Their texture and water absorption differ, so results may vary.
Why is my dough cracking when I roll it?
The dough may be too dry or insufficiently hydrated. Knead in warm water a teaspoon at a time until it holds together more easily, then let it rest while covered.
Why are my nachos chewy instead of crispy?
They may be too thick, underfried, or cooled in a way that traps steam. Roll the dough thinly, fry at the correct temperature, drain the chips well, and cool them in a single layer.
Why do my chips absorb too much oil?
The oil may be too cool, the pan may be overcrowded, or the chips may be too thick. Maintain the recommended temperature and fry in small batches.
Can I bake these nachos instead of deep-frying them?
Yes, although the texture will differ. Brush the thin dough triangles lightly with oil, arrange them in a single layer on a baking tray, and bake at approximately 375°F (190°C) until golden and crisp, checking frequently. The time depends on their thickness, and they may have a harder texture than the fried version.
Can I make these without chili powder?
Absolutely. Omit the chili powder for mild chips, or use paprika and garlic powder for flavor without much heat.
Are these nachos gluten-free?
The recipe contains all-purpose wheat flour, so it is not gluten-free as written. A gluten-free alternative would require a suitable recipe and binding ingredients designed for the specific maize flour you use.
How can I keep homemade nachos crunchy?
Cook them until crisp, allow them to cool completely, and store them in an airtight container away from humidity. Don’t cover or package them while they’re still warm.
Can I make the chips larger or smaller?
Yes. Smaller triangles are ideal for dipping, while larger chips work well as a base for toppings. Keep them a consistent thickness and adjust the frying time as necessary.
Estimated Nutrition Information
Approximate nutrition per serving, assuming 8 servings and excluding dips:
- Calories: 220–300
- Protein: 3–5 g
- Carbohydrates: 30–40 g
- Fat: 9–15 g
- Fiber: 2–4 g
- Sodium: 250–450 mg
These are estimates and will vary depending on the maize flour, amount of oil absorbed, and serving size.
Final Thoughts
Homemade Crispy Nachos Corn Tortillas are a fun and flavorful snack that turns simple pantry ingredients into a batch of golden, crunchy chips. The maize flour gives them a distinctive corn flavor, while the chili seasoning adds a gentle kick that pairs perfectly with creamy and tangy dips.
For the best results, keep the dough hydrated, roll it thinly, fry in small batches, and let the chips cool completely before serving or storing.
Serve them with salsa and guacamole for a simple snack, or load them with cheese and your favorite toppings for a delicious nacho platter. Once you try a batch of homemade chips, you’ll have a new favorite for movie nights, parties, and casual gatherings! 🌮🌶️