🧀 Homemade Cream Cheese
Rich, smooth, and creamy homemade cream cheese made with just four simple ingredients!
Did you know you can make delicious homemade cream cheese right in your own kitchen? With whole milk, fresh lemon juice, butter, and a little salt, you can create a wonderfully creamy spread that’s perfect for breakfast, baking, cheesecakes, dips, and so much more.
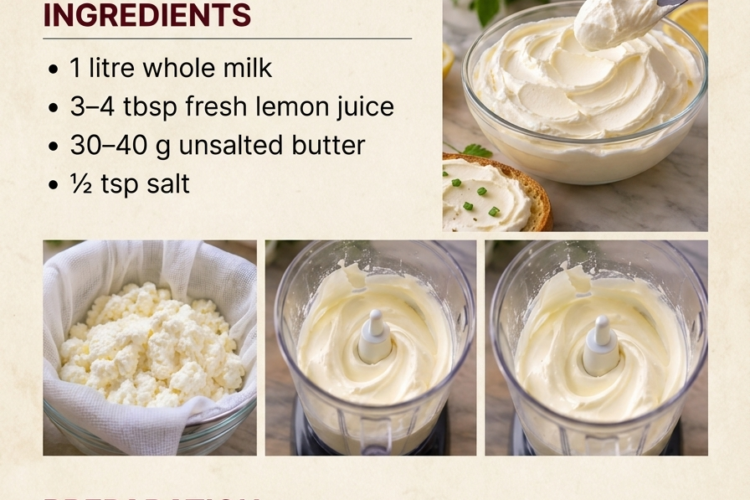
This easy recipe starts by curdling warm milk with fresh lemon juice, then blending the drained curds with butter until smooth and silky. It’s a simple and satisfying way to make your own fresh cream cheese without any complicated equipment.
Prep Time: 10 minutes
Cook Time: 15 minutes
Draining Time: 30–45 minutes
Total Time: Approximately 1 hour
Yield: About 250–350 g, depending on draining time
Course: Homemade Basics, Condiments
Difficulty: Easy
Ingredients
- 1 litre (4 cups) whole milk
- 3–4 tablespoons fresh lemon juice
- 30–40 g (2–3 tablespoons) unsalted butter, softened
- ½ teaspoon salt, or to taste
Instructions
1. Heat the Milk
Pour the whole milk into a heavy-bottomed saucepan.
Heat over medium heat, stirring occasionally to prevent scorching. Bring the milk to approximately 185–195°F (85–90°C). It should be steaming and close to a simmer, but avoid allowing it to boil vigorously.
2. Add the Lemon Juice
Reduce the heat to low and gradually add 3 tablespoons of fresh lemon juice, stirring gently.
Within a few moments, the milk should begin separating into soft white curds and yellowish-green whey.
If the milk hasn’t separated clearly, add the remaining tablespoon of lemon juice a little at a time.
3. Allow the Curds to Form
Turn off the heat and let the mixture rest for approximately 5–10 minutes.
You should see distinct white curds floating in the yellowish whey. This separation is essential for creating the cream cheese base.
4. Strain the Curds
Place a fine-mesh strainer over a large bowl and line it with clean cheesecloth or a thin, food-safe cotton cloth.
Carefully pour the milk mixture into the strainer, allowing the whey to drain away.
Let the curds drain for approximately 30–45 minutes. For a thicker cream cheese, allow a little more draining time.
Avoid squeezing too aggressively, as this can make the finished cheese dry.
5. Transfer to a Blender
Transfer the drained curds to a food processor or high-speed blender.
Add the softened butter and salt.
The butter helps create a richer, smoother, more spreadable texture.
6. Blend Until Smooth
Blend for 2–4 minutes, stopping occasionally to scrape down the sides of the bowl.
Continue blending until the mixture becomes creamy and smooth, with no noticeable grainy curds.
If the mixture is too thick to blend, add a teaspoon of reserved whey or milk at a time until it reaches your preferred consistency.
7. Adjust the Flavor and Texture
Taste the cream cheese and add a little more salt if needed.
For a softer, spreadable consistency, blend in a small amount of reserved whey or milk. For a thicker consistency, refrigerate it before serving.
8. Chill Until Firm
Transfer the homemade cream cheese to a clean, airtight container.
Smooth the top, cover, and refrigerate for at least 2–3 hours to allow the texture and flavor to develop.
9. Serve and Enjoy!
Once chilled, your homemade cream cheese is ready to enjoy!
Spread it over toasted bread, use it in frosting, mix it into dips, or add it to your favorite cheesecake recipe.
Helpful Tips for Perfect Homemade Cream Cheese
- Use whole milk: Full-fat milk gives a richer flavor and creamier result.
- Avoid ultra-pasteurized milk: It may not curdle as reliably as regular pasteurized milk.
- Add lemon juice gradually: Different milk brands may require slightly different amounts of acid.
- Watch the temperature: Heating the milk sufficiently helps the curds form properly.
- Drain according to texture: Longer draining produces thicker cheese, while shorter draining creates a softer consistency.
- Blend thoroughly: A food processor often gives a smoother result than hand mixing.
- Use softened butter: This makes it easier to incorporate evenly.
- Chill before using: Homemade cream cheese becomes firmer and more cohesive after refrigeration.
Delicious Variations
- Garlic Herb Cream Cheese: Blend in minced garlic, chopped parsley, chives, and black pepper.
- Honey Cream Cheese: Add 1–2 tablespoons of honey for a lightly sweet breakfast spread.
- Strawberry Cream Cheese: Blend in a little strawberry puree and powdered sugar.
- Chive and Onion Cream Cheese: Add finely chopped chives, onion powder, and a pinch of salt.
- Spicy Cream Cheese: Mix in chili flakes, smoked paprika, or finely chopped jalapeños.
- Vanilla Cream Cheese: Add vanilla extract and powdered sugar for a sweet filling or frosting base.
How to Use Homemade Cream Cheese
This versatile homemade spread can be used in so many delicious ways:
- Spread on toast, bagels, and sandwiches.
- Use as a base for cheesecake.
- Make creamy cream cheese frosting.
- Prepare homemade dips and savory spreads.
- Add to pasta sauces for extra creaminess.
- Use as a filling for pastries, buns, and desserts.
- Mix into mashed potatoes for a richer texture.
Storage and Food Safety
Refrigeration: Store homemade cream cheese in a clean, airtight container in the refrigerator at 40°F (4°C) or below.
Shelf Life: For best quality and safety, use within 3–4 days.
Freezing: Freezing is not recommended if you want to preserve the original smooth texture. Thawed cream cheese may become grainy or separate.
Handling: Always use a clean spoon when serving. Do not leave the cream cheese at room temperature for more than 2 hours.
Whey Storage: If you reserve the leftover whey, keep it refrigerated in a clean, covered container and use it promptly in cooking or baking.
Frequently Asked Questions
Can I make cream cheese without lemon juice?
Yes. White vinegar can be used as an alternative acid. Add it gradually until the milk separates into curds and whey.
Why didn’t my milk curdle?
The milk may not have been hot enough, or it may be ultra-pasteurized. Bring the milk close to a simmer and add a little more lemon juice if necessary.
Why is my homemade cream cheese grainy?
The curds may not have been blended long enough, or they may have been drained too much. Blend thoroughly and add a little reserved whey or milk to help achieve a smoother texture.
Can I use this cream cheese for cheesecake?
Yes! It works well in homemade cheesecakes, dips, fillings, and frosting. Keep in mind that its moisture and firmness may differ from commercial block cream cheese, so recipes may need slight adjustments.
Can I skip the butter?
You can, but the result will be less rich and may have a slightly grainier texture. Butter adds creaminess and helps create a smoother spread.
How much cream cheese does 1 litre of milk make?
The yield varies depending on the milk’s fat and protein content and how much whey is drained. Expect approximately 250–350 g of finished cream cheese.
Approximate Nutrition Information
Per 30 g serving, assuming approximately 300 g finished cream cheese:
- Calories: 85
- Carbohydrates: 2 g
- Protein: 2 g
- Fat: 8 g
- Saturated Fat: 5 g
- Sugar: 2 g
- Sodium: 130 mg
Nutrition information is an estimate and will vary according to milk fat content, final yield, and the amount of butter and salt used.
Fresh, Creamy, and Made with Love! ❤️
Making cream cheese at home is easier than you might think! With just a few everyday ingredients, you can create a fresh, delicious spread that’s perfect for both sweet and savory recipes.
Once you try this homemade version, you’ll love having a batch ready for your morning bagels, homemade cheesecakes, creamy desserts, and family favorites. Simple ingredients, beautiful results, and so much homemade goodness!