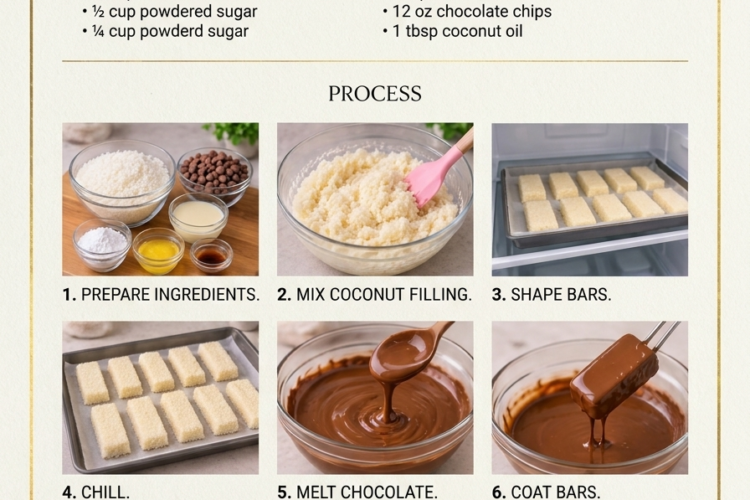
🥥🍫 Homemade Chocolate Coconut Bars – Easy, Chewy & Delicious!
Love the combination of rich chocolate and sweet coconut? These Homemade Chocolate Coconut Bars are a simple, irresistible treat that tastes like your favorite coconut candy bar!
Made with just a few ingredients, the filling combines desiccated coconut, a little icing sugar, and creamy condensed milk to create a sweet, chewy center. Each bar is then dipped in smooth melted chocolate, creating a delicious chocolate shell around the soft coconut filling.
No baking, no complicated techniques, and no special equipment required! Just mix, shape, chill, and coat.
They’re perfect for holiday treat platters, homemade gifts, afternoon snacks, or whenever you’re craving something sweet. ❤️
Recipe Details
- Prep Time: 20 minutes
- Chilling Time: 1–2 hours
- Total Time: Approximately 1 hour 20 minutes
- Yield: 12–16 bars
- Course: Dessert, Candy, Snack
- Cuisine: Homemade
- Difficulty: Easy
- Method: No-Bake
Ingredients
For the Coconut Filling
- 3 cups (approximately 225 g) desiccated coconut
- 1 tablespoon (8 g) icing sugar, sifted
- ½ cup (approximately 150 g) sweetened condensed milk
For the Chocolate Coating
- 10–12 oz (285–340 g) semi-sweet or milk chocolate, chopped or in chocolate chips
- 1 tablespoon (14 g) coconut oil or neutral vegetable oil, optional, for a smoother coating
Optional Garnishes
- 2 tablespoons desiccated coconut
- A little melted white chocolate for drizzling
- A pinch of flaky sea salt
Recipe note: The original ingredients provided were for the coconut filling. Chocolate and coconut oil are suggested additions to complete the chocolate-coated bars.
Instructions
1. Prepare the Coconut Mixture
Place the desiccated coconut in a large mixing bowl.
Add the sifted icing sugar and stir until evenly distributed.
Pour in the condensed milk gradually, mixing with a spatula or clean hands until the coconut begins to stick together.
The mixture should be moist, thick, and easy to shape without crumbling. If it feels too dry, add a little more condensed milk, one teaspoon at a time. Avoid adding too much, as the filling should remain firm enough to hold its shape.
2. Shape the Coconut Bars
Line a baking tray or large flat plate with parchment paper.
Divide the coconut mixture into 12–16 equal portions, depending on how large you want your bars.
Use your hands to shape each portion into a small rectangular bar. Press firmly enough to help the coconut hold together, but don’t compact it excessively.
Arrange the bars on the prepared tray, leaving a little space between each one.
3. Chill Until Firm
Place the tray in the refrigerator for approximately 45–60 minutes, or until the coconut bars feel firm enough to handle.
For a quicker option, place them in the freezer for about 20–30 minutes.
Chilling is important because firm coconut centers are much easier to dip into melted chocolate without breaking apart.
4. Melt the Chocolate
Place the chocolate in a heatproof bowl.
Microwave Method:
Microwave at 50% power in 20–30-second intervals, stirring thoroughly after each interval.
Continue until the chocolate is mostly melted and smooth. Stir until the remaining small pieces melt from the residual heat.
Double-Boiler Method:
Place the chocolate in a heatproof bowl over a saucepan of gently simmering water. Make sure the bottom of the bowl doesn’t touch the water.
Stir gently until the chocolate melts completely.
Add the coconut oil, if using, and mix until smooth and glossy.
Avoid letting water or steam enter the chocolate, as moisture can cause it to seize.
5. Dip the Coconut Bars
Remove the chilled coconut bars from the refrigerator.
Using two forks or a dipping tool, lower one coconut bar into the melted chocolate.
Turn it gently until completely coated, then lift it out and allow the excess chocolate to drip back into the bowl.
Place the coated bar onto the parchment-lined tray.
Repeat with the remaining coconut bars.
6. Decorate the Bars
While the chocolate is still wet, sprinkle a little desiccated coconut over the tops if desired.
Alternatively, allow the chocolate coating to firm up and drizzle with melted white chocolate for a pretty decorative finish.
For a slightly more indulgent flavor, add a tiny pinch of flaky sea salt to the chocolate coating.
7. Chill Until Set
Place the tray in the refrigerator for approximately 20–30 minutes, or until the chocolate coating is completely firm.
Once set, carefully remove the bars from the parchment paper.
Transfer to a serving plate or an airtight container.
Enjoy the delicious combination of sweet, chewy coconut and smooth chocolate! 🥥🍫
Expert Tips for Perfect Chocolate Coconut Bars
- Use unsweetened desiccated coconut: This balances the sweetness of the condensed milk and chocolate. Sweetened coconut can also be used, but the finished bars will be sweeter.
- Add condensed milk gradually: Different brands and types of coconut absorb moisture differently. Add just enough to bind the mixture.
- Check the texture before shaping: The filling should hold together when pressed between your fingers without feeling wet or sticky.
- Chill before dipping: Firm bars are much easier to coat and less likely to fall apart in the melted chocolate.
- Use good-quality chocolate: A good melting chocolate creates a smoother, more delicious coating.
- Melt gently: Overheated chocolate can become thick and grainy. Use low heat and stir frequently.
- Work in small batches: Keep the remaining coconut bars refrigerated while dipping a few at a time.
- Let excess chocolate drip off: This prevents thick pools of chocolate from forming around the bottom of each bar.
- Use parchment paper: It makes removing the finished bars much easier.
Delicious Variations
Almond Chocolate Coconut Bars: Place one whole roasted almond on top of each coconut bar before dipping in chocolate for an almond-coconut candy variation.
Dark Chocolate Coconut Bars: Use dark chocolate with a higher cocoa percentage for a less-sweet coating that contrasts beautifully with the coconut filling.
Milk Chocolate Coconut Bars: Choose milk chocolate for a sweeter, creamier candy-bar flavor.
White Chocolate Coconut Bars: Dip the coconut centers in melted white chocolate and finish with a sprinkle of toasted coconut.
Toasted Coconut Bars: Lightly toast ½ cup of the desiccated coconut before adding it to the filling for a deeper, nuttier flavor. Allow it to cool completely first.
Chocolate Almond Coconut Bars: Add ¼ cup (30 g) finely chopped roasted almonds to the coconut mixture for extra crunch.
Festive Coconut Bars: Decorate the chocolate coating with colored sprinkles, crushed pistachios, or festive edible decorations.
What to Serve With Homemade Chocolate Coconut Bars
These little treats are delicious on their own but are especially lovely alongside:
- Freshly brewed coffee
- Black tea or chai
- Hot chocolate
- A glass of cold milk
- Vanilla ice cream
- Fresh strawberries
- A platter of homemade cookies and fudge
- Other homemade chocolate candies
For a beautiful dessert platter, arrange the coconut bars alongside chocolate truffles, peanut butter fudge, shortbread, and assorted holiday sweets.
Make-Ahead Instructions
These bars are excellent for preparing ahead of time.
You can make the coconut filling, shape the bars, and refrigerate them overnight before coating them with chocolate the following day.
You can also prepare the completely coated bars a few days before a celebration and keep them stored in an airtight container in the refrigerator.
For homemade gifts, make sure the chocolate has fully set before placing the bars into decorative candy boxes or treat bags.
Storage and Freezing
Refrigeration: Store the finished bars in an airtight container in the refrigerator for up to 1 week.
Place parchment or wax paper between layers to prevent sticking.
Room Temperature: The bars can be served at room temperature for a short period in a cool environment. In warm conditions, keep them refrigerated because the chocolate may soften and the coconut filling can become sticky.
Freezing: Arrange the bars in a single layer until firm, then transfer them to a freezer-safe airtight container. Separate layers with parchment paper and freeze for up to 2 months for best quality.
Thawing: Transfer frozen bars to the refrigerator and allow them to thaw while covered. This helps reduce condensation on the chocolate coating.
Frequently Asked Questions
Can I make these coconut bars without baking?
Absolutely! This is a completely no-bake recipe. The coconut filling becomes firm through chilling, and the melted chocolate forms the outer shell.
Why is my coconut mixture too crumbly?
The coconut may need a little more moisture. Add condensed milk gradually, one teaspoon at a time, until the mixture holds together when pressed.
Why is my filling too sticky?
Too much condensed milk may have been added. Mix in a little extra desiccated coconut until the mixture becomes firm enough to shape, then refrigerate before dipping.
Can I use sweetened shredded coconut instead of desiccated coconut?
Yes, although the texture will be softer and the coconut pieces may be longer. You may need to adjust the amount of condensed milk, so add it gradually.
Can I use chocolate chips for the coating?
Yes! Semi-sweet, milk, or dark chocolate chips all work. Adding a little coconut oil can make the coating smoother and easier to dip.
Do I need to temper the chocolate?
No, not for this simple homemade version. You can melt regular chocolate gently and refrigerate the finished bars. However, properly tempered chocolate gives a firmer, shinier coating that is more stable at room temperature.
Can I make these bars extra thick?
Definitely! Shape the coconut mixture into thicker rectangles or use a smaller baking dish to press the mixture into an even layer before chilling and cutting.
Can I make them into balls instead of bars?
Of course! Roll the coconut mixture into small balls, chill until firm, and dip each one into melted chocolate. They make lovely bite-sized coconut truffles.
Can I reduce the sweetness?
Use unsweetened desiccated coconut and dark chocolate. You can also reduce or omit the icing sugar, although the condensed milk will still provide sweetness.
Estimated Nutrition
Approximate values per bar, assuming 16 bars and using semi-sweet chocolate with a little coconut oil. Actual values vary with the chocolate and coconut brands and the size of each bar.
- Calories: 220
- Protein: 2 g
- Carbohydrates: 25 g
- Fat: 14 g
- Saturated Fat: 11 g
- Fiber: 3 g
- Sugar: 21 g
- Sodium: 35 mg
A Little Chocolate-Coconut Heaven! ❤️
These Homemade Chocolate Coconut Bars are proof that a few simple ingredients can create something truly special. The sweet, chewy coconut center paired with a smooth chocolate coating makes every bite absolutely irresistible.
Whether you’re preparing treats for Christmas, making homemade gifts, or simply satisfying a chocolate craving, these no-bake bars are sure to become a favorite.
Make a batch, chill until perfectly set, and enjoy a little taste of homemade candy-bar happiness! 🥥🍫