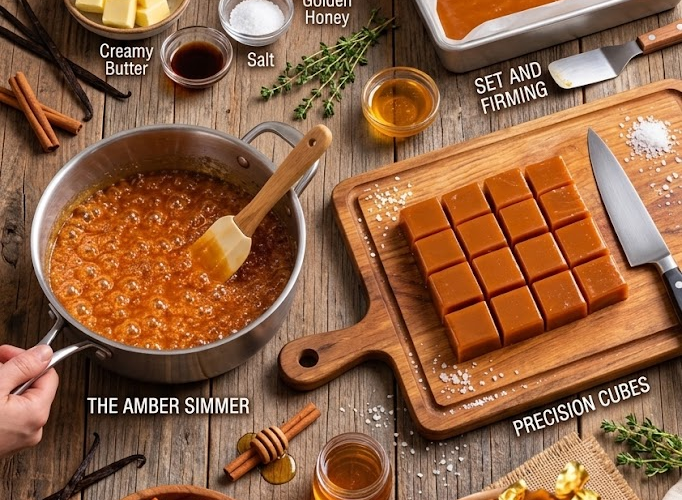
🍬 Homemade Caramel Candy
Soft, chewy, buttery caramel candies made from scratch with simple ingredients and finished with a delicate sprinkle of flaky sea salt.
These homemade caramels are rich, smooth, and wonderfully chewy. Granulated sugar is slowly caramelized with butter, cream, and corn syrup to create a glossy candy mixture that sets into soft, bite-sized pieces.
They’re perfect for holiday candy trays, homemade gifts, dessert tables, or simply enjoying whenever you want a little something sweet.
⏱️ Recipe Information
Prep Time: 10 minutes
Cook Time: 15–20 minutes
Cooling & Setting Time: 2–3 hours
Total Time: About 3 hours 30 minutes
Yield: Approximately 30–40 caramels
Difficulty: Easy–Intermediate
Method: Stovetop
🛒 Ingredients
- 1 cup (200 g) granulated sugar
- ½ cup (120 ml) heavy cream
- ½ cup (113 g) unsalted butter
- ½ cup (120 ml) corn syrup or glucose syrup
- 1 teaspoon vanilla essence
- ½ teaspoon fine salt
- ½ teaspoon flaky sea salt, for topping
You’ll Also Need
- Parchment paper
- An 8-inch square baking pan
- Candy thermometer
👩🍳 Instructions
1. Prepare the Pan
Line an 8-inch square baking pan with parchment paper, leaving some overhang on two sides.
Lightly butter the parchment and set the pan aside.
For individual wrapped caramels, you can also prepare small squares of wax paper or parchment while the caramel cooks.
2. Warm the Cream
Pour the heavy cream into a small saucepan.
Warm it over low heat until hot but not boiling.
Keep it warm while preparing the caramel.
Warm cream blends more easily into the hot sugar and reduces the chance of the caramel seizing.
3. Start the Sugar Mixture
Place the granulated sugar and corn syrup in a heavy-bottomed saucepan.
Cook over medium heat, stirring gently until the sugar begins to dissolve.
Once the mixture starts bubbling, allow it to cook without excessive stirring.
4. Add the Butter
Add the butter a few pieces at a time.
Stir carefully as the butter melts into the hot sugar mixture.
The mixture will bubble vigorously, so use caution.
5. Add the Warm Cream
Slowly pour the warm heavy cream into the caramel while stirring continuously.
Be careful—the mixture will bubble and rise significantly when the cream is added.
Continue cooking over medium heat.
6. Cook to the Soft-Ball Stage
Attach a candy thermometer to the saucepan.
Continue cooking, stirring frequently but gently, until the caramel reaches approximately 245–248°F (118–120°C).
This temperature produces a soft, chewy caramel.
For a slightly firmer caramel, cook toward the upper end of the range.
Do not rely only on cooking time. A candy thermometer gives the most reliable result.
7. Add Vanilla and Salt
Immediately remove the caramel from the heat.
Carefully stir in the vanilla essence and ½ teaspoon fine salt.
Mix until completely incorporated.
8. Pour Into the Pan
Immediately pour the hot caramel into the prepared parchment-lined pan.
Do not scrape excessively at the bottom or sides of the saucepan if there are crystallized bits.
Gently tilt the pan if necessary to help the caramel spread evenly.
9. Add the Sea Salt
While the caramel is still warm, sprinkle the flaky sea salt evenly over the surface.
Use a light hand—the sea salt should provide a subtle salty contrast without overpowering the caramel.
10. Cool Completely
Leave the caramel at room temperature until completely cool and firm, approximately 2–3 hours.
For an even firmer texture, refrigerate it for about 30–60 minutes after it has cooled.
11. Cut the Caramels
Lift the caramel slab from the pan using the parchment overhang.
Place it on a cutting board.
Use a sharp, lightly buttered knife to cut it into small squares or rectangles.
If the caramel becomes difficult to cut, chill it briefly before slicing.
12. Wrap and Store
Wrap each caramel individually in small squares of wax paper or parchment paper.
Twist the ends to secure the wrappers.
This keeps the caramels from sticking together and makes them perfect for gifting.
⭐ Chef’s Tips
Use a candy thermometer
Caramel is very temperature-sensitive. A few degrees can make the difference between soft, chewy candy and a much firmer caramel.
Warm the cream first
Adding cold cream to extremely hot caramel can cause violent bubbling and make the mixture harder to control.
Use a heavy-bottomed saucepan
A heavy pan distributes heat more evenly and helps prevent the sugar from scorching.
Watch the color
The caramel should develop a beautiful deep golden-amber color. If it becomes very dark and smells burnt, remove it from the heat immediately.
Don’t rush the cooking
Caramel needs time for the water to evaporate and the sugar concentration to increase. Keep the heat moderate rather than trying to speed up the process.
Be extremely careful with hot caramel
Hot caramel can cause severe burns. Keep children away from the cooking area and use heat-resistant utensils.
🍬 Easy Variations
Salted Caramel Candy
Increase the flaky sea salt slightly for a more pronounced sweet-and-salty flavor.
Chocolate Caramels
Stir ½ cup chopped chocolate or chocolate chips into the hot caramel after removing it from the heat.
Coffee Caramels
Add 1 teaspoon instant espresso powder to the warm cream before adding it to the caramel.
Pecan Caramels
Fold ½ cup finely chopped toasted pecans into the caramel just before pouring it into the pan.
Vanilla Bean Caramels
Replace the vanilla essence with 1 teaspoon vanilla bean paste for a richer vanilla flavor.
Coconut Caramels
Replace part of the heavy cream with coconut cream and finish with toasted coconut.
🎁 Serving & Gifting
Homemade caramels make wonderful edible gifts.
Arrange individually wrapped pieces in:
- Decorative candy boxes
- Small glass jars
- Cellophane bags
- Holiday tins
- Dessert gift baskets
They’re especially lovely paired with homemade cookies, brownies, or chocolate truffles.
🧊 Storage
Store individually wrapped caramels in an airtight container at cool room temperature for up to 2 weeks.
Keep them away from heat and direct sunlight.
If your kitchen is particularly warm, refrigerate them to help maintain their shape.
Allow refrigerated caramels to sit at room temperature for several minutes before serving.
❄️ Freezing
Individually wrap the caramels tightly and place them in a freezer-safe airtight container.
Freeze for up to 3 months.
Thaw at room temperature while still wrapped.
🍬✨ Final Result
These Homemade Caramel Candies are rich, buttery, silky, and irresistibly chewy, with just enough flaky sea salt to balance the sweetness.
They’re surprisingly simple to make, yet they look and taste like something from a beautiful artisan candy shop.
Soft, buttery, salty-sweet caramel in every bite—the perfect homemade treat for sharing, gifting, or sneaking straight from the candy jar! 🍬🧈✨