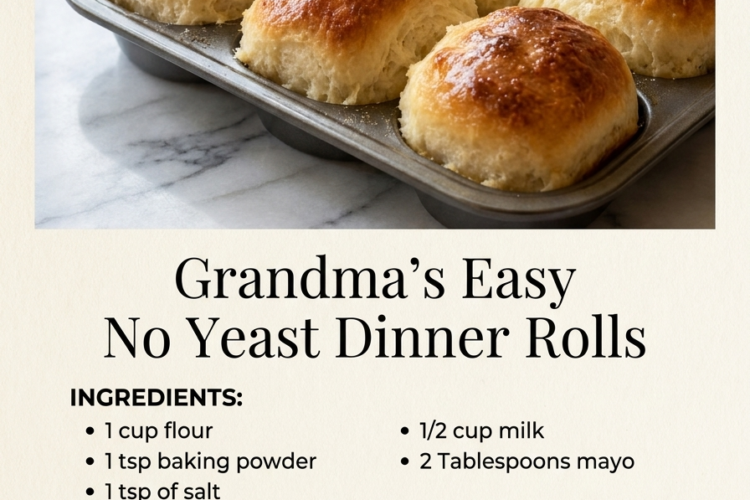
🍞 Grandma’s Easy No-Yeast Dinner Rolls
Soft, Fluffy, Buttery, and Golden — Homemade Rolls Without Yeast or Rising Time!
Nothing beats the comfort of warm homemade dinner rolls fresh from the oven! These Grandma’s Easy No-Yeast Dinner Rolls are perfect when you want soft, tender bread without waiting hours for yeast to rise. Made with simple pantry ingredients, including flour, baking powder, milk, and mayonnaise, these quick rolls come together in minutes and bake into golden little buns with a delicate, biscuit-like texture.
The secret is the mayonnaise, which adds fat and tenderness while helping keep the crumb soft. Baking powder provides the lift, so there’s no kneading, proofing, or complicated bread-making process required.
Brush the warm rolls with melted butter for a delicious finishing touch, then serve them alongside soups, stews, roasted chicken, or your favorite family dinner.
Recipe Details
- Prep Time: 10 minutes
- Bake Time: 15–20 minutes
- Total Time: Approximately 30 minutes
- Yield: 4–6 small rolls
- Course: Bread, Side Dish
- Cuisine: American-inspired
- Difficulty: Easy
- Method: Quick-bake, no yeast
Ingredients
For the Dinner Rolls
- 1 cup (125 g) all-purpose flour
- 1 teaspoon baking powder
- ½ teaspoon salt
- ½ cup (120 ml) milk
- 2 tablespoons (about 30 g) mayonnaise
For the Butter Topping
- 1 tablespoon (14 g) unsalted butter, melted, optional
Ingredient note: The original recipe lists 1 teaspoon of salt, but ½ teaspoon is a more balanced starting point for just 1 cup of flour. You can adjust it to your taste.
Instructions
Step 1: Preheat the Oven
Preheat your oven to 375°F (190°C).
Lightly grease a baking sheet or line it with parchment paper. Alternatively, grease a muffin tin if you prefer more uniformly shaped rolls.
Because these rolls contain no yeast, the dough can be prepared and baked immediately. There’s no need to wait for it to rise.
Step 2: Combine the Dry Ingredients
In a medium mixing bowl, whisk together the all-purpose flour, baking powder, and salt.
Mix thoroughly to distribute the baking powder evenly throughout the flour. This helps the rolls rise more consistently during baking.
Step 3: Mix the Milk and Mayonnaise
In a separate bowl, whisk together the milk and mayonnaise until reasonably smooth.
The mixture may not look completely uniform at first, but continue whisking until the mayonnaise is mostly incorporated.
The mayonnaise provides fat and tenderness, while the milk hydrates the flour and brings the dough together.
Step 4: Make the Dough
Pour the milk mixture into the bowl of dry ingredients.
Stir gently with a wooden spoon or spatula until a soft dough forms and no dry patches of flour remain.
The dough should be moist and slightly sticky, rather than stiff like traditional kneaded bread dough.
If it is too loose to portion, add a little extra flour, 1 tablespoon at a time, until it holds its shape. Avoid adding too much, as excess flour can make the rolls dense and dry.
Important: Do not knead the dough extensively. Mix only until combined to keep the rolls tender.
Step 5: Shape the Rolls
Lightly flour your hands or use a spoon to divide the dough into 4–6 portions.
For rounded rolls, gently shape each portion with lightly floured hands and place it on the prepared baking sheet, leaving space between each one.
If the dough is too sticky to shape neatly, use two spoons to portion it into mounds instead. The finished rolls may look more rustic, but they will still be delicious.
For a softer, more uniform shape, you can also spoon the dough into greased muffin cups.
Step 6: Bake Until Golden
Place the rolls in the preheated oven and bake for 15–20 minutes, depending on their size and shape.
The rolls are ready when the tops are lightly golden, the edges look set, and the centers are cooked through.
If baking in a muffin tin, begin checking around 15 minutes. Larger rolls may need a few extra minutes.
Avoid overbaking, as these quick rolls can become dry if left in the oven too long.
Step 7: Brush with Melted Butter
Remove the rolls from the oven and transfer them to a wire rack or serving basket.
While they are still warm, brush the tops with melted butter.
This optional finishing step adds a rich, buttery flavor and gives the tops a lovely sheen.
For extra flavor, you can mix a small pinch of garlic powder or finely chopped parsley into the melted butter.
Step 8: Serve Warm
Let the rolls cool for about 5 minutes before serving.
Enjoy them while warm, when the crust is lightly golden and the inside is soft and tender.
Serve with butter, honey, jam, soup, stew, or your favorite homemade meal.
Expert Tips for the Best No-Yeast Dinner Rolls
Measure the flour carefully. Too much flour can make the rolls heavy. Weigh it when possible, or spoon it into a measuring cup and level it off.
Use fresh baking powder. Since these rolls rely on chemical leavening rather than yeast, fresh baking powder is important for a good rise.
Don’t overmix. Stir just until the ingredients come together. Excessive mixing can make the texture tougher.
Expect a biscuit-like texture. These are quick rolls rather than traditional yeast bread, so their crumb will be closer to a soft biscuit than a stretchy, airy bakery roll.
Don’t add too much extra flour. A slightly sticky dough helps produce tender rolls. Use lightly floured hands or spoons instead of making the dough stiff.
Bake immediately. Once the wet and dry ingredients are combined, the baking powder begins working. For the best lift, shape the rolls and put them in the oven promptly.
Brush with butter while warm. The melted butter adds flavor and makes the crust more tender.
Delicious Variations
🧄 Garlic Butter Dinner Rolls
Mix a pinch of garlic powder into the melted butter and brush it over the warm rolls. Add chopped parsley for a savory finish that pairs beautifully with pasta and soup.
🧀 Cheddar Dinner Rolls
Fold ¼ cup (about 30 g) shredded cheddar cheese into the dough before shaping. Avoid overmixing, and bake until the cheese is melted and the rolls are golden.
🌿 Herb Dinner Rolls
Add ½ teaspoon dried Italian herbs or a little finely chopped rosemary to the dry ingredients for a fragrant, savory variation.
🍯 Honey Butter Rolls
After baking, brush the rolls with melted butter mixed with 1 teaspoon honey for a lightly sweet finish. These are especially delicious with roasted vegetables or holiday dinners.
🧅 Cheesy Onion Rolls
Add 1–2 tablespoons finely chopped green onions and a little shredded cheese to the dough. Keep the added ingredients modest so the rolls retain their structure.
🌾 Whole-Wheat Quick Rolls
Replace up to half of the all-purpose flour with whole-wheat flour. The rolls will be slightly denser and more rustic, and you may need a small extra splash of milk.
🥛 Extra-Tender Rolls
Replace the milk with buttermilk for a slightly tangy flavor and tender crumb. If the dough seems thicker than expected, add a small splash of milk until it reaches a soft, scoopable consistency.
What to Serve with Grandma’s Dinner Rolls
These quick rolls are versatile enough to accompany almost any meal.
- Chicken soup: Perfect for dipping into a warm, comforting broth.
- Beef stew: Soak up the rich gravy with a soft, buttery roll.
- Roasted chicken: A simple homemade side for a family dinner.
- Creamy pasta: Use the rolls to scoop up extra sauce.
- Mashed potatoes and gravy: A classic comfort-food combination.
- Salads and sandwiches: Split the cooled rolls and fill with cheese, chicken, or leftover roasted vegetables.
- Honey or fruit jam: Turn them into a quick breakfast or afternoon snack.
Make-Ahead and Storage Instructions
Can You Prepare the Dough Ahead?
These rolls are best mixed and baked immediately because the baking powder begins reacting once it meets the wet ingredients.
For easier preparation, measure the dry ingredients ahead and keep them in a covered container. Mix in the milk and mayonnaise just before baking.
Room Temperature Storage
Allow the rolls to cool completely before storing them in an airtight container. Keep them in a cool, dry place and enjoy within 1–2 days for the best texture.
Refrigerator Storage
For longer storage, place the cooled rolls in an airtight container and refrigerate for up to 4 days. Refrigeration can make quick breads firmer, so warming them before serving helps restore their softness.
Reheating
Warm the rolls in an oven at 300°F (150°C) for approximately 5–8 minutes. Brush with a little butter afterward if desired.
For a quick option, microwave an individual roll for about 10–15 seconds, checking that it doesn’t become too hot or rubbery.
Freezing
These rolls can be frozen once completely cooled. Place them in a freezer-safe airtight bag or container and freeze for up to 2 months for best quality.
Thaw at room temperature and warm briefly in the oven before serving.
Frequently Asked Questions
Do these dinner rolls really need no yeast?
Yes. Baking powder provides the lift instead of yeast, so there’s no proofing or rising time. The rolls can go into the oven as soon as the dough is mixed and shaped.
Will these rolls be as fluffy as yeast rolls?
They will be soft and tender, but their texture is different from traditional yeast bread. Expect a quick-bread or biscuit-like crumb rather than the stretchy, airy structure of yeast rolls.
Why did my rolls turn out dense?
Common causes include too much flour, expired baking powder, or overmixing the dough. Measure the ingredients carefully, mix only until combined, and bake immediately after shaping.
Can I use self-rising flour?
You can, but self-rising flour already contains baking powder and salt. If using it, omit the added baking powder and salt, then follow the same method. Results may vary by brand.
Can I replace mayonnaise with butter?
Not as a direct one-to-one substitution without changing the texture. Mayonnaise contains oil and other ingredients that affect moisture and tenderness. Using softened butter instead may produce a different, potentially firmer roll.
Can I make these rolls sweet?
Yes. Add 1–2 tablespoons sugar to the dry ingredients and serve the rolls with honey butter or jam. Keep the added sweetness modest unless you’re aiming for a sweet quick bread.
Why are my rolls pale?
They may need a few more minutes in the oven. Make sure the oven is fully preheated and bake until the tops are lightly golden and the centers are cooked through.
Can I make these in a muffin tin?
Absolutely. Grease the muffin cups and divide the dough evenly among them. Bake until the tops are golden and the centers are set, beginning to check at around 15 minutes.
Estimated Nutrition Information
Approximate nutrition per roll, assuming 6 rolls and including the optional butter topping:
- Calories: 120–160
- Protein: 2–4 g
- Carbohydrates: 16–22 g
- Fat: 5–8 g
- Sugar: 1–3 g
These values are estimates and vary depending on the mayonnaise, milk, size of each roll, and amount of butter used for brushing.
Final Thoughts
Grandma’s Easy No-Yeast Dinner Rolls are a wonderful reminder that homemade bread doesn’t have to be complicated. With a handful of everyday ingredients, no yeast, and no rising time, you can make warm, tender rolls that are perfect for any meal.
Serve them fresh from the oven with melted butter, pair them with a hearty soup or stew, or enjoy them with a little honey for a simple treat.
No yeast, no waiting, just warm homemade rolls ready for the dinner table! 🍞🧈