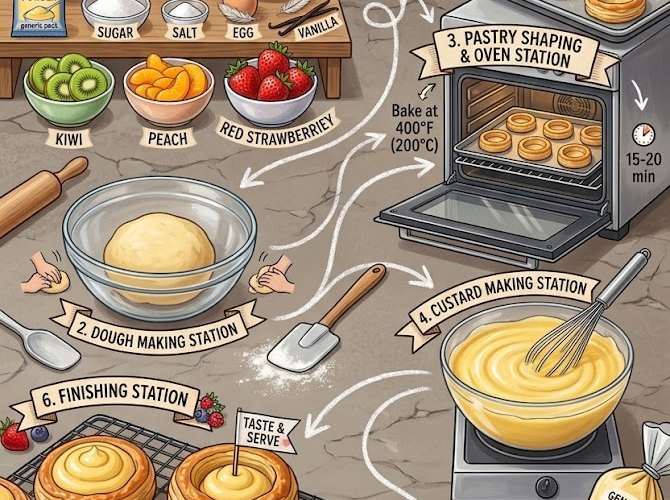
🍓🥝 Fruit Custard Pastry Rings
Buttery pastry rings filled with silky vanilla custard and topped with colorful fresh fruit make an elegant dessert that’s as beautiful as it is delicious.
These individual fruit custard pastries combine a crisp, tender shortcrust shell with a smooth homemade custard and a bright assortment of fresh fruit. They’re perfect for afternoon tea, brunch, parties, celebrations, or whenever you want a bakery-style dessert at home.
⏱️ Recipe Information
Prep Time: 30 minutes
Chill Time: 30 minutes
Bake Time: 15–18 minutes
Total Time: About 1 hour 20 minutes
Servings: 8–10 pastry rings
Difficulty: Intermediate
Method: Oven-Baked
🛒 Ingredients
For the Pastry
- 2 cups (250 g) all-purpose flour
- ½ cup (113 g) cold unsalted butter, cubed
- ¼ cup (30 g) powdered sugar
- 1 large egg
- 2–3 tbsp cold milk, as needed
- ½ tsp vanilla extract
- Pinch of salt
For the Vanilla Custard
- 2 cups (480 ml) whole milk
- ½ cup (100 g) granulated sugar
- 3 large egg yolks
- 3 tbsp cornstarch
- 1 tsp vanilla extract
- 1 tbsp unsalted butter
For the Fruit Topping
Use a colorful combination of fresh fruit, such as:
- Strawberries, sliced
- Kiwi, peeled and sliced
- Blueberries
- Raspberries
- Peaches, thinly sliced
- Mango, diced
- Grapes, halved
Optional Glaze
- 2 tbsp apricot jam
- 1 tsp water
👩🍳 Instructions
🥧 Make the Pastry
1. Combine the Dry Ingredients
Add the flour, powdered sugar, and salt to a large mixing bowl.
Whisk briefly to combine.
2. Cut in the Butter
Add the cold cubed butter.
Using your fingertips or a pastry cutter, work the butter into the flour until the mixture resembles coarse crumbs.
Some small pieces of butter can remain—this helps create a tender, flaky texture.
3. Add the Egg
Add the egg and vanilla extract.
Mix gently until the dough begins to come together.
Add the cold milk 1 tablespoon at a time, using only enough to form a soft dough.
Avoid adding more liquid than necessary.
4. Chill the Dough
Turn the dough onto a lightly floured surface and gently bring it together.
Shape it into a disk and wrap it in plastic wrap.
Refrigerate for at least 30 minutes.
Chilling prevents the pastry from shrinking excessively during baking.
🥧 Shape the Pastry Rings
5. Roll Out the Dough
Preheat the oven to 375°F (190°C).
Lightly flour your work surface.
Roll the chilled pastry to approximately ⅛ inch (3 mm) thick.
6. Cut the Rings
Use a round cookie cutter or pastry cutter to cut circles approximately 4 inches (10 cm) wide.
For each circle, cut a smaller circle from the center to create a ring.
Alternatively, use individual tartlet or pastry-ring molds.
7. Prepare for Baking
Place the pastry rings onto a parchment-lined baking sheet.
If using pastry rings or tart molds, gently press the dough into the molds without stretching it.
Prick the base lightly with a fork where necessary.
For especially neat pastry rings, chill the shaped dough for another 10–15 minutes before baking.
8. Bake
Bake for approximately 15–18 minutes, or until the pastry is lightly golden around the edges.
Remove from the oven and allow the pastry to cool completely.
Handle the cooled pastry carefully, as it will be crisp and delicate.
🍮 Make the Custard
9. Heat the Milk
Pour the milk into a medium saucepan.
Heat over medium heat until steaming and hot, but do not bring it to a full boil.
Remove from the heat.
10. Whisk the Egg Mixture
In a separate bowl, whisk together:
- Egg yolks
- Sugar
- Cornstarch
Whisk until smooth, pale, and free of lumps.
11. Temper the Eggs
Slowly pour about ½ cup of the hot milk into the egg mixture while whisking constantly.
This gradually raises the temperature of the eggs and prevents them from scrambling.
12. Cook the Custard
Pour the tempered egg mixture back into the saucepan with the remaining milk.
Cook over medium-low heat, whisking continuously.
After several minutes, the custard will begin to thicken.
Continue cooking until it becomes smooth and thick enough to coat the back of a spoon.
13. Finish the Custard
Remove the saucepan from the heat.
Stir in the vanilla extract and butter.
Mix until the butter is completely melted and the custard is silky smooth.
14. Cool the Custard
Transfer the custard to a bowl.
Press plastic wrap directly against the surface to prevent a skin from forming.
Refrigerate until completely chilled.
Before using, whisk the custard briefly to restore its smooth texture.
🍓 Assemble the Pastry Rings
15. Fill With Custard
Place the cooled pastry rings on a serving tray.
Transfer the chilled custard to a piping bag fitted with a round or star tip.
Pipe a generous layer of custard into the center of each pastry ring.
You can pipe it in decorative swirls for a bakery-style appearance.
16. Add the Fresh Fruit
Arrange sliced strawberries, kiwi, blueberries, raspberries, mango, peaches, or other fresh fruit over the custard.
Use a variety of colors and shapes for an attractive presentation.
17. Add the Optional Glaze
For a glossy professional finish, warm the apricot jam with the water over low heat.
Brush a very thin layer over the fruit using a pastry brush.
Allow the glaze to cool slightly before serving.
18. Chill and Serve
Refrigerate the finished pastry rings for 15–30 minutes before serving.
Serve chilled.
⭐ Chef’s Tips
Keep the butter cold: Cold butter gives the pastry a tender, crisp texture.
Don’t overwork the dough: Mix just until it comes together to prevent tough pastry.
Chill before baking: This helps the pastry keep its shape.
Temper the eggs carefully: Always whisk while adding the hot milk gradually.
Cook the custard gently: Medium-low heat and constant whisking help prevent lumps.
Cool everything completely: The pastry should be completely cool and the custard fully chilled before assembly.
Choose firm fruit: Strawberries, kiwi, blueberries, mango, and peaches hold their shape beautifully.
🍓 Easy Variations
🍫 Chocolate Custard Rings
Add 1–2 tablespoons cocoa powder to the custard mixture for a chocolate version.
🍋 Lemon Custard Rings
Add 1 teaspoon finely grated lemon zest to the custard for a bright citrus flavor.
🥭 Tropical Fruit Rings
Top the pastries with mango, pineapple, kiwi, and passion fruit.
🍓 Berry Custard Rings
Use strawberries, raspberries, blueberries, and blackberries for a beautiful berry version.
🥥 Coconut Custard Rings
Replace ½ cup of the milk with coconut milk and sprinkle toasted coconut over the fruit.
🍫 Chocolate-Dipped Pastry
Dip the underside or edges of the cooled pastry rings in melted chocolate before filling them with custard.
🧊 Storage
Because these pastries contain homemade custard and fresh fruit, store them covered in the refrigerator.
For the best texture, enjoy within 1–2 days.
The pastry will gradually soften as it absorbs moisture from the custard.
For the crispiest result, store the pastry shells separately from the custard and fruit and assemble shortly before serving.
❄️ Make-Ahead Instructions
The pastry shells can be baked 1–2 days ahead and stored in an airtight container at room temperature.
The custard can be prepared up to 2 days ahead and refrigerated.
For the best presentation, assemble the pastries shortly before serving.
🍓🥧 Final Result
These Fruit Custard Pastry Rings bring together everything you want in an elegant little dessert: crisp buttery pastry, silky vanilla custard, juicy fresh fruit, and a beautiful glossy finish.
They’re delicate enough for afternoon tea but impressive enough for celebrations and special occasions.
Crispy, creamy, fruity, and absolutely bakery-worthy! 🍓🥝🍮✨