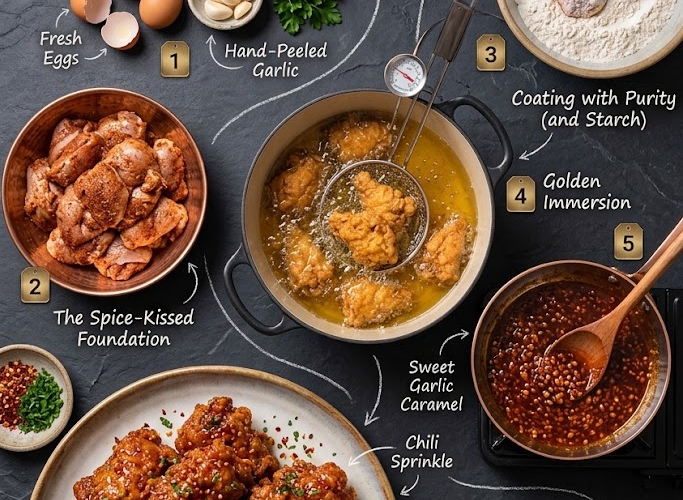
🍗🧄 Crispy Garlic Chicken
Ultra-crispy fried chicken coated in a glossy, sticky garlic glaze that hits the perfect balance of sweet, savory, and garlicky.
This crispy garlic chicken starts with juicy boneless chicken pieces coated in a light, crunchy flour-and-cornstarch batter. They’re fried until deeply golden and crisp, then tossed in a homemade garlic glaze that clings to every piece.
It’s an irresistible weeknight dinner, party appetizer, or takeout-style meal made right at home.
⏱️ Recipe Information
Prep Time: 20 minutes
Marinating/Resting Time: 15 minutes
Cook Time: 20 minutes
Total Time: About 55 minutes
Servings: 4–6
Difficulty: Easy
Method: Deep-Fried
🛒 Ingredients
🍗 For the Crispy Chicken
- 700g boneless chicken thighs or chicken breast, cut into bite-size pieces
- 1 cup (125g) all-purpose flour
- ½ cup (65g) cornstarch
- 1 teaspoon salt
- 1 teaspoon paprika
- ½ teaspoon black pepper
- 1 teaspoon garlic powder
- ½ teaspoon onion powder
- 1 large egg
- ½ cup (120ml) cold water
- Neutral oil, for deep frying
🧄 For the Garlic Glaze
- 6 cloves garlic, finely minced
- ¼ cup (60ml) honey
- ¼ cup (60ml) soy sauce
- 2 tablespoons brown sugar
- 2 tablespoons water
- 1 tablespoon rice vinegar
- 1 teaspoon sesame oil
- 1 teaspoon cornstarch
- 1 tablespoon cold water
- ½ teaspoon red pepper flakes, optional
Optional Garnish
- Toasted sesame seeds
- Sliced green onions
- Thinly sliced red chili
- Fresh cilantro
👩🍳 Instructions
1. Prepare the Chicken
Pat the chicken pieces dry with paper towels.
Cut the chicken into evenly sized bite-size pieces so they cook at the same rate.
Place the chicken in a bowl and set aside.
🥣 2. Make the Crispy Coating
In a large bowl, whisk together:
- Flour
- Cornstarch
- Salt
- Paprika
- Black pepper
- Garlic powder
- Onion powder
Mix thoroughly so the seasonings are evenly distributed.
🥚 3. Make the Wet Batter
In a separate bowl, whisk together the egg and cold water.
Pour the egg mixture into the seasoned flour mixture.
Whisk until a thick, smooth batter forms.
Don’t worry if a few small lumps remain.
🍗 4. Coat the Chicken
Add the chicken pieces to the batter.
Toss thoroughly until every piece is completely coated.
Let the coated chicken rest for approximately 10–15 minutes.
This allows the coating to adhere better to the chicken.
🧄 5. Prepare the Garlic Glaze
While the chicken rests, prepare the glaze.
In a small bowl, whisk together the cornstarch and 1 tablespoon cold water to create a smooth slurry.
Set aside.
Place a saucepan over medium heat.
Add the minced garlic and sesame oil.
Cook for approximately 30–60 seconds, stirring constantly, until fragrant.
Don’t allow the garlic to brown heavily.
🍯 6. Build the Glaze
Add the honey, soy sauce, brown sugar, water, rice vinegar, and red pepper flakes if using.
Stir well.
Bring the mixture to a gentle simmer.
Cook for approximately 2–3 minutes.
Slowly whisk in the cornstarch slurry.
Continue cooking for another 1–2 minutes, stirring constantly, until the glaze becomes glossy and thick enough to coat the back of a spoon.
Remove from the heat.
🫕 7. Heat the Oil
Pour enough neutral oil into a deep, heavy-bottomed pot to allow the chicken pieces to cook without touching the bottom.
Heat the oil to 350°F (175°C).
Use a kitchen thermometer to maintain a consistent temperature.
🍗 8. Fry the Chicken
Carefully place several battered chicken pieces into the hot oil.
Do not overcrowd the pot.
Fry for approximately 4–6 minutes, depending on the size of the pieces, turning occasionally, until deeply golden brown and cooked through.
The chicken should reach an internal temperature of 165°F (74°C).
🧻 9. Drain
Remove the fried chicken with a slotted spoon or spider strainer.
Transfer it to a wire rack set over a baking sheet.
A wire rack is preferable to paper towels because it allows air to circulate underneath, helping preserve the crispy coating.
Repeat with the remaining chicken.
Allow the oil to return to 350°F (175°C) between batches.
🔥 10. Make the Chicken Extra Crispy
For an especially crunchy coating, fry the chicken in two stages.
First Fry
Cook at 350°F (175°C) for about 3–4 minutes, until lightly golden and cooked through.
Remove and rest for several minutes.
Second Fry
Increase the oil temperature to approximately 375°F (190°C).
Fry the chicken again for 1–2 minutes, until deeply golden and extremely crisp.
Drain on a wire rack.
This step is optional but gives the chicken an exceptional crunch.
🧄 11. Toss With the Garlic Glaze
Place the freshly fried chicken in a large mixing bowl.
Pour the warm garlic glaze over the chicken.
Toss quickly but gently until every piece is glossy and coated.
Don’t let the chicken sit in the glaze too long, or the crispy coating will soften.
🌿 12. Garnish and Serve
Transfer the glazed chicken to a serving platter.
Sprinkle generously with toasted sesame seeds and sliced green onions.
Add sliced red chili for extra heat if desired.
Serve immediately while the chicken is still hot and crisp.
⭐ Chef’s Tips
Use cornstarch: The combination of flour and cornstarch creates a lighter, crunchier crust than flour alone.
Keep the water cold: Cold water helps produce a crispier fried coating.
Don’t overcrowd the oil: Too many pieces at once will lower the oil temperature and can result in greasy chicken.
Use a thermometer: Maintaining the correct oil temperature is one of the most important steps for crispy chicken.
Drain on a wire rack: This prevents steam from making the bottom of the chicken soggy.
Glaze right before serving: The longer the chicken sits in the glaze, the softer the crust becomes.
Keep the glaze thick: A properly reduced glaze clings to the chicken instead of pooling at the bottom of the bowl.
Thighs stay juicy: Boneless chicken thighs are especially forgiving and remain tender even after frying.
🌶️ Easy Variations
🔥 Spicy Garlic Chicken
Add extra red pepper flakes, chili garlic sauce, or sliced fresh chilies to the glaze.
🍯 Honey Garlic Chicken
Increase the honey to ⅓ cup for a sweeter, stickier glaze.
🧄 Extra Garlic Chicken
Add several additional cloves of finely minced garlic to the glaze for an intensely garlicky finish.
🍊 Orange Garlic Chicken
Replace half of the water in the glaze with fresh orange juice and add a little orange zest.
🌶️ Sweet Chili Garlic Chicken
Add 2 tablespoons sweet chili sauce to the glaze for a sweet, spicy finish.
🍗 Chicken Tenders
Instead of bite-size pieces, cut the chicken into strips and fry them as crispy garlic chicken tenders.
🍚 Serving Suggestions
Serve this crispy garlic chicken with:
- Steamed jasmine rice
- Fried rice
- Chow mein
- Stir-fried vegetables
- Asian cucumber salad
- Steamed broccoli
- Coleslaw
- Spring rolls
- Egg rolls
For a complete takeout-style dinner, serve over hot rice with steamed broccoli and plenty of extra garlic glaze.
🧊 Storage
Store leftover chicken in an airtight container in the refrigerator for up to 3 days.
For the best texture, keep the chicken and glaze separate if you know you’ll have leftovers.
🔥 Reheating
For the crispiest results, reheat the chicken in an air fryer at 375°F (190°C) for 4–6 minutes.
You can also reheat it in a 400°F (200°C) oven for approximately 8–12 minutes.
Warm the glaze separately and toss with the chicken immediately before serving.
Avoid microwaving if possible, as it will soften the crispy coating.
❄️ Freezing
Freeze the fried chicken without the glaze for up to 2 months.
Arrange the cooled chicken pieces in a single layer and freeze until firm before transferring them to a freezer-safe container or bag.
Reheat directly from frozen in an air fryer or hot oven until crisp and heated through.
Prepare fresh glaze and toss just before serving.
🍗🧄✨ Final Result
This Crispy Garlic Chicken delivers everything you want from homemade takeout-style chicken: crunchy golden coating, juicy tender chicken, and a glossy garlic glaze packed with sweet, savory flavor.
The cornstarch creates an irresistible crunch, while the honey-soy-garlic glaze coats every piece in a sticky, flavorful finish.
Crispy. Sticky. Garlicky. Completely addictive. 🍗🧄🔥