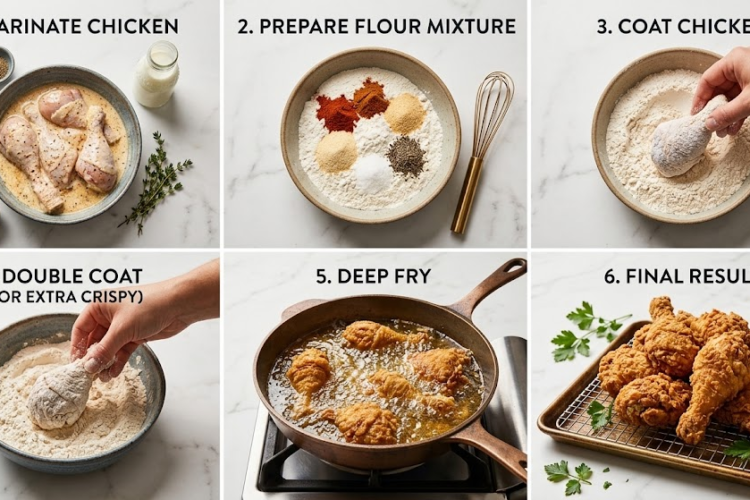
🍗🔥 Crispy Fried Chicken
Juicy, tender chicken marinated in seasoned buttermilk and coated in a flavorful, extra-crispy crust before being fried until beautifully golden.
This classic Crispy Fried Chicken is everything you want in homemade fried chicken: flavorful meat, crunchy golden coating, and juicy tenderness inside. The buttermilk marinade helps tenderize the chicken while the seasoned flour creates those irresistible crispy edges.
Perfect for family dinners, picnics, gatherings, or a weekend comfort-food feast.
⏱️ Recipe Information
Prep Time: 20 minutes
Marinating Time: 4–8 hours
Cook Time: 20–30 minutes
Total Time: About 5 hours
Servings: 5–6
Difficulty: Easy
Method: Deep-Fried
🛒 Ingredients
🍗 For the Chicken
- 1 kg chicken pieces, bone-in or boneless
- 1 cup (240 ml) buttermilk
- 1 teaspoon salt
- 1 teaspoon black pepper
- 1 teaspoon paprika
- 1 teaspoon garlic powder
- 1 teaspoon onion powder
🌾 For the Crispy Coating
- 2 cups (250 g) all-purpose flour
- ½ cup (60 g) cornstarch
- 1 teaspoon paprika
- 1 teaspoon garlic powder
- 1 teaspoon onion powder
- 1 teaspoon salt
- 1 teaspoon black pepper
- ½ teaspoon cayenne pepper, optional
- ½ teaspoon baking powder, optional, for extra crispness
🥚 For Frying
- Vegetable oil, enough for deep frying
👩🍳 Instructions
1. Prepare the Chicken
If using large chicken pieces, make a few shallow cuts through the thickest portions.
This allows the buttermilk marinade and seasoning to penetrate more effectively and helps the chicken cook evenly.
Pat the chicken lightly with paper towels if it is excessively wet.
2. Make the Buttermilk Marinade
In a large bowl, combine the buttermilk, salt, black pepper, paprika, garlic powder, and onion powder.
Whisk until evenly combined.
3. Marinate the Chicken
Add the chicken pieces to the buttermilk mixture.
Turn each piece several times so it is completely coated.
Cover the bowl and refrigerate for at least 4 hours.
For deeper flavor and tenderness, marinate for 6–8 hours.
Avoid leaving the chicken in the marinade for much longer than overnight because the texture can become overly soft.
🌾 Prepare the Crispy Coating
4. Combine the Dry Ingredients
In a large shallow bowl, whisk together:
- Flour
- Cornstarch
- Paprika
- Garlic powder
- Onion powder
- Salt
- Black pepper
- Cayenne pepper, if using
- Baking powder, if using
Mix thoroughly so the seasoning is evenly distributed throughout the flour.
5. Create Crispy Bits
For an especially craggy coating, drizzle 2–3 tablespoons of the buttermilk marinade into the seasoned flour.
Rub it between your fingers until small irregular crumbs form throughout the flour.
These little pieces stick to the chicken and fry into delicious crunchy flakes.
🍗 Coat the Chicken
6. Remove the Chicken From the Marinade
Take one piece of chicken from the buttermilk.
Allow excess marinade to drip off briefly.
Don’t wipe the marinade completely away—the moisture helps the flour coating adhere.
7. Dredge in the Flour
Place the chicken into the seasoned flour mixture.
Press the flour firmly onto all sides of the chicken.
Turn the piece several times and press again, making sure the coating is thick and completely covered.
Shake off only the loose excess flour.
Repeat with all remaining pieces.
8. Rest the Coated Chicken
Place the coated chicken on a wire rack.
Allow it to rest for approximately 10–15 minutes before frying.
This helps the coating hydrate and adhere more firmly to the chicken.
🍳 Fry the Chicken
9. Heat the Oil
Pour enough vegetable oil into a deep, heavy-bottomed pot or Dutch oven to allow the chicken to cook without touching the bottom.
Heat the oil to approximately 175°C (350°F).
Use a thermometer if possible.
Maintaining the correct oil temperature is one of the most important steps for crispy fried chicken.
10. Fry in Batches
Carefully lower a few chicken pieces into the hot oil.
Do not overcrowd the pot.
Overcrowding causes the oil temperature to drop and can result in greasy, soggy chicken.
Fry the pieces according to their size:
- Small pieces: approximately 8–10 minutes
- Medium pieces: approximately 10–13 minutes
- Large bone-in pieces: approximately 13–16 minutes
Turn the chicken occasionally so it browns evenly.
The coating should become deep golden brown and crisp.
11. Check the Chicken
The chicken should reach an internal temperature of 165°F (74°C) at the thickest part, without touching the bone.
For bone-in chicken, make sure the juices run clear and the meat is fully cooked near the bone.
If the outside is browning too quickly before the chicken is cooked through, reduce the heat slightly.
12. Drain Properly
Remove the chicken using tongs or a slotted spoon.
Place the pieces on a wire rack set over a baking sheet.
Allow excess oil to drip away.
Avoid stacking the chicken directly on paper towels because trapped steam can soften the crispy crust.
⭐ Chef’s Tips
Marinate for maximum flavor
A few hours in seasoned buttermilk gives the chicken a more tender texture and allows the seasoning to penetrate.
Use cornstarch
Cornstarch helps create a lighter, crunchier crust than flour alone.
Press the flour onto the chicken
Don’t simply toss the chicken through the flour. Pressing the coating onto the surface creates a thicker, crispier crust.
Create flour crumbles
Adding a little buttermilk to the flour mixture creates irregular pieces that fry into extra-crispy bits.
Maintain the oil temperature
Aim for approximately 350°F (175°C) before adding each batch. The temperature will naturally drop when cold chicken is added.
Don’t overcrowd the pot
Fry in several batches if necessary.
Use a wire rack
It allows air to circulate around the fried chicken and keeps the bottom crisp.
🌶️ Easy Variations
Spicy Fried Chicken
Add 1–2 teaspoons cayenne pepper to the flour mixture and a few dashes of hot sauce to the buttermilk marinade.
Southern-Style Fried Chicken
Add ½ teaspoon dried thyme and ½ teaspoon dried oregano to the flour seasoning.
Lemon Pepper Chicken
Add 1 teaspoon lemon pepper seasoning to the coating.
Smoky Fried Chicken
Replace regular paprika with smoked paprika.
Extra-Garlic Chicken
Add another ½ teaspoon garlic powder to the flour mixture.
Hot Honey Fried Chicken
Drizzle the finished chicken with warm honey mixed with a pinch of cayenne and chili flakes.
🥣 Serving Suggestions
Serve crispy fried chicken with:
- Creamy mashed potatoes
- French fries
- Coleslaw
- Corn on the cob
- Biscuits
- Mac and cheese
- Green beans
- Potato salad
- Gravy
- Pickles
For dipping, try:
- Ranch dressing
- Honey mustard
- Spicy mayo
- BBQ sauce
- Hot honey
- Garlic sauce
🧊 Storage
Allow leftover chicken to cool completely before refrigerating.
Store in an airtight container in the refrigerator for up to 3 days.
For the best texture, avoid tightly wrapping the chicken while it is still warm because trapped steam will soften the crust.
🔥 Reheating
The best way to restore the crispiness is with an air fryer.
Heat at 375°F (190°C) for 5–8 minutes, depending on the size of the pieces.
Alternatively, place the chicken on a wire rack over a baking sheet and reheat in a 400°F (200°C) oven for 10–15 minutes.
Avoid microwaving when possible, as it will soften the crust.
❄️ Freezing
Allow the fried chicken to cool completely.
Wrap individual pieces tightly and place them in a freezer-safe container or bag.
Freeze for up to 2 months.
Thaw overnight in the refrigerator, then reheat in a 375°F (190°C) oven or air fryer until hot and crisp.
🍗🔥 Final Result
This Crispy Fried Chicken delivers everything you want from homemade fried chicken: juicy, flavorful meat surrounded by a deeply golden, crunchy, craggy crust.
The seasoned buttermilk marinade keeps the chicken tender, while the flour-and-cornstarch coating creates an irresistible crunch.
Crispy outside, juicy inside, perfectly seasoned, and made for sharing! 🍗🔥✨