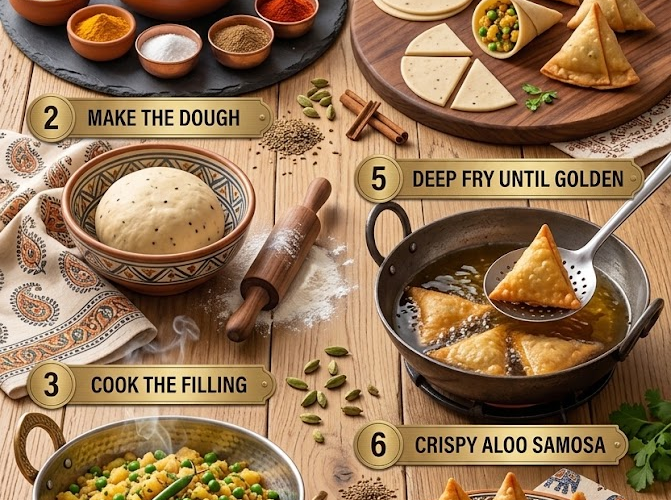
🥔🥟 Crispy Aloo Samosa
Golden, flaky, and irresistibly crispy, these homemade Aloo Samosas are filled with a deliciously spiced mixture of tender potatoes and sweet green peas. Each samosa has a crisp, crunchy pastry shell surrounding a flavorful, comforting filling scented with aromatic spices.
Perfect as a snack, appetizer, party food, or afternoon treat, these classic potato samosas are especially delicious served with mint chutney, tamarind chutney, or your favorite dipping sauce.
⏱️ Recipe Information
Prep Time: 30 minutes
Rest Time: 30 minutes
Cook Time: 20–25 minutes
Total Time: About 1 hour 25 minutes
Yield: 10–12 samosas
Difficulty: Medium
Method: Deep-Fried
🛒 Ingredients
For the Dough
- 2 cups (250g) all-purpose flour
- ½ teaspoon salt
- 4 tablespoons oil
- ½ cup (120ml) water, or as needed
For the Potato Filling
- 4 medium potatoes, boiled, peeled, and roughly mashed
- ½ cup green peas, cooked
Suggested Seasonings
- 1 tablespoon oil
- 1 teaspoon cumin seeds
- 1 teaspoon grated or minced ginger
- 1 green chili, finely chopped, optional
- ½ teaspoon turmeric
- 1 teaspoon ground coriander
- ½ teaspoon ground cumin
- ½ teaspoon garam masala
- ½ teaspoon chili powder, optional
- 1 teaspoon salt, or to taste
- 1 tablespoon fresh lemon juice
- 2 tablespoons fresh cilantro, chopped
For Frying
- Vegetable oil, as needed for deep frying
For Serving
- Mint chutney
- Tamarind chutney
- Yogurt dip
- Tomato ketchup
👩🍳 Instructions
1. Prepare the Samosa Dough
Add the flour and salt to a large mixing bowl.
Mix well.
Pour in the 4 tablespoons of oil.
Using your fingertips, rub the oil into the flour until the mixture resembles coarse breadcrumbs.
When you squeeze a small amount of the flour mixture in your hand, it should hold its shape.
This step is important because the oil helps create the samosa’s signature flaky and crisp pastry.
2. Add the Water
Gradually add the water, a little at a time.
Mix and gently bring the dough together.
Knead only until a firm, smooth dough forms.
The dough should be firmer than regular bread dough and should not be sticky.
Avoid over-kneading, as this can make the pastry tough.
3. Rest the Dough
Cover the dough with a clean kitchen towel or plastic wrap.
Allow it to rest for 30 minutes.
Resting the dough allows the flour to absorb the water and makes it easier to roll.
🥔 Prepare the Potato Filling
4. Cook the Aromatics
Heat 1 tablespoon of oil in a skillet over medium heat.
Add the cumin seeds.
Allow them to sizzle for a few seconds until fragrant.
Add the ginger and chopped green chili.
Cook for approximately 30 seconds.
5. Add the Spices
Add:
- Turmeric
- Ground coriander
- Ground cumin
- Garam masala
- Chili powder, if using
Stir quickly.
Cook the spices for just a few seconds.
Be careful not to burn them.
6. Add the Potatoes and Peas
Add the boiled and mashed potatoes to the skillet.
Add the cooked green peas.
Season with salt.
Gently stir everything together until the potatoes and spices are evenly combined.
The filling should be flavorful and relatively dry.
7. Finish the Filling
Remove the skillet from the heat.
Add the fresh lemon juice and chopped cilantro.
Mix gently.
Taste and adjust the salt or spices if needed.
Allow the filling to cool completely before assembling the samosas.
Never fill the pastry with hot filling, as the heat can soften the dough and make assembly difficult.
🥟 Assemble the Samosas
8. Divide the Dough
Once rested, knead the dough very briefly.
Divide it into 5–6 equal portions.
Roll each portion into a smooth ball.
Keep the dough covered while working so it doesn’t dry out.
9. Roll and Cut
Lightly oil your work surface.
Roll one dough ball into a thin oval, approximately 6–7 inches long.
Cut the oval in half to create two semicircles.
Repeat with the remaining dough.
10. Form the Samosa Cone
Take one semicircle.
Lightly brush the straight edge with water.
Bring the two corners of the straight edge together, overlapping them slightly to form a cone.
Press the seam firmly to seal.
Make sure the bottom of the cone is completely closed.
11. Fill the Samosa
Hold the cone in your hand.
Fill it with approximately 2–3 tablespoons of the cooled potato mixture.
Do not overfill.
Leave enough room at the top to seal the samosa properly.
12. Seal the Samosa
Lightly brush the inside edge of the open pastry with water.
Create a small fold along one side to form the traditional samosa shape.
Press the edges together firmly.
Make sure there are no openings where the filling can escape during frying.
Repeat with the remaining dough and filling.
Keep the assembled samosas covered with a clean towel.
🍳 Fry the Samosas
13. Heat the Oil
Pour enough oil into a deep, heavy-bottomed pot or deep frying pan.
Heat the oil over low to medium heat.
For traditional samosas, the oil should not be extremely hot.
The ideal temperature is approximately 300–325°F (150–165°C).
14. Fry Slowly
Carefully place several samosas into the oil.
Do not overcrowd the pan.
Fry the samosas slowly for approximately 12–18 minutes, turning occasionally.
The slower frying process allows the pastry to become:
- Crisp
- Flaky
- Golden brown
- Fully cooked
Avoid frying on very high heat.
If the oil is too hot, the outside may brown quickly while the pastry remains undercooked and develops bubbles.
15. Drain
Once the samosas are beautifully golden and crisp, remove them using a slotted spoon.
Place them on a wire rack or paper towel-lined plate to drain excess oil.
Allow them to cool for a few minutes before serving.
🍽️ Serve
Serve the Crispy Aloo Samosas warm with your favorite dipping sauces.
They are especially delicious with:
- 🌿 Mint chutney
- 🍯 Tamarind chutney
- 🥣 Yogurt sauce
- 🍅 Tomato ketchup
For a complete snack platter, serve alongside masala chai.
⭐ Chef’s Tips
Use firm dough: A soft dough can absorb too much oil and produce less crispy samosas.
Rub the oil into the flour: This step is essential for a flaky pastry texture.
Don’t over-knead: Overworking the dough can make the samosa shell tough.
Keep the filling dry: Wet filling can cause the pastry to become soggy or burst.
Cool the filling completely: Warm filling makes the dough soft and difficult to seal.
Seal carefully: Even small openings can allow oil to enter the samosa.
Fry slowly: Low-to-medium heat creates the crispiest, flakiest results.
Don’t overcrowd: Fry in batches to maintain a steady oil temperature.
🌶️ Easy Variations
Spicy Aloo Samosa
Add extra green chilies, chili powder, or crushed red pepper flakes to the filling.
Cheese Potato Samosa
Add ½ cup shredded mozzarella or cheddar cheese to the cooled potato filling.
Paneer Samosa
Add small cubes of paneer along with the potatoes and peas.
Sweet Potato Samosa
Replace regular potatoes with boiled sweet potatoes for a slightly sweet and earthy variation.
Vegetable Samosa
Add finely chopped carrots, corn, cauliflower, or green beans to the potato mixture.
🧊 Storage
Allow the samosas to cool completely before storing.
Place them in an airtight container and refrigerate for up to 3 days.
❄️ Freezing
Freeze Before Frying
Arrange the assembled, uncooked samosas on a parchment-lined baking sheet.
Freeze until firm.
Transfer them to a freezer-safe bag or container.
Freeze for up to 2 months.
Fry directly from frozen over low-to-medium heat, allowing a few additional minutes for cooking.
🔥 Reheating
For the crispiest results, reheat samosas in:
Oven
Bake at 375°F (190°C) for 10–15 minutes.
Air Fryer
Air fry at 350°F (175°C) for 5–8 minutes.
Avoid microwaving if possible, as it can make the pastry soft.
🥔🥟✨ Final Result
These Crispy Aloo Samosas are wonderfully crunchy on the outside and filled with a warm, savory mixture of spiced potatoes and tender green peas.
With their flaky pastry, aromatic filling, and golden crispy exterior, they’re the ultimate homemade snack.
Serve them hot, dip generously, and enjoy every delicious crunchy bite! 🥔🥟💛