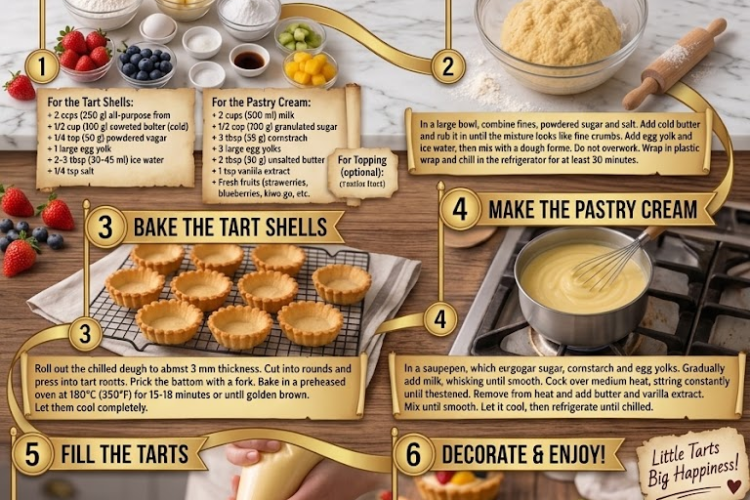
🥧✨ Cream Tart
Buttery, crisp pastry shells filled with silky homemade pastry cream and finished with fresh fruit for an elegant dessert that’s as beautiful as it is delicious.
This classic Cream Tart combines a delicate shortcrust shell with luscious vanilla pastry cream. The contrast between the crisp, buttery pastry and smooth custard makes every bite wonderfully balanced.
It’s perfect for afternoon tea, birthdays, dinner parties, holidays, or whenever you want an elegant homemade dessert.
⏱️ Recipe Information
Prep Time: 35 minutes
Chill Time: 1 hour
Bake Time: 20–25 minutes
Total Time: About 2 hours
Yield: 8 individual tartlets or 1 large 9-inch tart
Difficulty: Intermediate
Method: Oven-Baked
🛒 Ingredients
For the Tart Shells
- 2 cups (250 g) all-purpose flour
- ½ cup (100 g) unsalted butter, cold and cubed
- ¼ cup (50 g) powdered sugar
- 1 large egg yolk
- 2–3 tablespoons (30–45 ml) ice water
- ¼ teaspoon salt
For the Pastry Cream
- 2 cups (480 ml) whole milk
- ½ cup (100 g) granulated sugar, divided
- 4 large egg yolks
- ¼ cup (30 g) cornstarch
- 1 teaspoon vanilla extract
- 2 tablespoons (28 g) unsalted butter
- Pinch of salt
For Decoration
- Fresh strawberries
- Blueberries
- Raspberries
- Kiwi
- Mango
- Blackberries
- Powdered sugar
- Mint leaves, optional
Use any combination of fresh fruit you enjoy.
👩🍳 Instructions
Part 1 — Make the Tart Shells
1. Combine the Dry Ingredients
In a large mixing bowl, whisk together the flour, powdered sugar, and salt.
2. Cut in the Butter
Add the cold cubed butter.
Using a pastry cutter or your fingertips, work the butter into the flour until the mixture resembles coarse crumbs.
Work quickly so the butter stays cold.
3. Add the Egg Yolk
Add the egg yolk and gently mix it into the dough.
The mixture will still look crumbly.
4. Add Ice Water
Add 2 tablespoons of ice water and gently mix.
If the dough still seems too dry to come together, add another tablespoon a little at a time.
Stop as soon as the dough forms a cohesive ball.
Do not overwork the dough.
5. Chill the Dough
Flatten the dough into a disk.
Wrap it tightly in plastic wrap and refrigerate for at least 30–60 minutes.
Chilling relaxes the gluten and helps prevent the tart shells from shrinking during baking.
6. Roll the Dough
Lightly flour your work surface.
Roll the chilled dough to approximately ⅛ inch (3 mm) thick.
For individual tartlets, cut circles slightly larger than your tart molds.
For one large tart, roll the dough large enough to cover the bottom and sides of a 9-inch tart pan.
7. Line the Tart Pans
Gently press the dough into the tart molds.
Press the dough firmly into the corners and sides.
Trim away excess pastry around the edges.
Prick the bottom several times with a fork.
8. Chill Again
Place the prepared tart shells in the refrigerator for 15–20 minutes.
This second chilling step helps the pastry maintain its shape during baking.
Meanwhile, preheat the oven to 375°F (190°C).
9. Blind Bake
Place parchment paper inside each tart shell and fill with pie weights or dried beans.
Bake for approximately 15 minutes.
Remove the parchment and weights.
Return the shells to the oven and bake for another 5–10 minutes, until the pastry is lightly golden and completely cooked.
10. Cool Completely
Remove the tart shells from the oven.
Allow them to cool completely before filling.
Do not add pastry cream to warm shells, as the heat can loosen the custard and soften the pastry.
Part 2 — Make the Pastry Cream
11. Heat the Milk
Pour the milk into a medium saucepan.
Add half of the sugar.
Heat over medium heat until the milk is hot and steaming, but do not allow it to reach a rolling boil.
12. Whisk the Egg Yolks
In a separate bowl, whisk together the egg yolks, remaining sugar, and cornstarch.
Continue whisking until the mixture is smooth, pale, and free of lumps.
13. Temper the Eggs
Slowly pour about one-third of the hot milk into the egg-yolk mixture while whisking constantly.
This gradually raises the temperature of the eggs without scrambling them.
Pour the tempered mixture back into the saucepan with the remaining milk.
14. Cook the Pastry Cream
Return the saucepan to medium heat.
Whisk continuously.
The mixture will gradually thicken.
Once it begins bubbling, continue cooking and whisking for approximately 1–2 minutes to fully cook the cornstarch.
The pastry cream should be thick, smooth, and glossy.
15. Finish the Pastry Cream
Remove the saucepan from the heat.
Whisk in the vanilla extract, butter, and pinch of salt.
For an exceptionally smooth pastry cream, strain it through a fine-mesh sieve into a clean bowl.
16. Chill
Press plastic wrap directly against the surface of the pastry cream.
This prevents a skin from forming.
Refrigerate for at least 1 hour, or until completely chilled.
Before using, whisk the chilled pastry cream briefly until smooth and creamy.
Part 3 — Assemble the Cream Tart
17. Fill the Tart Shells
Transfer the chilled pastry cream to a piping bag or use a spoon.
Fill each completely cooled tart shell with pastry cream.
Smooth the top with a small spatula or leave it beautifully swirled.
18. Add Fresh Fruit
Arrange fresh fruit over the pastry cream.
Create a simple pattern or mix the colors for a more decorative presentation.
For individual tartlets, placing the fruit in small clusters makes them especially elegant.
19. Finish and Serve
Dust lightly with powdered sugar.
Add a few fresh mint leaves if desired.
For the best texture, serve the tart within a few hours of assembly.
⭐ Chef’s Tips
Keep the butter cold: Cold butter creates a delicate, crisp pastry.
Don’t overwork the dough: Overworked pastry can become tough.
Chill before baking: This significantly reduces shrinking.
Blind bake properly: Make sure the shell is fully baked and golden before filling.
Strain the pastry cream: This removes any tiny lumps and produces an exceptionally silky filling.
Cover the pastry cream directly: Plastic wrap touching the surface prevents a thick skin from forming.
Fill shortly before serving: The longer the pastry cream sits inside the shell, the softer the crust becomes.
🍓 Easy Variations
Chocolate Cream Tart
Add 2 tablespoons unsweetened cocoa powder to the pastry cream along with the cornstarch, or stir in 100 g melted dark chocolate after cooking.
Lemon Cream Tart
Add 1 tablespoon finely grated lemon zest to the milk while heating and replace the vanilla with 1 tablespoon lemon juice after cooking.
Strawberry Cream Tart
Fill the shell with pastry cream and cover the top with sliced fresh strawberries.
Mixed Berry Cream Tart
Decorate with strawberries, blueberries, raspberries, and blackberries.
Tropical Cream Tart
Top with mango, kiwi, pineapple, and passion fruit.
Almond Cream Tart
Add ½ teaspoon almond extract to the pastry cream and finish with toasted sliced almonds.
🍽️ Serving Suggestions
Serve chilled or slightly cool with:
- Fresh berries
- Whipped cream
- Raspberry sauce
- Chocolate drizzle
- Caramel sauce
- Fresh mint
- Powdered sugar
A cup of coffee or tea makes a perfect accompaniment.
🧊 Storage
Store assembled cream tart in the refrigerator.
For the best texture, enjoy within 24 hours.
The pastry shells can be baked 1–2 days ahead and kept in an airtight container at room temperature.
The pastry cream can be refrigerated separately for up to 3 days.
❄️ Freezing
The baked tart shells can be frozen for up to 1 month.
Freeze them completely cooled and well wrapped.
Do not freeze the fully assembled cream tart, as the pastry cream and fresh fruit can become watery after thawing.
🥧✨ Final Result
This Cream Tart combines a beautifully crisp, buttery pastry shell with silky vanilla pastry cream and fresh, colorful fruit.
The result is elegant enough for a celebration but simple enough to make at home.
Crisp pastry + silky custard + fresh fruit = a truly irresistible dessert! 🥧🍓✨