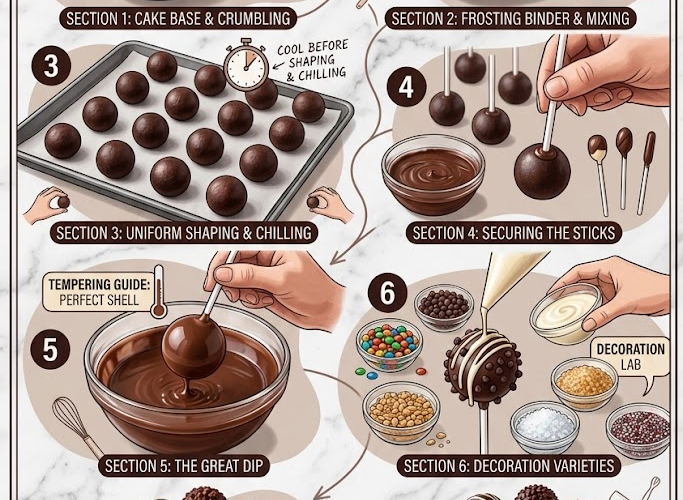
🍫 Classy Chocolate Cake Pops
Elegant, rich, and irresistibly chocolatey, these Classy Chocolate Cake Pops transform moist chocolate cake and creamy frosting into bite-sized treats coated in glossy chocolate.
Finished with delicate white chocolate drizzles, chocolate curls, or sprinkles, they’re perfect for birthdays, weddings, baby showers, holidays, dessert tables, or any celebration where you want something that looks as good as it tastes.
⏱️ Recipe Information
Prep Time: 30 minutes
Chill Time: 1 hour
Total Time: 1 hour 30 minutes
Yield: 24–30 cake pops
Difficulty: Easy
Method: No-Bake Assembly
🛒 Ingredients
For the Cake Pops
- 1 chocolate cake, baked and completely cooled
- ½ cup (120g) chocolate frosting, plus more if needed
- 300g dark or milk chocolate, finely chopped, for coating
- 200g white chocolate, finely chopped, for decorating
- Chocolate sprinkles or chocolate curls, for decorating
- Cake pop sticks
Optional
- 1 teaspoon vegetable shortening or coconut oil, to thin the melted chocolate if needed
- Small amount of melted chocolate, for securing the sticks
👩🍳 Instructions
1. Crumble the Chocolate Cake
Make sure the cake is completely cool before beginning.
Cut the cake into large pieces and place them in a large mixing bowl.
Using your hands, crumble the cake into very fine, even crumbs.
Remove any particularly hard edges if your cake has a firm crust.
Tip: The finer the crumbs, the smoother and more professional the finished cake pops will be.
2. Add the Chocolate Frosting
Add ½ cup chocolate frosting to the cake crumbs.
Using your hands, a sturdy spatula, or the paddle attachment of a mixer, mix until the frosting is evenly distributed.
The mixture should hold together when pressed between your fingers without feeling wet or greasy.
If the mixture is too dry, add frosting 1 tablespoon at a time until it reaches the right consistency.
Avoid adding too much frosting—the cake pops should remain dense and truffle-like rather than becoming soft and mushy.
3. Shape the Cake Balls
Scoop approximately 1 tablespoon of the mixture for each cake pop.
Roll each portion firmly between your palms until smooth.
Aim for balls approximately 1–1¼ inches (2.5–3 cm) in diameter.
Place the finished balls on a parchment-lined baking tray.
Continue until all the cake mixture has been used.
4. Chill the Cake Balls
Place the tray in the refrigerator for 30–45 minutes.
The cake balls should become firm but not rock-hard.
Important: Chilling helps the cake pops stay securely on their sticks when dipped in chocolate.
5. Prepare the Cake Pop Sticks
Melt a small amount of the dark or milk chocolate.
Dip the tip of each cake pop stick about ½ inch (1–2 cm) into the melted chocolate.
Immediately insert the chocolate-coated end into the center of a chilled cake ball.
Insert the stick approximately halfway through the cake ball.
Return the cake pops to the refrigerator for another 10–15 minutes to allow the chocolate to set.
This creates a small chocolate “anchor” that helps prevent the cake balls from sliding off the sticks.
🍫 Make the Chocolate Coating
6. Melt the Dark or Milk Chocolate
Place the 300g chocolate in a completely dry, heatproof bowl.
Melt gently in the microwave in 15–20 second intervals, stirring well after each interval.
Continue until almost completely melted, then stir until completely smooth.
Alternatively, melt it over a saucepan of gently simmering water, making sure the bottom of the bowl does not touch the water.
If the chocolate seems too thick for dipping, stir in 1 teaspoon vegetable shortening or coconut oil.
7. Dip the Cake Pops
Remove the chilled cake pops from the refrigerator.
Hold one cake pop by the stick and gently dip it straight into the melted chocolate.
Rotate slowly to coat the entire cake ball.
Lift it out and allow excess chocolate to drip back into the bowl.
Avoid repeatedly swirling the cake pop through the chocolate, as excessive movement can loosen the cake from the stick.
8. Let the Coating Set
Gently tap the stick against your hand while slowly rotating the cake pop.
This helps remove excess chocolate and creates a smoother finish.
Place the cake pop upright in a cake-pop stand or a piece of Styrofoam until the coating begins to set.
If you don’t have a stand, place them stick-side up on parchment paper, although the tops may become slightly flat.
🤍 Create the Classy Chocolate Finish
9. Melt the White Chocolate
Melt the 200g white chocolate gently using the same method as the dark chocolate.
Stir until completely smooth.
Allow it to cool for a few minutes if it is very hot.
10. Decorate
Transfer the melted white chocolate to a small piping bag, decorating bottle, or zip-top bag with the corner snipped off.
Drizzle thin lines of white chocolate over the coated cake pops.
Immediately decorate with:
- Chocolate sprinkles
- Chocolate curls
- Fine chocolate shavings
- White chocolate curls
For an especially elegant presentation, keep the decoration minimal and use a combination of thin white chocolate drizzles and delicate chocolate curls.
11. Allow to Set
Let the decorated cake pops stand at room temperature until the chocolate has completely hardened.
For faster setting, refrigerate for approximately 10–15 minutes.
Avoid leaving them uncovered in the refrigerator for too long, as condensation can develop on the chocolate coating.
⭐ Chef’s Tips
Use completely cooled cake: Warm cake will make the frosting mixture too soft.
Don’t over-frost: Too much frosting creates soft, heavy cake pops that are difficult to dip.
Make evenly sized balls: A small cookie scoop makes it easy to create uniform cake pops.
Chill before dipping: Firm cake balls are much less likely to fall from their sticks.
Don’t overheat chocolate: Chocolate that gets too hot can become thick or seize.
Use a deep bowl: A narrow, deep container makes dipping much easier because the cake pop can be fully submerged.
Tap gently: Too much tapping can cause the cake ball to loosen from the stick.
Decorate while wet: Add sprinkles and chocolate curls immediately after dipping, before the coating sets.
🍫 Easy Variations
🤎 Double Chocolate Cake Pops
Use chocolate cake, chocolate frosting, and milk chocolate coating for an intensely rich chocolate treat.
🤍 Black & White Cake Pops
Coat half the cake pops in dark chocolate and half in white chocolate. Finish each with contrasting chocolate drizzle.
🍓 Chocolate Strawberry Cake Pops
Add finely crushed freeze-dried strawberries to the cake mixture and decorate with white chocolate.
☕ Mocha Cake Pops
Add 1–2 teaspoons instant espresso powder to the chocolate cake crumbs before mixing with the frosting.
🥜 Chocolate Hazelnut Cake Pops
Mix a few tablespoons of chocolate-hazelnut spread into the cake mixture and decorate with chopped toasted hazelnuts.
🎄 Holiday Chocolate Cake Pops
Use festive sprinkles and drizzle with white chocolate for an elegant holiday dessert.
🎀 Elegant Presentation
For a truly classy dessert-table presentation:
- Use gold or white cake-pop sticks
- Arrange the cake pops upright in a decorated stand
- Keep the chocolate coating smooth and glossy
- Use thin, delicate white chocolate drizzles
- Finish with a few chocolate curls rather than heavy decorations
- Place each cake pop in a small clear treat bag for individual serving
For weddings or formal celebrations, match the drizzle and decorations to the event’s color palette.
🧊 Storage
Store finished cake pops in an airtight container.
They can be kept:
- At room temperature: up to 2 days in a cool environment
- Refrigerated: up to 5 days
If refrigerated, allow them to sit at room temperature for 15–20 minutes before serving for the best texture.
❄️ Freezing
Cake pops can be frozen for up to 2 months.
For best results, freeze the shaped cake balls before coating them.
Place them in a single layer on a tray and freeze until firm, then transfer them to an airtight freezer container.
Thaw overnight in the refrigerator before dipping and decorating.
🍫✨ Final Result
These Classy Chocolate Cake Pops are everything you want in an elegant bite-sized dessert—moist chocolate cake, creamy frosting, a crisp chocolate shell, and a delicate white chocolate finish.
They’re simple enough for a homemade celebration but polished enough for a sophisticated dessert table.
Rich, glossy, elegant, and completely irresistible. 🍫🤍✨