🥧 Classic Sweet Tart Shells
Buttery, crisp, delicately sweet tart shells with a tender crumb and a beautiful golden finish.
These classic sweet tart shells are the perfect foundation for homemade fruit tarts, chocolate tarts, custard tarts, lemon tarts, and elegant mini pastries.
The dough comes together with simple pantry ingredients and can be prepared ahead of time. The key to beautifully crisp tart shells is keeping the butter cold, avoiding overworking the dough, and chilling the shaped pastry before baking.
⏱️ Recipe Information
Prep Time: 20 minutes
Chill Time: 1 hour
Bake Time: 15–20 minutes
Total Time: About 1 hour 40 minutes
Yield: 1 large 9-inch tart shell or 8–10 mini tart shells
Difficulty: Easy
Method: Oven-Baked
🛒 Ingredients
- 250 g (2 cups) all-purpose flour
- 125 g (½ cup + 1 tablespoon) unsalted butter, cold and cubed
- 80 g (⅔ cup) icing/powdered sugar
- 1 large egg
- 1 teaspoon vanilla extract
- ¼ teaspoon salt
- 1–2 tablespoons cold milk or water, only if needed
👩🍳 Instructions
1. Prepare the Dry Ingredients
In a large mixing bowl, whisk together the flour, powdered sugar, and salt.
This evenly distributes the sugar and salt throughout the flour.
2. Cut in the Cold Butter
Add the cold, cubed butter.
Using a pastry cutter, your fingertips, or a food processor, work the butter into the flour mixture until it resembles coarse crumbs with a few small pea-sized pieces of butter remaining.
Work quickly so the butter stays cold.
Those small pieces of butter help create a delicate, tender pastry.
3. Add the Egg and Vanilla
In a small bowl, lightly whisk the egg and vanilla together.
Pour them into the flour and butter mixture.
Mix gently with a fork or spatula until the dough begins to come together.
Avoid kneading.
4. Adjust the Dough
If the mixture still seems too dry or crumbly, add cold milk or water 1 tablespoon at a time.
Stop adding liquid as soon as the dough holds together when gently pressed.
You may not need any additional liquid depending on the size of your egg and the flour.
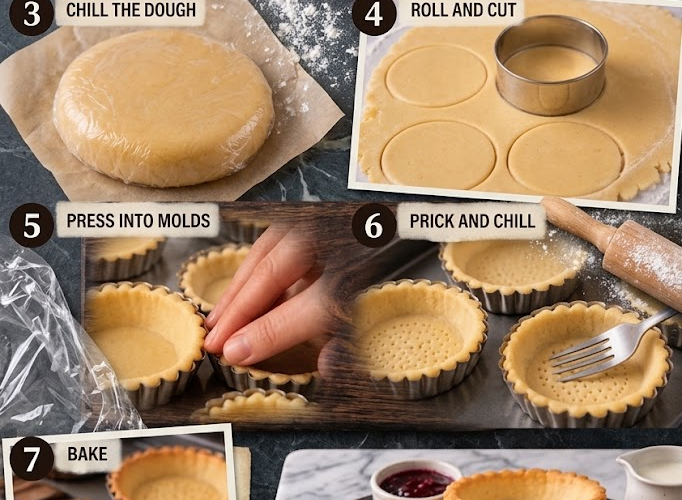
❄️ Chill the Dough
5. Form a Disc
Turn the dough onto a lightly floured work surface.
Gently bring it together with your hands and form it into a flat disc.
Do not knead the dough like bread.
Wrap tightly in plastic wrap.
6. Refrigerate
Refrigerate the dough for at least 1 hour.
This allows the butter to firm up and gives the gluten time to relax, making the pastry easier to roll and helping prevent shrinkage during baking.
For convenience, the dough can be refrigerated overnight.
🥧 Roll and Shape
7. Roll Out the Pastry
Lightly flour your work surface and rolling pin.
Roll the chilled dough to approximately 3–4 mm thick.
Roll from the center outward, turning the dough occasionally to maintain an even thickness.
If the dough becomes too soft while rolling, return it to the refrigerator for a few minutes.
8. Transfer to the Tart Pan
Carefully lift the pastry and place it into a greased 9-inch tart pan with a removable bottom.
Gently press the dough into the base and sides of the pan.
Don’t stretch the pastry, as stretched dough is more likely to shrink during baking.
9. Trim the Edges
Run a rolling pin over the top of the tart pan to remove excess pastry.
Alternatively, trim the edges neatly with a sharp knife.
Press the dough gently into the corners and sides to create an even shell.
10. Chill Again
Place the shaped tart shell in the refrigerator for at least 20–30 minutes before baking.
For an especially crisp shell with minimal shrinkage, chill it until thoroughly firm.
🔥 Blind Bake
11. Preheat the Oven
Preheat the oven to 350°F (175°C).
12. Dock the Pastry
Remove the chilled tart shell from the refrigerator.
Prick the bottom lightly with a fork.
Don’t make deep holes—just enough to prevent the base from puffing excessively during baking.
13. Add Baking Weights
Place a sheet of parchment paper over the pastry.
Fill the shell with pie weights, dried beans, or uncooked rice.
Spread the weights evenly across the bottom.
14. Bake
Bake for approximately 12–15 minutes with the weights.
Carefully remove the parchment and weights.
Return the tart shell to the oven and bake for another 5–8 minutes, or until the pastry is lightly golden and completely cooked through.
For a fully baked shell that will be filled with a no-bake filling, allow it to become a deeper golden brown.
15. Cool Completely
Remove the tart shell from the oven.
Allow it to cool in the pan for approximately 10–15 minutes.
Carefully remove the outer ring and allow the shell to cool completely on a wire rack before filling.
🍓 Filling Ideas
Once completely cooled, these sweet tart shells can be filled with:
🍋 Lemon Tart
Fill with smooth lemon curd and chill until set.
🍓 Fresh Fruit Tart
Fill with pastry cream and arrange fresh strawberries, blueberries, raspberries, kiwi, or peaches over the top.
🍫 Chocolate Tart
Fill with silky chocolate ganache and refrigerate until firm.
🍮 Custard Tart
Fill with vanilla custard and finish with fresh fruit or powdered sugar.
🥜 Peanut Butter Tart
Fill with a creamy peanut butter mousse and finish with chocolate drizzle.
🍎 Apple Tart
Fill with pastry cream or frangipane and arrange thinly sliced apples on top before baking.
⭐ Chef’s Tips
Keep the butter cold
Cold butter is essential for a crisp, tender pastry. If the butter starts becoming soft while you’re working, chill the dough.
Don’t overwork the dough
Mix only until it comes together. Excessive mixing develops gluten and can make the tart shell tough.
Don’t stretch the pastry
When transferring the dough to the pan, gently settle it into place rather than pulling it into the corners.
Chill before baking
A thoroughly chilled shell is much less likely to shrink or lose its shape in the oven.
Use baking weights
Pie weights keep the base flat during blind baking and help produce a neat, professional tart shell.
Let it cool before filling
A warm tart shell can soften delicate fillings and make them difficult to set properly.
🧁 Mini Tart Shells
To make individual tartlets, divide the chilled dough into 8–10 equal portions.
Roll each portion thinly and press into small tartlet pans.
Chill the shaped shells before baking.
Begin checking them after approximately 10–12 minutes, since smaller shells bake more quickly.
🧊 Make-Ahead & Storage
Unbaked Dough
Wrap the dough tightly and refrigerate for up to 3 days.
Baked Shell
Store completely cooled baked tart shells in an airtight container at room temperature for up to 3 days.
Keep them dry and away from moisture until ready to fill.
Filled Tart
Storage depends on the filling. Cream, custard, and fresh-fruit tarts should generally be refrigerated.
❄️ Freezing
Freeze the Unbaked Dough
Wrap the dough tightly in plastic wrap and place it in a freezer-safe bag.
Freeze for up to 2 months.
Thaw overnight in the refrigerator before rolling.
Freeze Baked Shells
Completely cooled baked shells can also be wrapped tightly and frozen for up to 1 month.
Thaw at room temperature before filling.
🥧✨ Final Result
These Classic Sweet Tart Shells are crisp, buttery, delicately sweet, and wonderfully versatile.
The tender pastry provides the perfect contrast to creamy custards, silky chocolate fillings, tangy lemon curd, and colorful fresh fruit.
Master this simple pastry shell and you’ll have the perfect base for countless beautiful homemade desserts. 🥧🍓🍋🍫✨