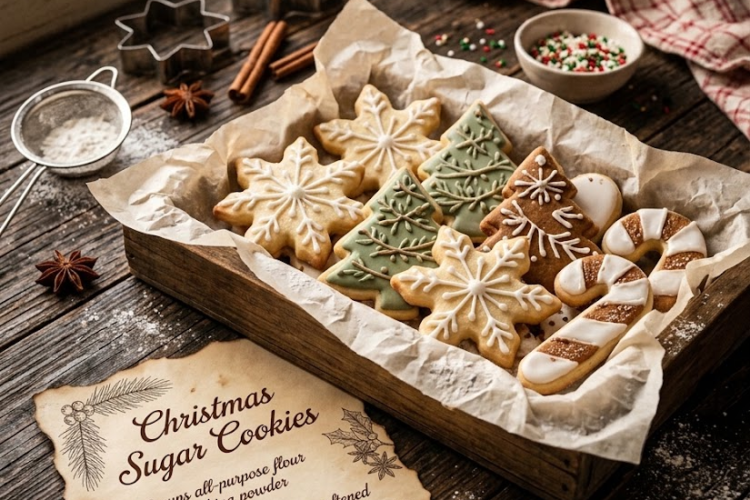
🎄 Christmas Sugar Cookies – Buttery, Sweet & Made to Decorate!
These Classic Christmas Sugar Cookies are buttery, tender, and perfectly sweet, with a delicate vanilla-almond flavor that makes every bite taste like the holidays. Their smooth dough rolls out beautifully, holds its shape during baking, and creates the perfect canvas for colorful royal icing, festive sprinkles, and sparkling holiday decorations.
Whether you’re making stars, Christmas trees, snowflakes, gingerbread people, or candy canes, this reliable sugar cookie recipe is perfect for holiday baking with family and friends. The cookies have lightly golden edges, soft centers, and just the right texture for decorating.
Best of all, you only need a handful of everyday ingredients to make a batch of beautiful homemade Christmas cookies!
Recipe Information
- Prep Time: 20 minutes
- Chilling Time: 1 hour
- Bake Time: 8–11 minutes per batch
- Total Time: Approximately 1 hour 30 minutes
- Yield: 24–30 cookies, depending on cutter size
- Course: Dessert, Holiday Baking
- Cuisine: American
- Difficulty: Easy
Ingredients
For the Christmas Sugar Cookies
- 1 cup salted butter (227 g), softened
- 1 cup granulated white sugar (200 g)
- 1 large egg, at room temperature
- 1 tablespoon vanilla extract (15 ml)
- ¼ teaspoon almond extract
- 2½ cups all-purpose flour (approximately 313 g)
- ½ teaspoon baking powder
For Decorating (Optional)
- Royal icing or prepared sugar cookie icing
- Red, green, white, and gold food coloring
- Christmas sprinkles
- Colored sanding sugar
- Mini chocolate chips or edible sugar pearls
Instructions
Step 1: Cream the Butter and Sugar
Place the softened salted butter and granulated sugar in a large mixing bowl.
Using an electric mixer, beat on medium speed for approximately 2–3 minutes, until the mixture looks creamy and well combined. Scrape down the sides of the bowl as needed.
The mixture should be smooth and slightly lighter in texture, but it does not need to become extremely fluffy. Too much air incorporated at this stage can contribute to the cookies spreading during baking.
Tip: The butter should be soft enough to press gently with a finger but should not look oily or melted.
Step 2: Add the Egg and Extracts
Add the egg, vanilla extract, and almond extract to the butter mixture.
Beat until everything is smoothly combined, scraping the bowl to ensure no butter mixture remains stuck to the sides.
The vanilla provides the classic sugar cookie flavor, while the small amount of almond extract adds a subtle bakery-style aroma. If you prefer a nut-free flavor profile, you can omit the almond extract.
Step 3: Combine the Dry Ingredients
In a separate bowl, whisk together the flour and baking powder.
This distributes the baking powder evenly throughout the flour, helping the cookies bake consistently.
Step 4: Make the Cookie Dough
Add the flour mixture to the butter mixture in two or three additions, mixing on low speed after each addition.
Continue until a soft dough forms and no large patches of dry flour remain. Avoid overmixing, as this can develop the gluten in the flour and make the cookies tougher.
The dough should be soft but manageable. If it feels sticky, that’s fine at this stage—the chilling process will make it firmer and easier to roll.
Step 5: Chill the Dough
Divide the dough into two portions and flatten each into a disc.
Wrap each disc tightly in plastic wrap and refrigerate for at least 1 hour.
Chilling firms the butter, makes the dough easier to roll, and helps the cookies hold their shape while baking.
If the dough has been refrigerated for several hours and becomes too firm to roll, let it stand at room temperature for approximately 5–10 minutes.
Step 6: Preheat the Oven
Preheat the oven to 350°F (175°C).
Line two baking sheets with parchment paper. Avoid greasing the baking sheets, as the extra fat may encourage the cookies to spread.
Step 7: Roll Out the Dough
Lightly flour your work surface and rolling pin.
Take one chilled dough disc and roll it evenly to approximately ¼ inch (6 mm) thick. Turn the dough occasionally as you roll, adding a light dusting of flour only when necessary.
Try to maintain a consistent thickness so the cookies bake evenly.
If the dough becomes very soft or sticky while you’re working, return it to the refrigerator for 10–15 minutes.
Step 8: Cut Out the Christmas Shapes
Use Christmas cookie cutters to cut the dough into your favorite shapes, such as stars, Christmas trees, bells, snowflakes, stockings, or hearts.
Transfer the shapes carefully to the prepared baking sheets, leaving approximately 1 inch (2.5 cm) between cookies.
Gather the scraps, gently press them together, and reroll once or twice. If the scraps become warm or soft, chill them briefly before cutting more shapes.
For especially sharp edges, refrigerate the cut-out cookies on the baking sheet for 10–15 minutes before baking.
Step 9: Bake the Cookies
Bake in the preheated oven for 8–11 minutes, depending on the size and thickness of the cookies.
The cookies are ready when the tops look set and the edges are just beginning to turn lightly golden. The centers may still look pale, which is ideal for maintaining a tender texture.
Avoid waiting for the entire cookie to turn golden brown, as this can make the finished cookies dry and crisp.
Remove the baking sheet from the oven and let the cookies rest for 5 minutes before carefully transferring them to a wire rack.
Step 10: Cool Completely
Allow the cookies to cool completely on the wire rack before decorating.
Warm cookies can melt icing, cause colors to run, and make sprinkles slide off. Cooling also allows the cookies to firm up enough to handle without breaking.
Step 11: Decorate for Christmas
Once cooled, decorate the cookies with royal icing, prepared cookie icing, colored sugar, or festive sprinkles.
For a simple design, spread white icing over each cookie and add red and green sprinkles. For more detailed decorations, use piping bags fitted with small round tips to create outlines, snowflakes, stripes, dots, or Christmas tree branches.
If using royal icing, allow the decorations to dry according to the icing recipe before stacking the cookies.
Step 12: Serve and Enjoy
Arrange the decorated cookies on a festive platter or place them in decorative tins for homemade holiday gifts.
Enjoy them with hot chocolate, coffee, tea, or a cold glass of milk. These buttery sugar cookies are delicious plain, but decorating them makes them extra special for Christmas celebrations.
Chef’s Tips for Perfect Christmas Sugar Cookies
- Measure the flour carefully: Too much flour can make the cookies dry and difficult to roll. Weighing the flour provides the most consistent results.
- Use softened butter, not melted butter: Melted butter can cause the dough to spread excessively in the oven.
- Don’t skip chilling: Cold dough is easier to handle and helps preserve detailed cookie shapes.
- Roll evenly: A consistent thickness ensures that small, delicate shapes and larger cookies bake at a similar rate.
- Avoid overbaking: Remove the cookies when the edges are only lightly golden for a tender, buttery result.
- Refrigerate cut-out shapes if needed: A short chill before baking helps preserve intricate designs.
- Cool before decorating: Completely cooled cookies provide a stable surface for icing and decorations.
- Use the almond extract sparingly: A little provides a lovely bakery flavor, but too much can overpower the vanilla.
- Keep the dough covered: Exposed dough can dry out, making the edges crack when rolled.
Delicious Variations
🎄 Classic Vanilla Sugar Cookies
Omit the almond extract and use an additional ¼ teaspoon vanilla extract for a simple, pure vanilla flavor.
🍋 Lemon Sugar Cookies
Add 1 teaspoon finely grated lemon zest to the butter and sugar mixture for a fresh citrus note.
🍫 Chocolate-Dipped Christmas Cookies
Dip half of each cooled cookie into melted dark or white chocolate. Add sprinkles before the chocolate sets.
❤️ Almond Christmas Cookies
Increase the almond extract slightly to ½ teaspoon for a more pronounced almond aroma, keeping the vanilla for balance.
✨ Cinnamon Sugar Cookies
Add ½ teaspoon ground cinnamon to the flour mixture for a warm, festive flavor.
🌈 Colored Sugar Cookies
For simple decorations without icing, brush the cut-out shapes lightly with milk and sprinkle with colored sanding sugar before baking.
Make-Ahead Instructions
The cookie dough can be prepared up to 3 days ahead and kept tightly wrapped in the refrigerator.
You can also cut out the cookie shapes in advance and refrigerate them on a covered baking sheet before baking.
For longer storage, freeze the wrapped dough discs for up to 2 months. Thaw overnight in the refrigerator before rolling.
Storage Instructions
Room Temperature: Store completely cooled, undecorated or fully set decorated cookies in an airtight container for up to 1 week. Keep them away from direct heat and moisture.
Refrigerator: Refrigeration is generally unnecessary for plain sugar cookies, but cookies decorated with perishable fillings or frostings should be stored according to the frosting’s food-safety requirements.
Freezer: Freeze undecorated cookies in an airtight container for up to 2–3 months for best quality. Separate layers with parchment paper to protect the shapes.
Freezing Decorated Cookies: If the icing has dried completely, arrange the cookies in a rigid freezer-safe container with parchment between the layers. Thaw while still covered to help prevent condensation from forming directly on the decorations.
Frequently Asked Questions
Why did my Christmas cookies spread in the oven?
The butter may have been too warm, the dough may not have chilled long enough, or the baking sheet may have been warm when the cookies were placed on it. Chill the dough and cut-out shapes as needed, and always use a cool baking sheet.
Why are my sugar cookies tough?
Overmixing the dough or adding too much flour can create a tougher texture. Mix only until the dough comes together and measure the flour accurately.
Can I make these cookies without almond extract?
Absolutely. Simply omit it or replace it with a little extra vanilla extract. The cookies will still taste delicious.
Can I use this dough for detailed cookie cutters?
Yes. This dough is well suited to cut-out shapes. Keep the dough chilled, roll it evenly, and avoid using excessively warm dough when cutting intricate designs.
Why are my cookies browning too much?
They may be baking too long or the oven may run hot. Begin checking at 8 minutes and remove them when the edges are just starting to color.
Can I decorate these cookies with royal icing?
Yes. Royal icing works beautifully because it can be piped into precise designs and dries firm enough for stacking and gifting. Let the icing dry completely before storing the cookies.
Serving Suggestions
Serve these Christmas Sugar Cookies with:
- Hot chocolate or warm milk
- Coffee or spiced tea
- Christmas brownies and fudge
- Gingerbread cookies
- Peppermint bark
- Fresh fruit and a holiday dessert platter
For gifting, arrange the cookies in decorative tins or clear bags tied with festive ribbon. Add a mixture of stars, trees, and snowflakes for a beautiful holiday assortment.
Final Result
These Classic Christmas Sugar Cookies are buttery, tender, and lightly crisp around the edges, with a delicate vanilla-almond flavor and a smooth surface made for festive decorating. Their reliable shape and simple preparation make them perfect for holiday baking with children, cookie exchanges, and homemade Christmas gifts.
The secret to success: chill the dough, roll it evenly, cut the shapes while the dough is firm, and bake only until the edges are lightly golden. You’ll have beautiful homemade Christmas cookies ready for icing, sprinkles, and holiday celebrations!