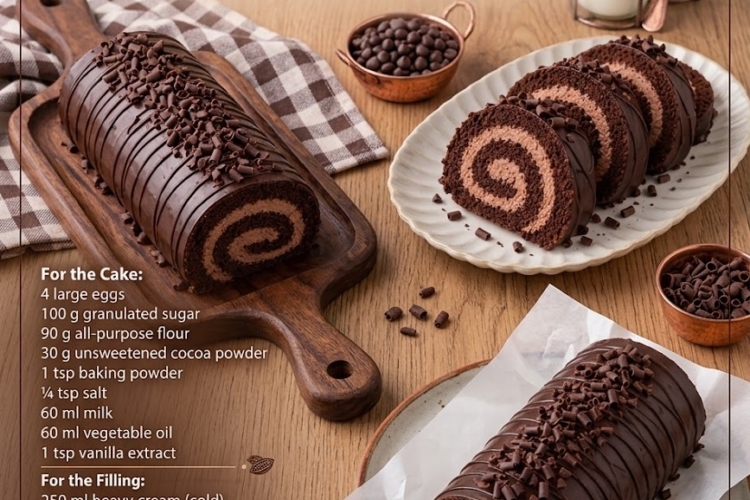
🍫🍰 Chocolate Swiss Roll Cake
Soft, fluffy chocolate sponge rolled around a rich, creamy filling for an elegant homemade dessert that’s easier than it looks.
This Chocolate Swiss Roll has a light cocoa sponge that’s flexible enough to roll without cracking, paired with a sweet, silky cream filling. Finished with powdered sugar, chocolate drizzle, or fresh berries, it’s perfect for birthdays, holidays, afternoon tea, or any special occasion.
⏱️ Recipe Information
Prep Time: 25 minutes
Bake Time: 12–15 minutes
Cooling & Chilling Time: 1½ hours
Total Time: About 2 hours 15 minutes
Servings: 8–10 slices
Difficulty: Medium
Method: Baked / Rolled
🛒 Ingredients
🍫 For the Chocolate Cake
- 4 large eggs, room temperature
- 100 g granulated sugar
- 90 g all-purpose flour
- 30 g unsweetened cocoa powder
- 1 teaspoon baking powder
- ¼ teaspoon salt
- 60 ml milk
- 60 ml vegetable oil
- 1 teaspoon vanilla extract
🤍 For the Cream Filling
- 1 cup (240 ml) heavy whipping cream, very cold
- ¼ cup (30 g) powdered sugar
- 1 teaspoon vanilla extract
- 4 oz (113 g) cream cheese, softened, optional for a richer, more stable filling
🍫 Optional Decoration
- Powdered sugar
- Melted chocolate
- Chocolate shavings
- Fresh strawberries or raspberries
- Whipped cream
👩🍳 Instructions
1. Prepare the Oven and Pan
Preheat the oven to 350°F (175°C).
Line a 10 × 15-inch (25 × 38 cm) jelly-roll pan with parchment paper.
Lightly grease the parchment and the sides of the pan.
A properly prepared pan makes it much easier to remove the delicate sponge without tearing it.
2. Combine the Dry Ingredients
In a medium bowl, sift together:
- All-purpose flour
- Cocoa powder
- Baking powder
- Salt
Sifting helps remove cocoa lumps and keeps the sponge light.
Set aside.
3. Beat the Eggs and Sugar
Place the eggs and granulated sugar in a large mixing bowl.
Using an electric mixer, beat on medium-high speed for approximately 5–7 minutes.
The mixture should become pale, thick, and fluffy and should fall from the beaters in a ribbon.
This step incorporates much of the air needed to give the sponge its light texture.
4. Add the Vanilla
Add the vanilla extract and mix briefly until incorporated.
5. Fold in the Dry Ingredients
Gradually sift the dry ingredients over the beaten egg mixture.
Using a large rubber spatula, gently fold until just combined.
Do not vigorously stir—the goal is to preserve as much of the air in the whipped eggs as possible.
6. Add the Milk and Oil
In a small bowl, whisk together the milk and vegetable oil.
Add a small amount of the cake batter to the milk mixture and whisk gently.
Then fold this mixture back into the main batter.
This makes it easier to incorporate the liquid ingredients without deflating the sponge.
Mix just until smooth.
7. Spread the Batter
Pour the batter into the prepared baking pan.
Use a spatula to spread it evenly into the corners.
Gently tap the pan once against the counter to remove any large air bubbles.
8. Bake
Bake for 12–15 minutes.
The cake is ready when:
- The surface springs back when lightly touched.
- The center looks set.
- A toothpick inserted into the center comes out clean or with a few moist crumbs.
Avoid overbaking.
A dry sponge is much more likely to crack during rolling.
🍫 9. Roll the Cake While Warm
Place a clean sheet of parchment paper on your work surface and dust it generously with powdered sugar.
Immediately after removing the cake from the oven, carefully turn the sponge onto the prepared parchment.
Peel away the parchment from the bottom.
Trim the edges if desired.
Starting from one short end, gently roll the warm cake together with the parchment into a tight spiral.
Allow it to cool completely while rolled.
This helps the sponge develop a flexible “memory” and makes the final roll much less likely to crack.
🤍 10. Prepare the Cream Filling
Pour the cold heavy whipping cream into a chilled mixing bowl.
Add the powdered sugar and vanilla extract.
If using cream cheese, add it as well.
Beat on medium-high speed until the mixture forms firm peaks.
Don’t overbeat, or the cream can become grainy.
Keep the filling refrigerated until ready to use.
🍫 11. Unroll the Cake
Once the chocolate sponge has completely cooled, carefully unroll it.
It should retain a slight curve, which is perfectly normal.
Don’t force it completely flat.
If necessary, trim any dry edges with a sharp knife.
🤍 12. Add the Filling
Spread the cream evenly over the surface of the sponge.
Leave approximately ½ inch (1 cm) around the edges.
Spread slightly less filling near the far edge because the cream will move forward as the cake is rolled.
🍫 13. Roll the Swiss Roll
Starting from the same short end, carefully roll the cake forward.
Use the parchment underneath to guide the cake.
Keep the roll snug without pressing too hard.
Place the finished roll seam-side down.
❄️ 14. Chill
Wrap the Swiss roll loosely in parchment or plastic wrap.
Refrigerate for at least 1 hour.
Chilling allows the filling to firm up and makes the cake much easier to slice cleanly.
For the neatest slices, chill for 2 hours or overnight.
✨ 15. Decorate
Before serving, dust the top with powdered sugar.
For a more decadent finish, drizzle with melted chocolate and add chocolate shavings.
Fresh raspberries or strawberries also make a beautiful contrast against the chocolate sponge.
🔪 16. Slice and Serve
Use a sharp serrated knife to cut the Swiss roll into 8–10 slices.
For clean cuts, wipe the knife between slices.
Serve chilled or allow the slices to sit at room temperature for approximately 10 minutes before serving.
⭐ Chef’s Tips
Don’t overbake
The sponge needs to remain soft and flexible. Even a few extra minutes can make rolling more difficult.
Whip the eggs properly
The eggs and sugar should become very pale, thick, and fluffy. This gives the cake its characteristic light texture.
Fold gently
Overmixing can deflate the batter and result in a dense sponge.
Roll while warm
Rolling the sponge immediately after baking helps prevent cracking later.
Don’t overfill
Too much cream will squeeze out when the cake is rolled.
Chill before cutting
A chilled Swiss roll holds its shape much better and produces cleaner slices.
🍓 Easy Variations
Chocolate Strawberry Swiss Roll
Add sliced strawberries to the cream filling and decorate with fresh berries.
Chocolate Raspberry Roll
Fold fresh raspberries into the cream and finish with a raspberry drizzle.
Mocha Swiss Roll
Add 1 teaspoon instant espresso powder to the cocoa mixture and serve with coffee-flavored cream.
Chocolate Hazelnut Roll
Spread a thin layer of chocolate-hazelnut spread over the sponge before adding the whipped cream.
Black Forest Swiss Roll
Add chopped cherries and a little cherry sauce to the filling, then decorate with chocolate shavings.
Chocolate Ganache Roll
Instead of powdered sugar, cover the finished roll with a thin layer of chocolate ganache.
🍽️ Serving Suggestions
Serve slices with:
- Fresh berries
- Chocolate sauce
- Whipped cream
- Vanilla ice cream
- Fresh raspberries
- Chocolate shavings
- Powdered sugar
- Strawberry or raspberry sauce
A cup of coffee or espresso makes an especially delicious pairing.
🧊 Storage
Store the filled Swiss roll covered in the refrigerator for up to 3 days.
Keep refrigerated until serving because of the cream filling.
For the best texture, allow it to sit at room temperature for about 10 minutes before serving.
❄️ Freezing
The unfilled chocolate sponge can be wrapped tightly and frozen for up to 1 month.
Thaw completely in the refrigerator before filling.
A fully assembled roll can also be frozen, although cream fillings containing fresh fruit may become softer after thawing.
🍫🍰 Final Result
This Chocolate Swiss Roll Cake combines a soft, airy cocoa sponge with a smooth, creamy filling, all rolled into an elegant spiral that’s perfect for slicing and sharing.
It’s light enough for afternoon tea but decadent enough for celebrations, especially when finished with chocolate drizzle and fresh berries.
Soft, chocolatey, creamy, and beautifully rolled—an impressive dessert that’s completely homemade! 🍫✨